'%20d='M0%208a8%208%200%200%201%208-8h24a8%208%200%200%201%208%208v24a8%208%200%200%201-8%208H8a8%208%200%200%201-8-8V8Z'/%3e%3cpath%20fill='%23fff'%20d='M32.576%206C12.293%206%208.776%2025.887%207.424%2034H9.1c.45-2.977%203.493-14.748%2010.899-20.287%200%200-5.633%206.976-6.572%2015.051%203.426-.652%2013.845-3.372%2016.056-12.927l-3.84-.61c1.352-1.351%204.909-5.17%206.931-9.226V6Z'/%3e%3cdefs%3e%3clinearGradient%20id='reapit-lettings__a'%20x1='20.702'%20x2='20.702'%20y1='.351'%20y2='31.228'%20gradientUnits='userSpaceOnUse'%3e%3cstop%20stop-color='%235573FD'/%3e%3cstop%20offset='.575'%20stop-color='%234E56EA'/%3e%3c/linearGradient%3e%3c/defs%3e%3c/svg%3e)
Reapit Lettings (IRE) / Reapit PM (Console Cloud) Integration
This article will run through how to activate integrations between Reapit Letting and Reapit PM
Reapit Lettings (IRE) / Reapit PM (Console Cloud) Integration
This article will run through how to activate integrations between Reapit Lettings and Reapit PM.
Access Permissions:
- To access the ****Integration Key in Reapit PM, you must have Administrator permissions.
- To activate integrations in Inspect Real Estate, you must have Diamond permission level.
If you have not used the Applications workflow in Reapit PM previously, brush up on the functionality in our applications article. You may find existing properties in the workflow that do not need to remain, simply click on the relevant property and select Remove.
Clients using Reapit PM and having Console Pay activated can seamlessly enable this integration. It allows for the inclusion of a Console Pay sign-up link alongside approval messages during application processing, enabling tenants to set up their Console Pay accounts right at the start of the approval process. The integration also allows certain data to be shared between the platforms.
The following data can be sent between Reapit Lettings and Reapit PM.
To view what d****ata is shared using integrations, click here.
This article covers the following processes:
- Reapit PM – Inspect Real Estate Activation
- Establishing Integration between Reapit Lettings and Reapit PM
- Integration Settings - Send Application Data to Reapit PM
- Integration Settings - Console Pay Status Rules and Messages
- Lead Data – Send to Reapit PM
- Lead Data – Message Setting
Reapit PM – Inspect Real Estate Activation
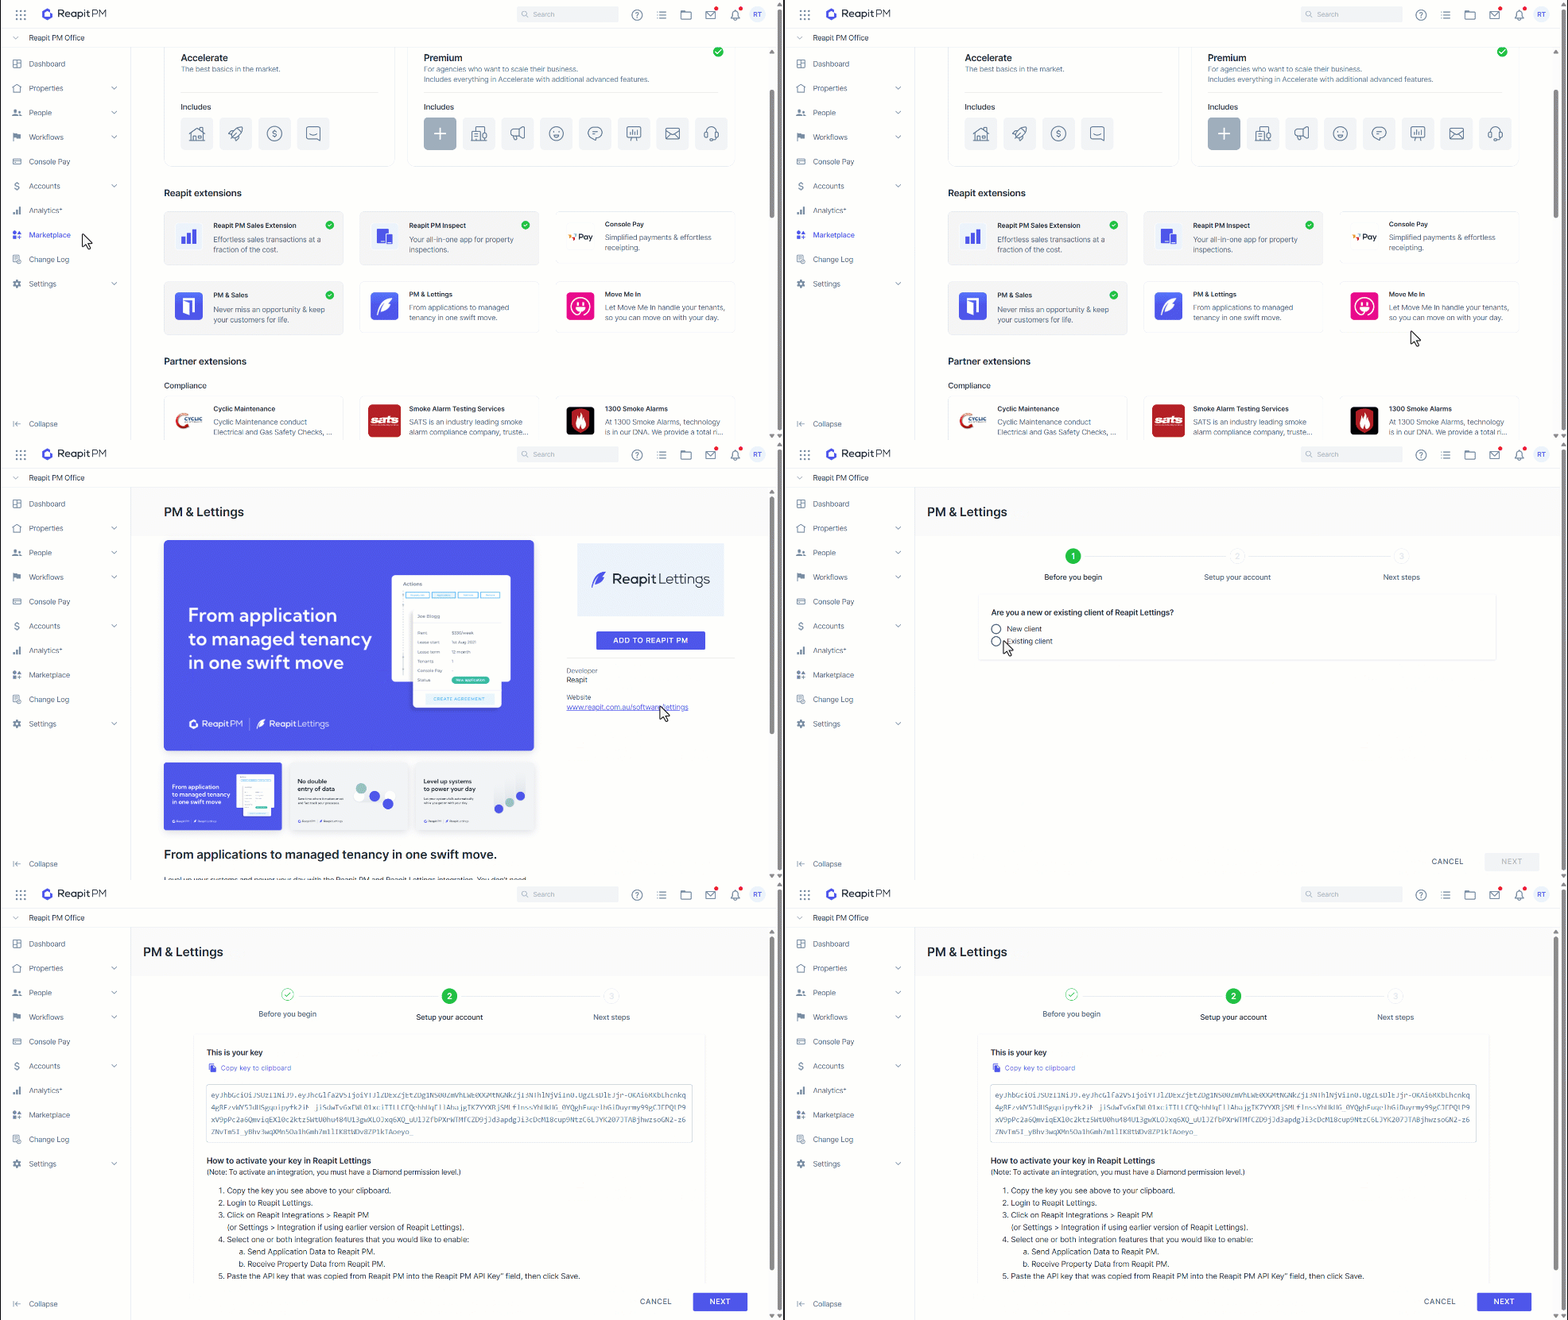
- Prior to activation of the Integration within Reapit Lettings, you must access the API key in Reapit PM.
- Navigate to Marketplace.
- Under Reapit extensions, click on Inspect Real Estate.
- Click on Add to Reapit PM.
- If you're already using Reapit Lettings, select Existing Client, then click Next.
- Click on Copy key to clipboard and follow the instructions on screen.
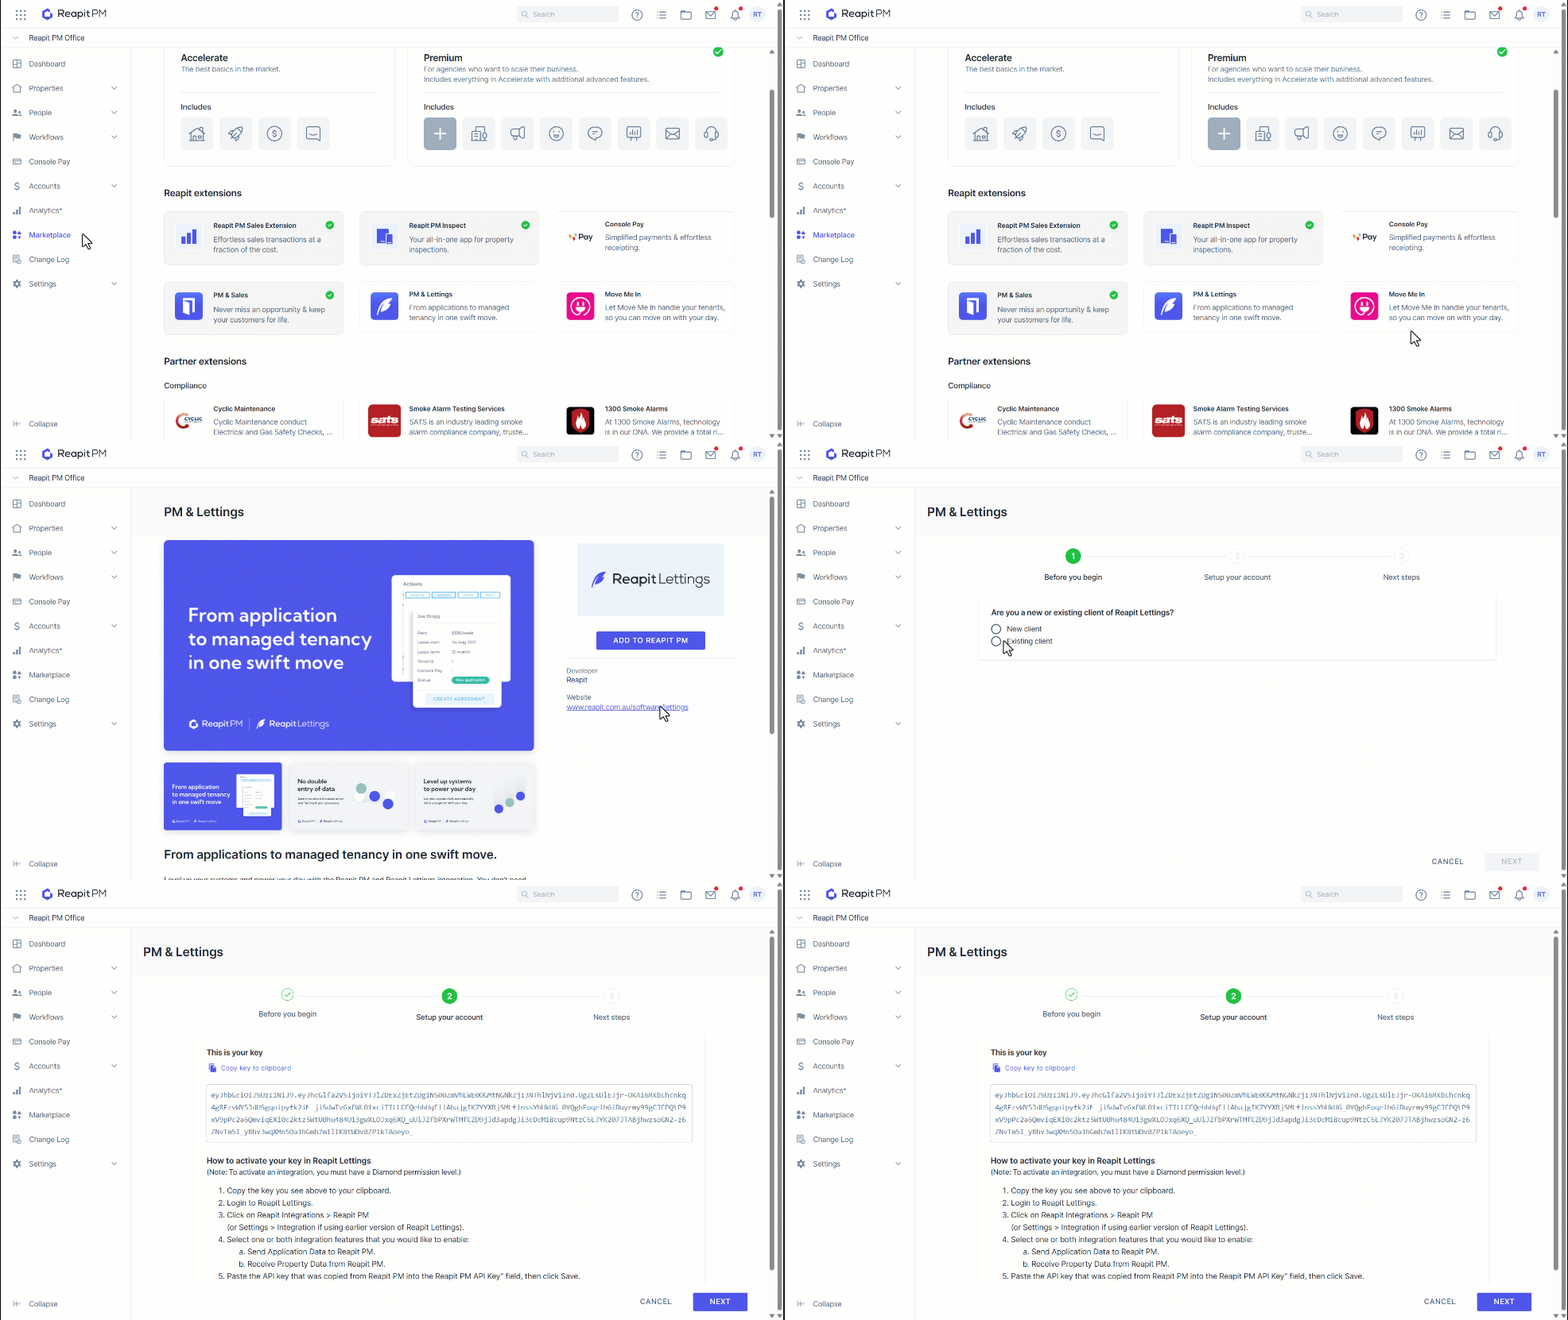
- If you want to sign up and activate Inspect Real Estate, select New client and click Next
- Click Next, and a member of the Reapit Lettings Sales Team will reach out the help you get set up with Reapit Lettings.
Establishing Integration between Reapit Lettings and Reapit PM
This process is completed in Reapit Lettings (IRE).
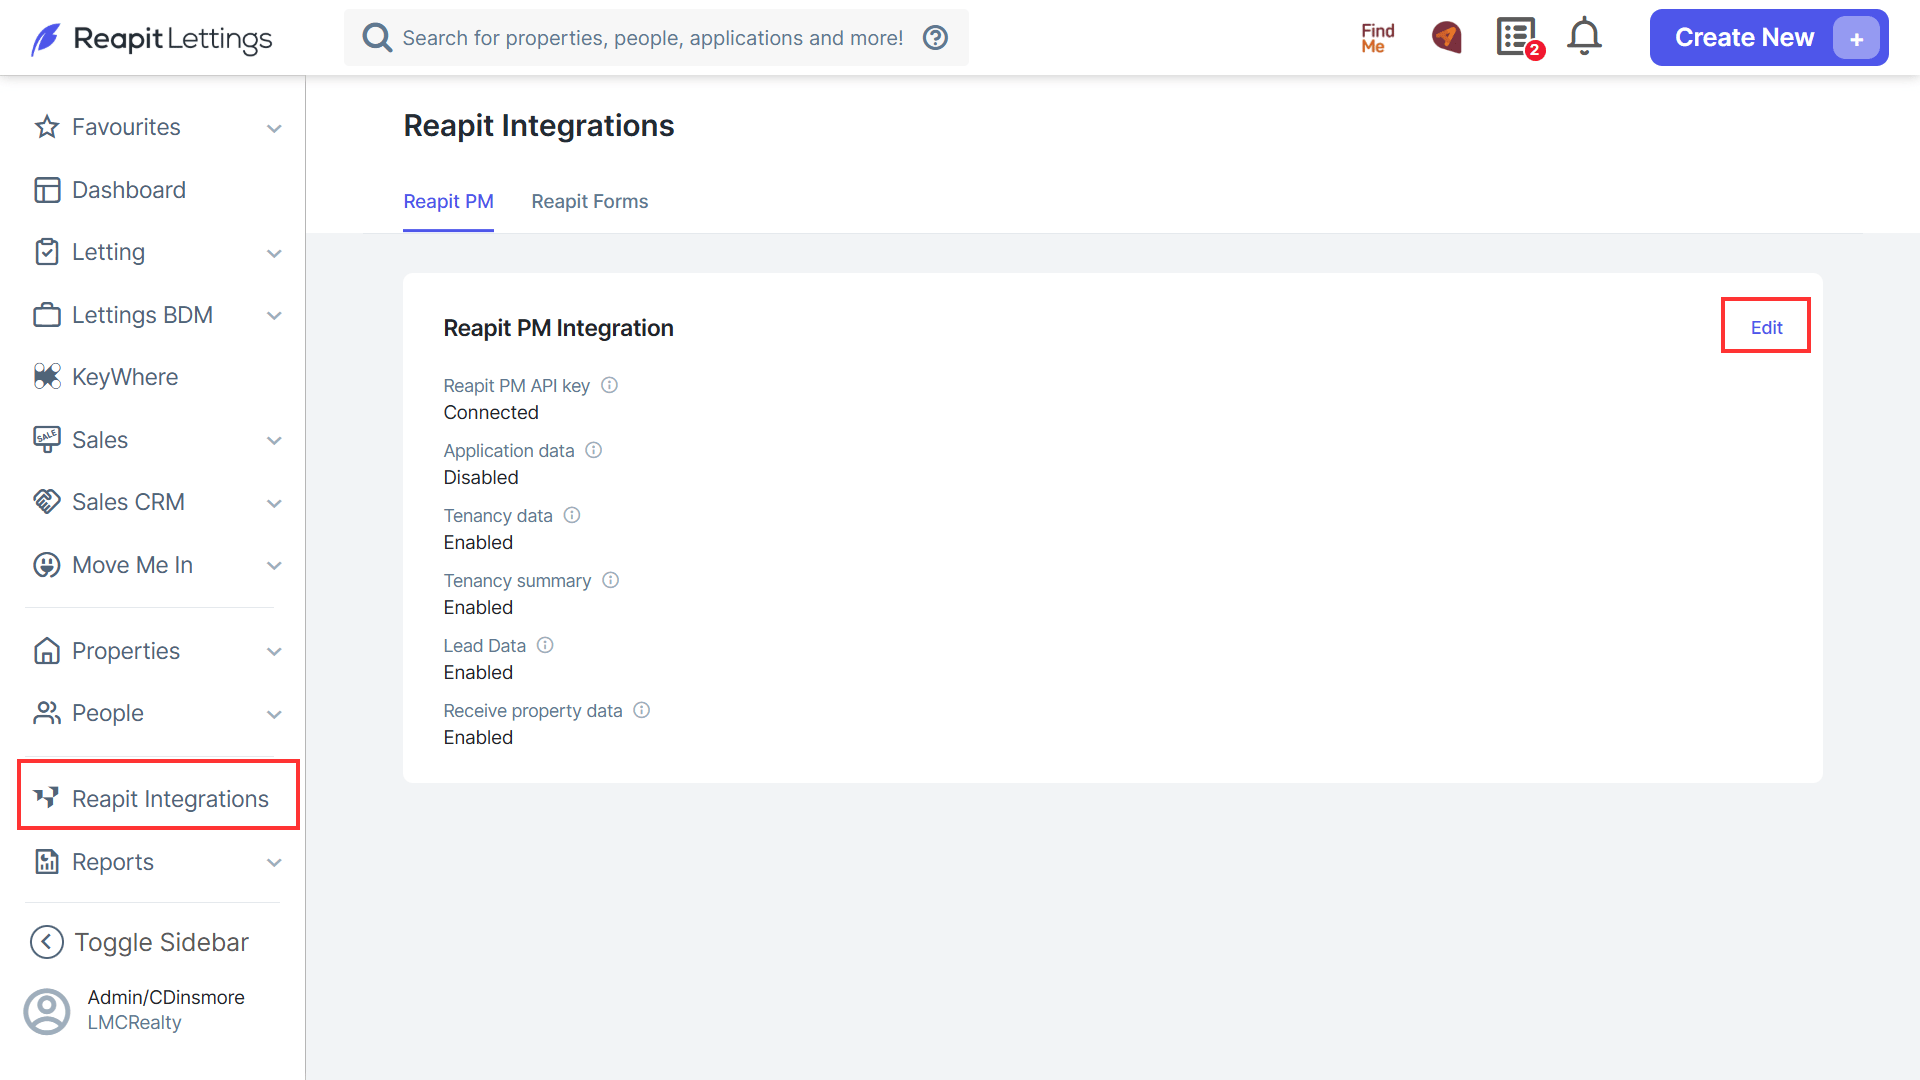
- Navigate to Reapit Integrations.
****2. ****Click Edit.
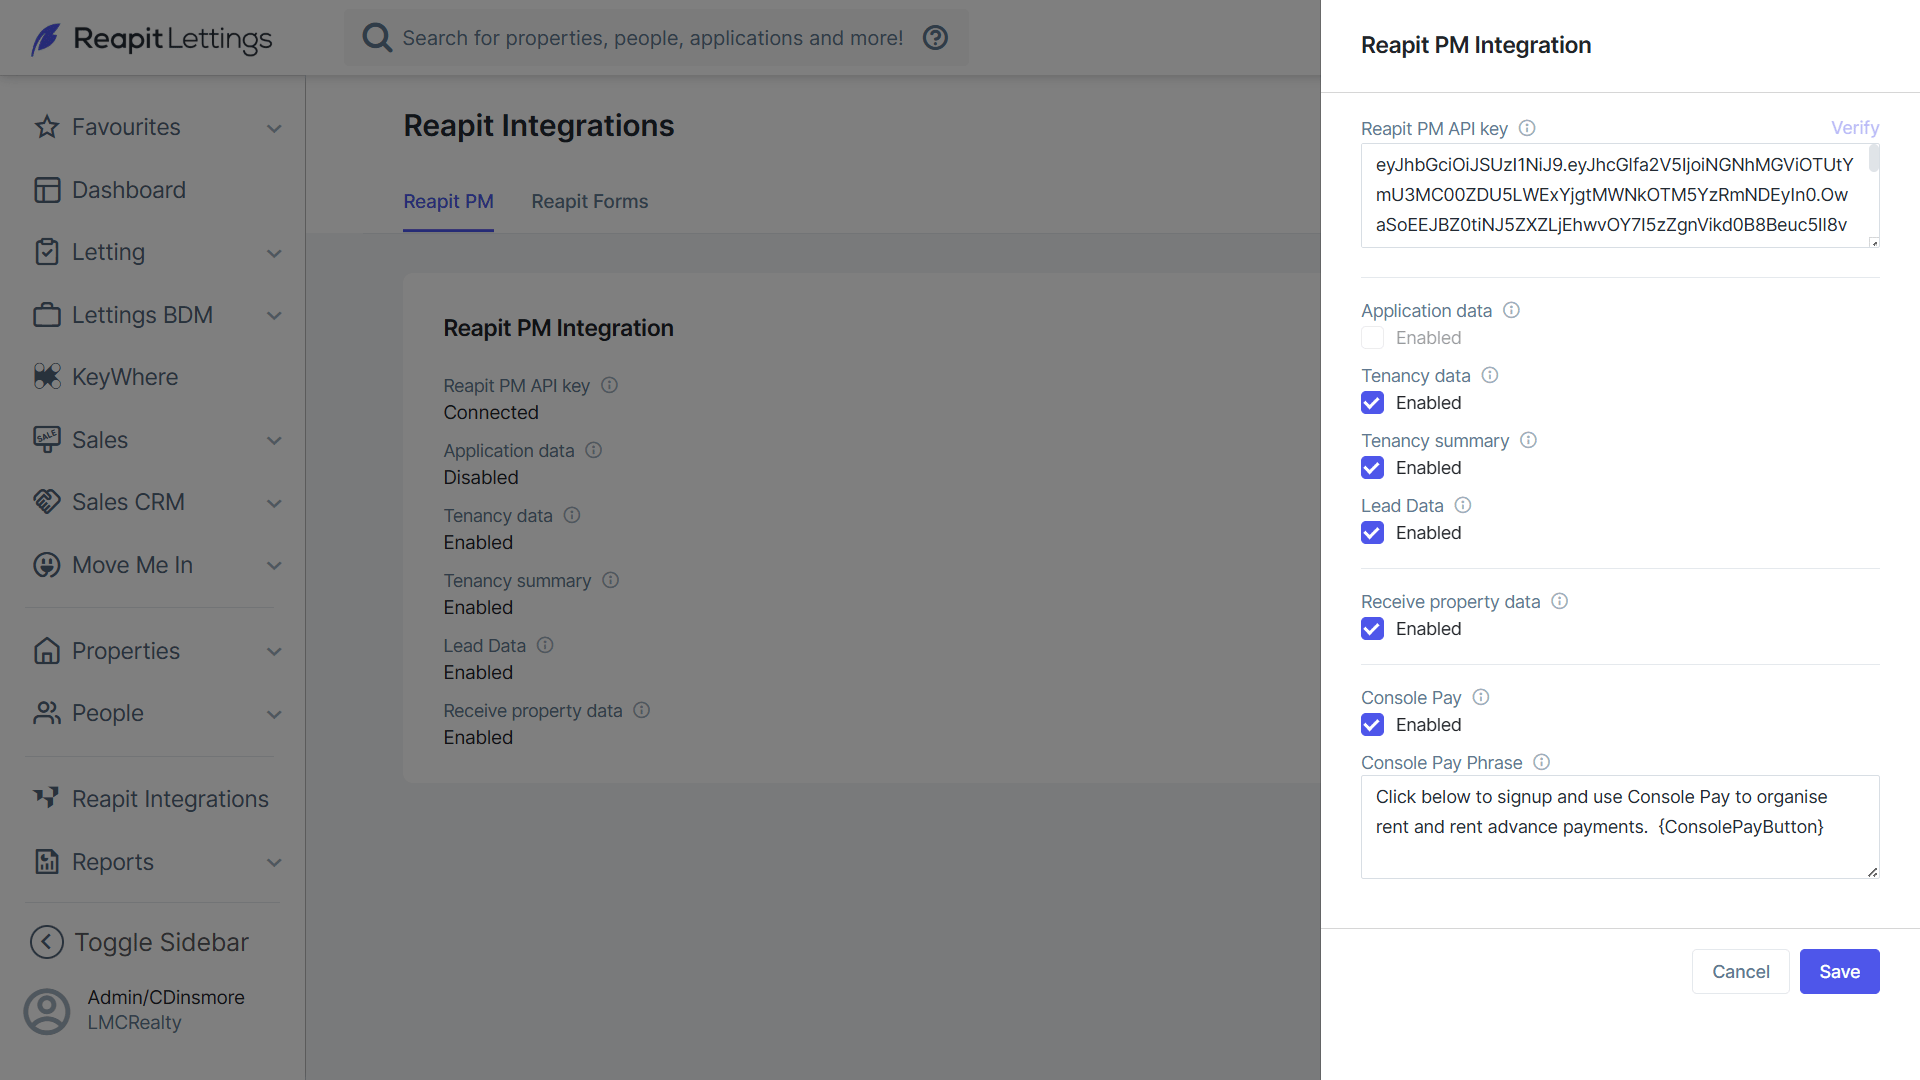
- Paste the API key that was copied from Reapit PM in the Console API key field and select the integrations that you would like to enable by ticking the related box and then click on Save.
| Integration | Explanation |
| Tenancy Data | If enabled, applications sent to Reapit PM will create a Tenancy agreement when the application in Reapit Lettings has a status change to the selected status configured in Settings > Applications > Status Rules. |
| Tenancy Summary (only available if Tenancy Data has been selected) | If enabled, the Reapit Lettings Application Summary will be sent to Reapit PM and stored in the Tenants > Documents. This setting is used in conjunction with send 'Tenancy Data to Reapit PM' setting. |
| Lead Data | If enabled, lead property and owners will be sent to Reapit PM when a lead goes under management in Inspect Real Estate. |
| Receive Property Data | If enabled, when a property is listed in Inspect Real Estate, information relating to access, owners and tenants will be loaded automatically for the property from Reapit PM. |
| Console Pay | If enabled, when application data is sent to Reapit PM, if the {ConsolePayButton} is used in the status configured in Settings > Applications > Status Rule 'Send Applications to Reapit PM'. |
Integration Settings - Send Application Data to Reapit PM Status
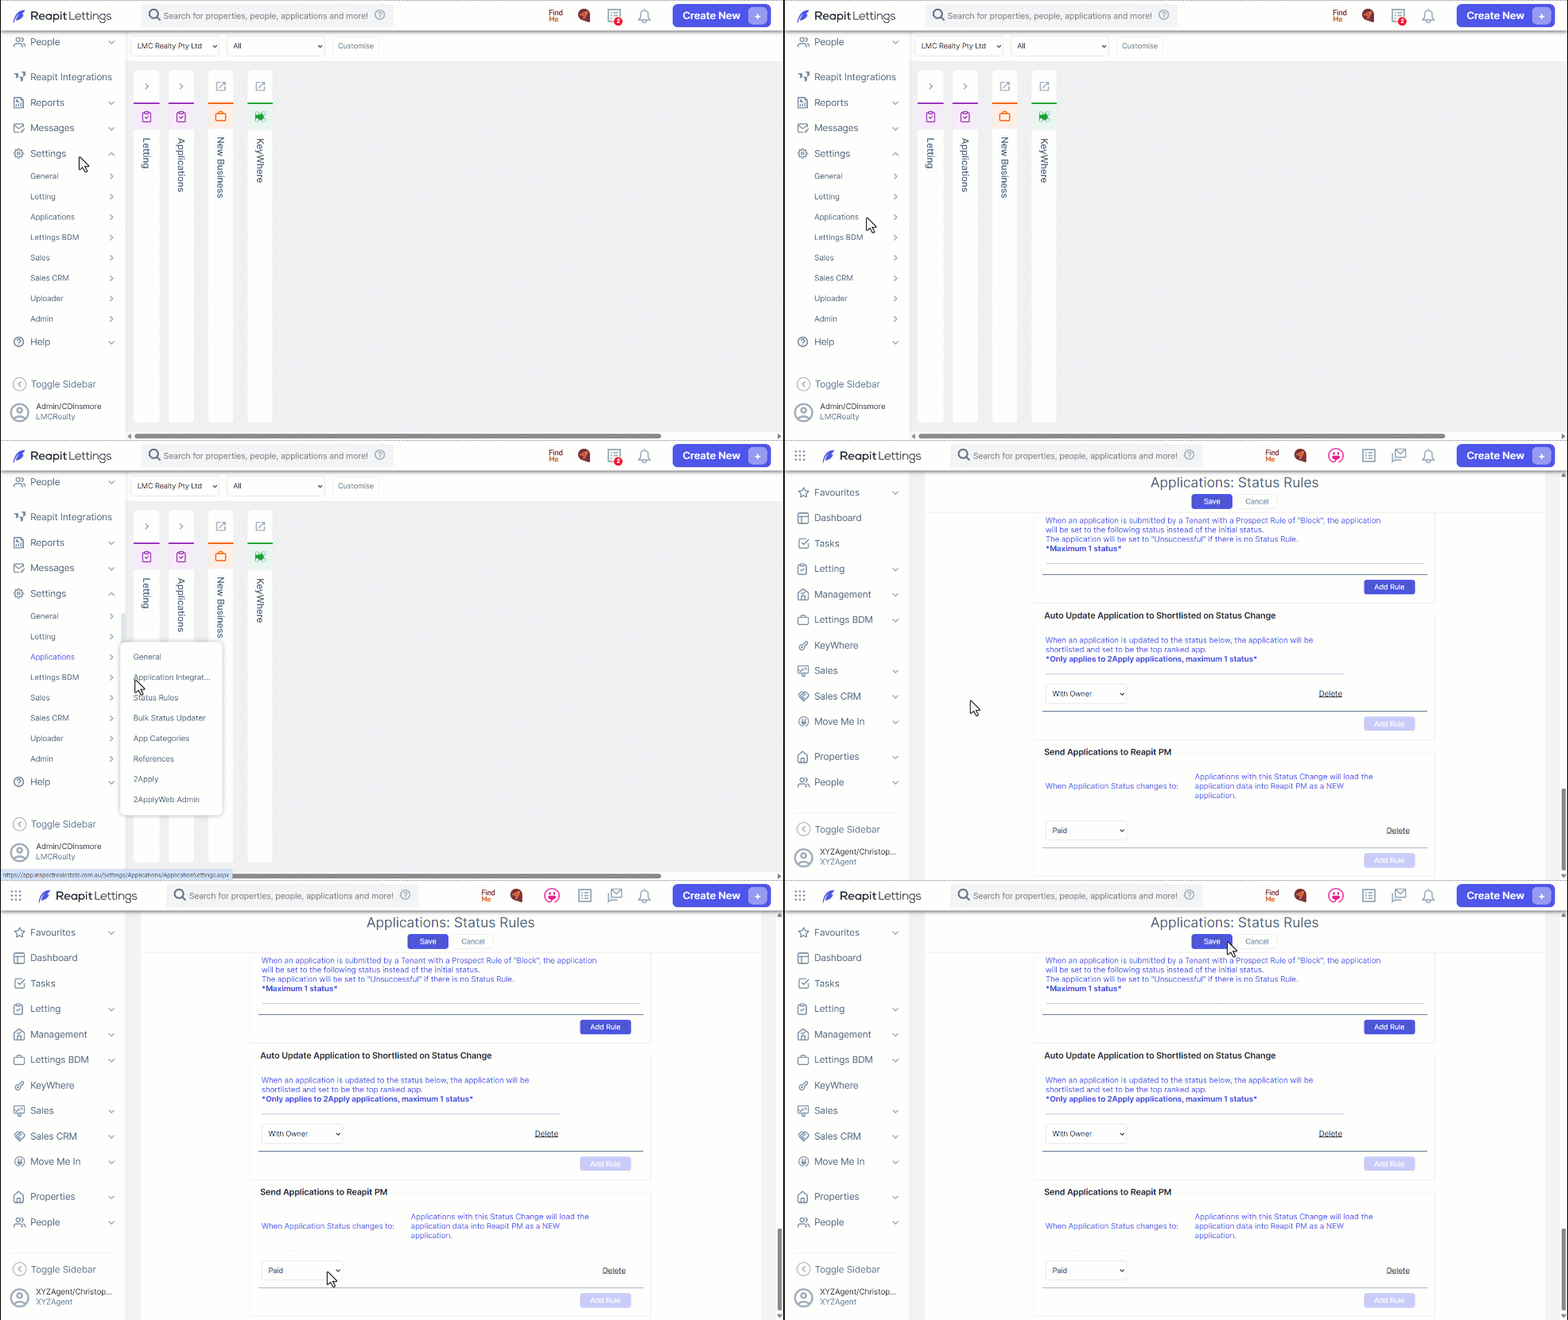
- Navigate to Settings.
- Click Applications. ****
- Click S****tatus Rules.
- Navigate to the bottom of the page, to the Send Applications to Reapit PM section.
- Click the Add Rule button, select the Application Status you would like to use to trigger the sending of the application to Reapit PM (we recommend “Paid”) then Save the rules.
Integration Settings - Console Pay Status Rules and Messages
- Once the Console Pay integration is active, you will need to set a status to send the application to Reapit PM. Navigate to Settings > Applications > Status Rules.
- Scroll to the 'Send Applications to Reapit PM' rule to set a status, then click Save.
- With the Status Rule now set, you will need to add the relevant merge fields to the status message. Navigate to Messages. ****
- ****Click Applications.
- ****Click Statuses & Applications.
- From the Current menu, find the relevant status and click Edit Message. You will now be able to add the {ConsolePayPhrase} or {ConsolePayButton} to your message. Click Save to finalise the changes.
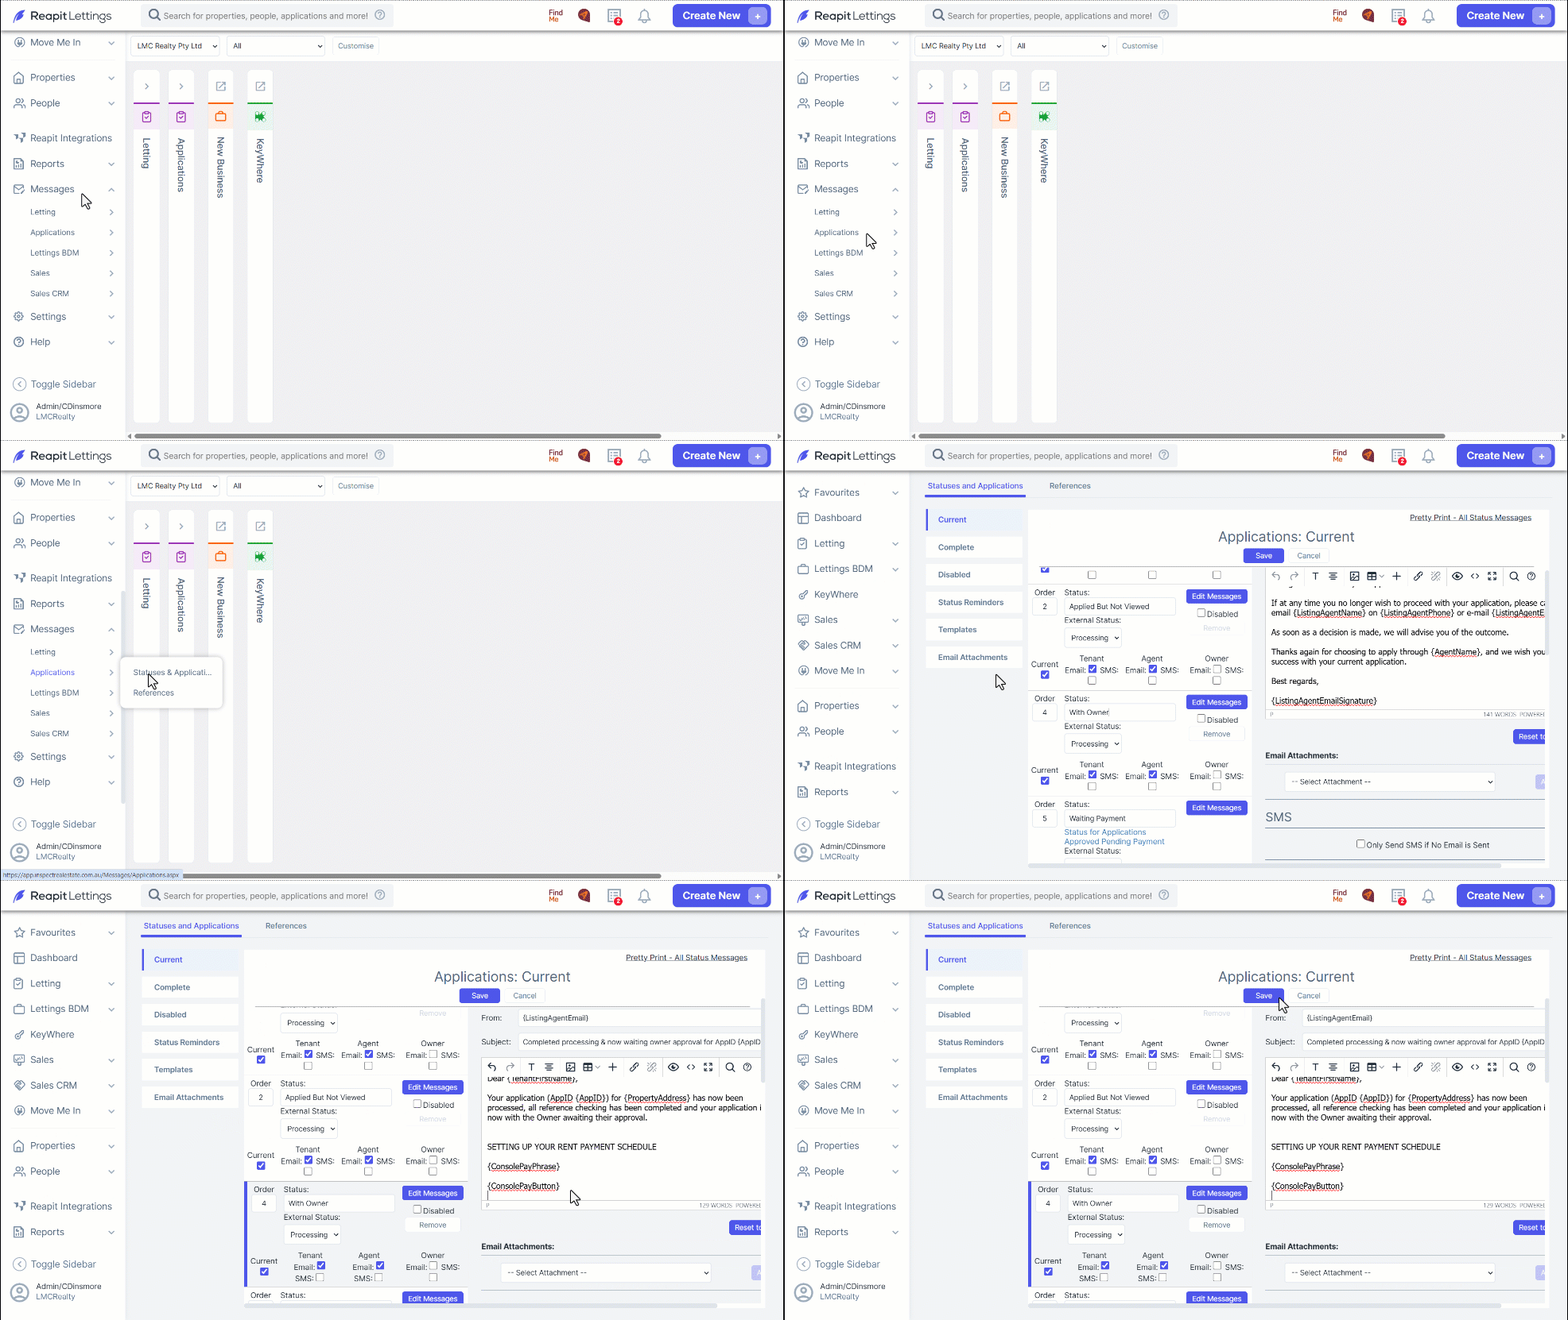
Note: You do not need to display both the {ConsolePayPhrase} and {ConsolePayButton} fields on the message. You can return to the Reapit Integrations screen and add the {ConsolePayButton} to the Console Phrase box, which will mean it is included in the Phrase merge when it is sent. Be sure to save any changes before exiting the integrations page.
- Once completed, the Console Pay integration will be fully prepared for processing the next application. Below is a preview of the received email using the new Console Pay integration.
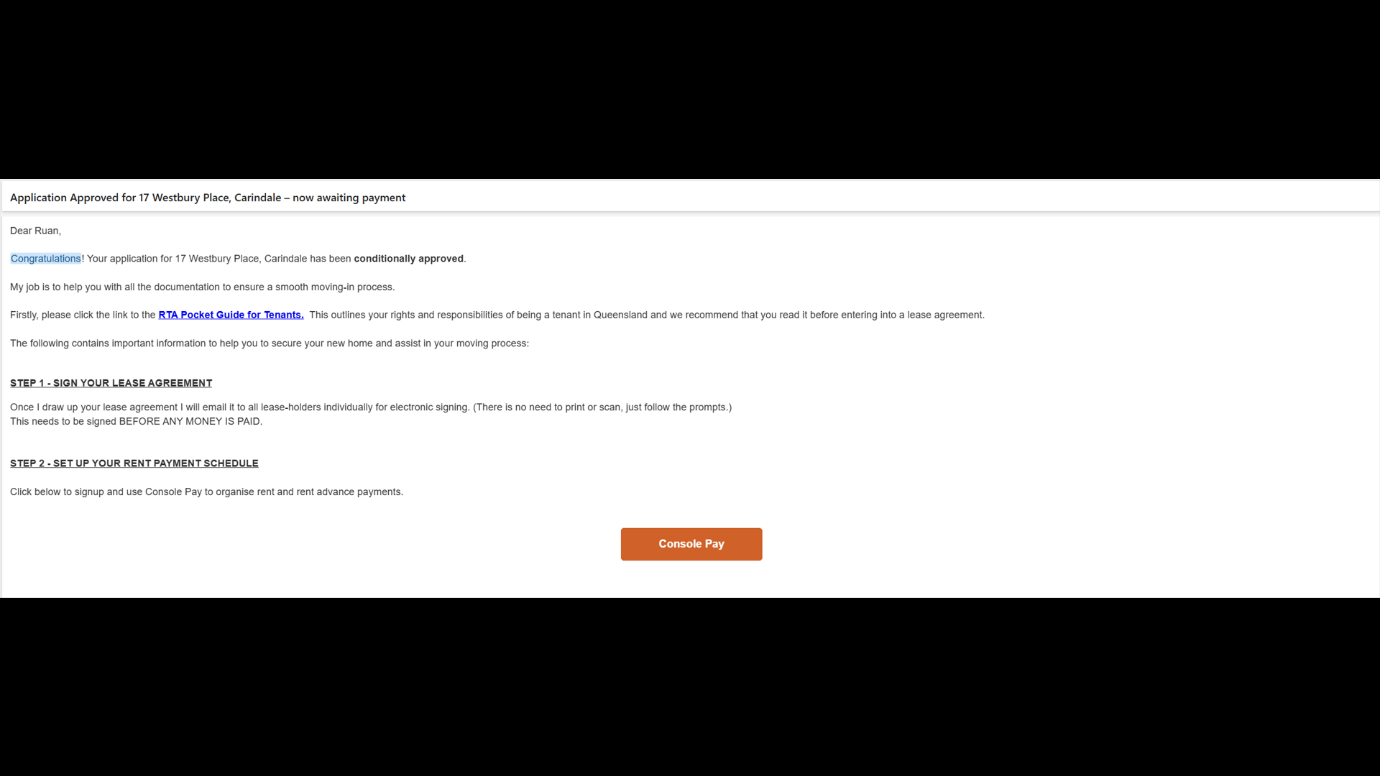
Note: By default, the system displays the payment schedule and guides tenants to set up recurring payments; however, it does not process initial payments. To resolve this, it is recommended to contact Reapit PM support to enable the one-off payment feature. This ensures that initial payments, such as bond, are covered before recurring rent payments are initiated.
Integration Settings - Lead Data Messages
- To review and modify the Lead Data message settings, navigate to Messages. ****
- Click Lettings BDM.
- Click Current Status.
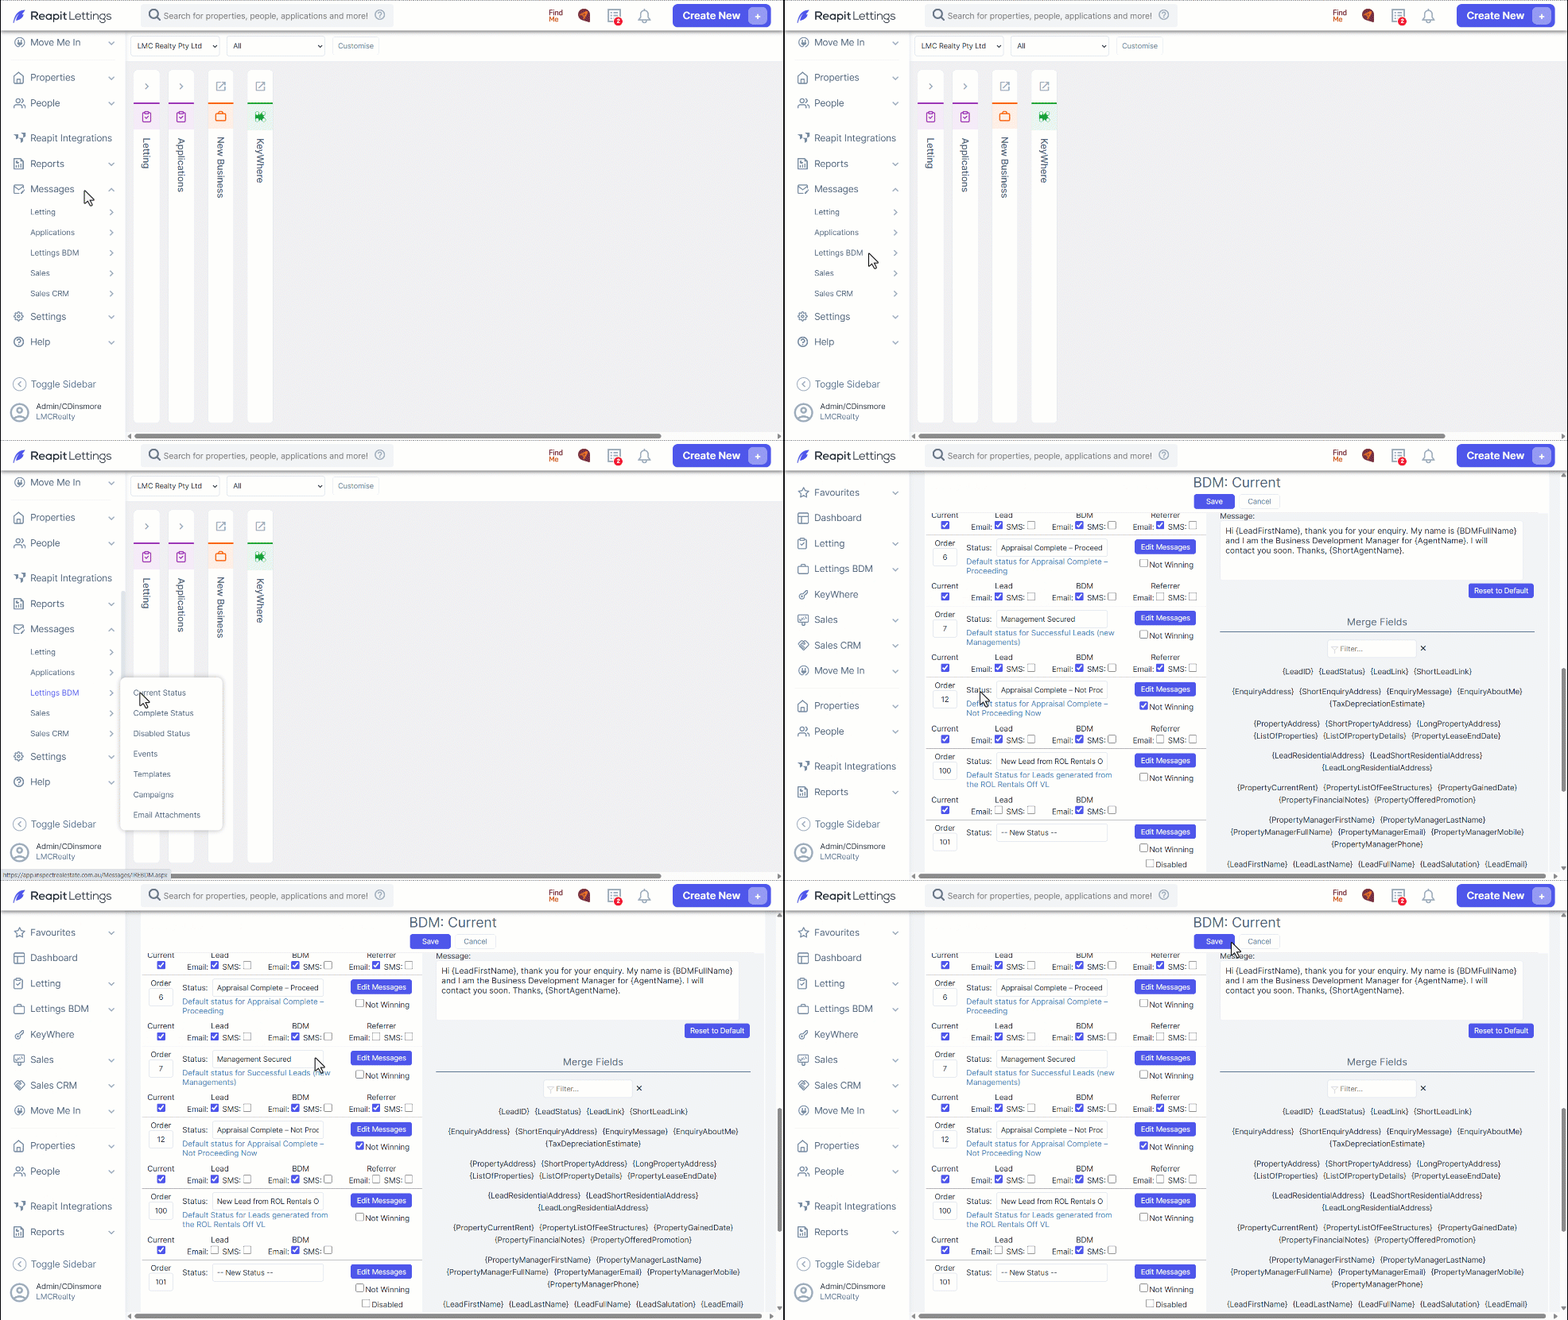
- Scroll and locate Status: Management Secured. Select Reapit Letting tick box options, use the Edit Message to update email and SMS messages for the Lead, BDM and Referrer. Select Save to retain all changes.