'%20d='M0%208a8%208%200%200%201%208-8h24a8%208%200%200%201%208%208v24a8%208%200%200%201-8%208H8a8%208%200%200%201-8-8V8Z'/%3e%3cpath%20fill='%23fff'%20d='M32.576%206C12.293%206%208.776%2025.887%207.424%2034H9.1c.45-2.977%203.493-14.748%2010.899-20.287%200%200-5.633%206.976-6.572%2015.051%203.426-.652%2013.845-3.372%2016.056-12.927l-3.84-.61c1.352-1.351%204.909-5.17%206.931-9.226V6Z'/%3e%3cdefs%3e%3clinearGradient%20id='reapit-lettings__a'%20x1='20.702'%20x2='20.702'%20y1='.351'%20y2='31.228'%20gradientUnits='userSpaceOnUse'%3e%3cstop%20stop-color='%235573FD'/%3e%3cstop%20offset='.575'%20stop-color='%234E56EA'/%3e%3c/linearGradient%3e%3c/defs%3e%3c/svg%3e)
Quick Guide for using Reapit Viewings at an Inspection
This article will run through how to use Reapit Viewings at an inspection.
Quick Guide for Using Reapit Viewings at an Inspection
This article will run through how to use Reapit Viewings at an inspection.
The Processes in this article include:
- Quick Guide for Using Reapit Viewings an an Inspection
- How to Use the QR Code in Reapit Viewings
Quick Guide for Using Reapit Viewings at an Inspection
- When you first log in, you will be presented with the below screen which also includes some quick stats about your inspections for the day.
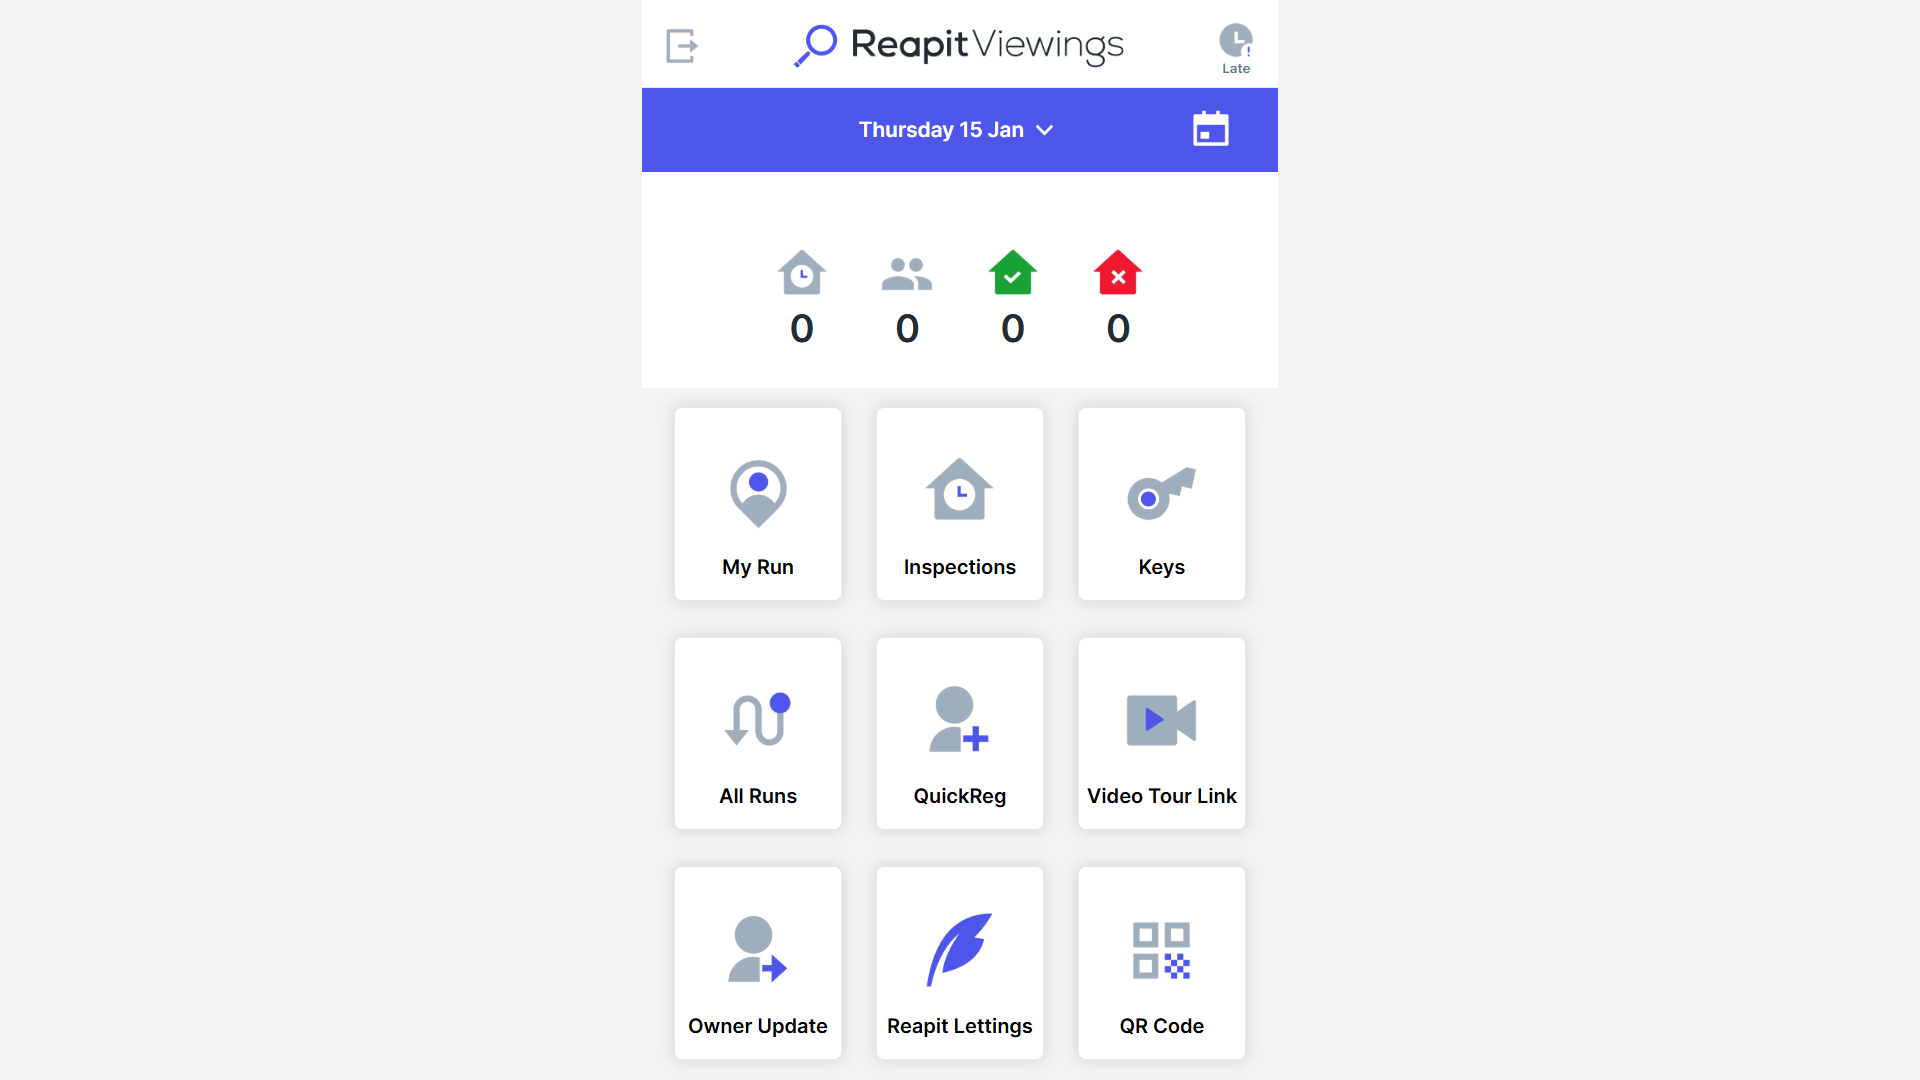
- On the day you are conducting your Inspections tap the My Run button.
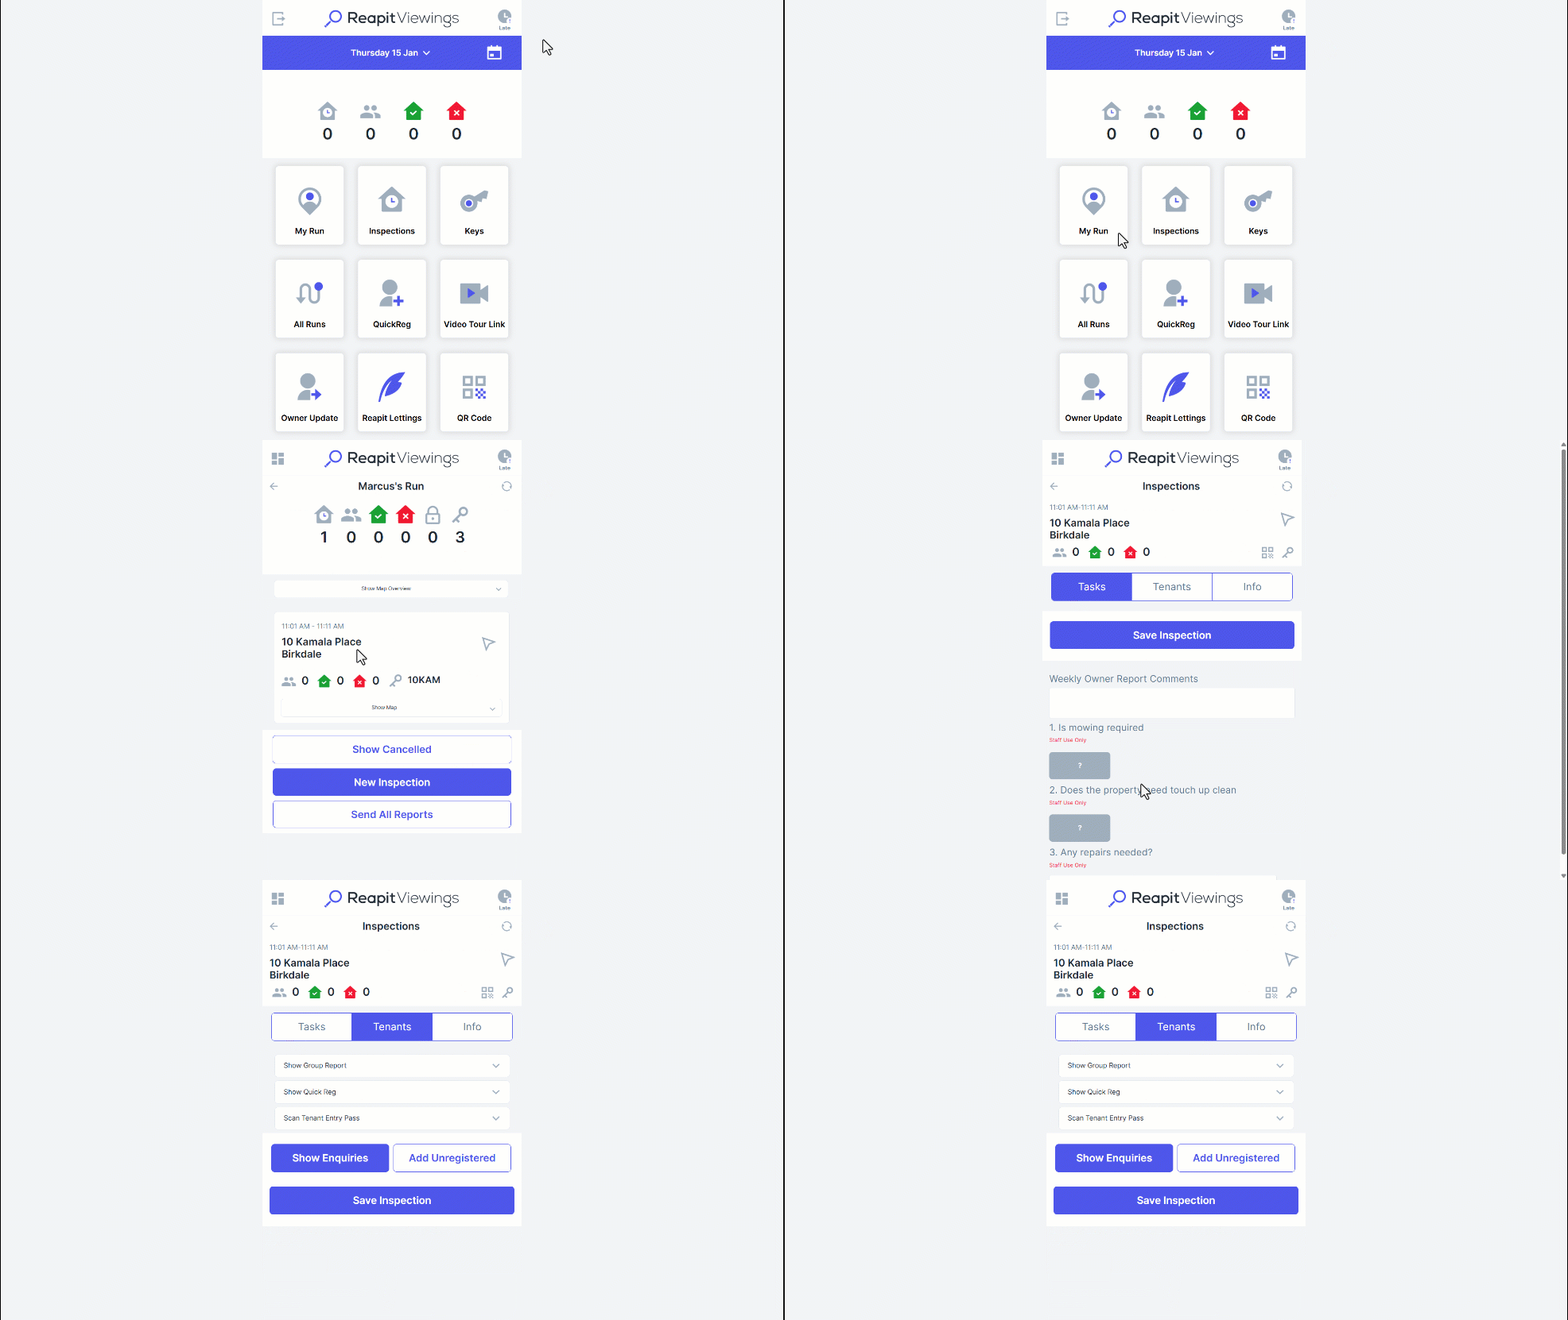
- Choose the inspection you’re currently attending by tapping on the address.
- Once in the inspection you can fill out the office questions and make any comments to go on the Weekly Owner Report.
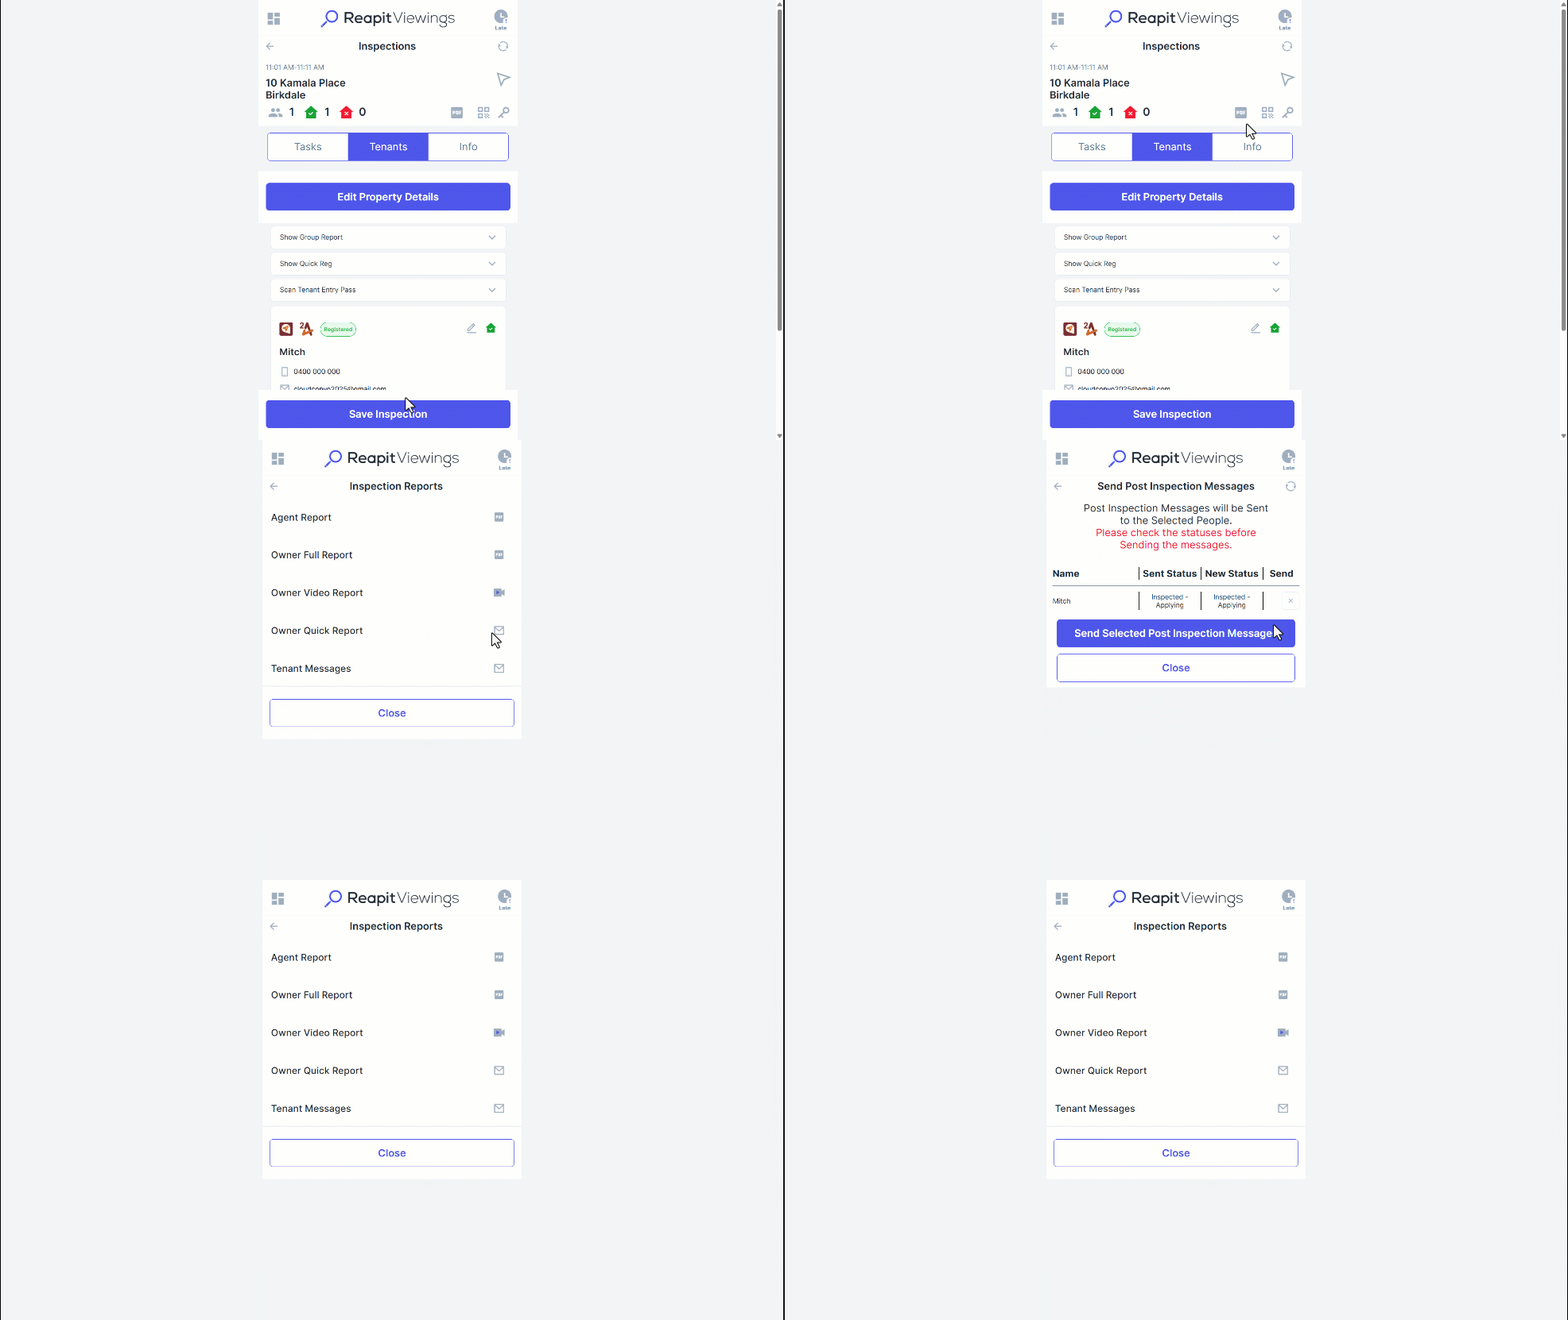
- You can now tap the Tenants button to record the attendance of the registered tenants.
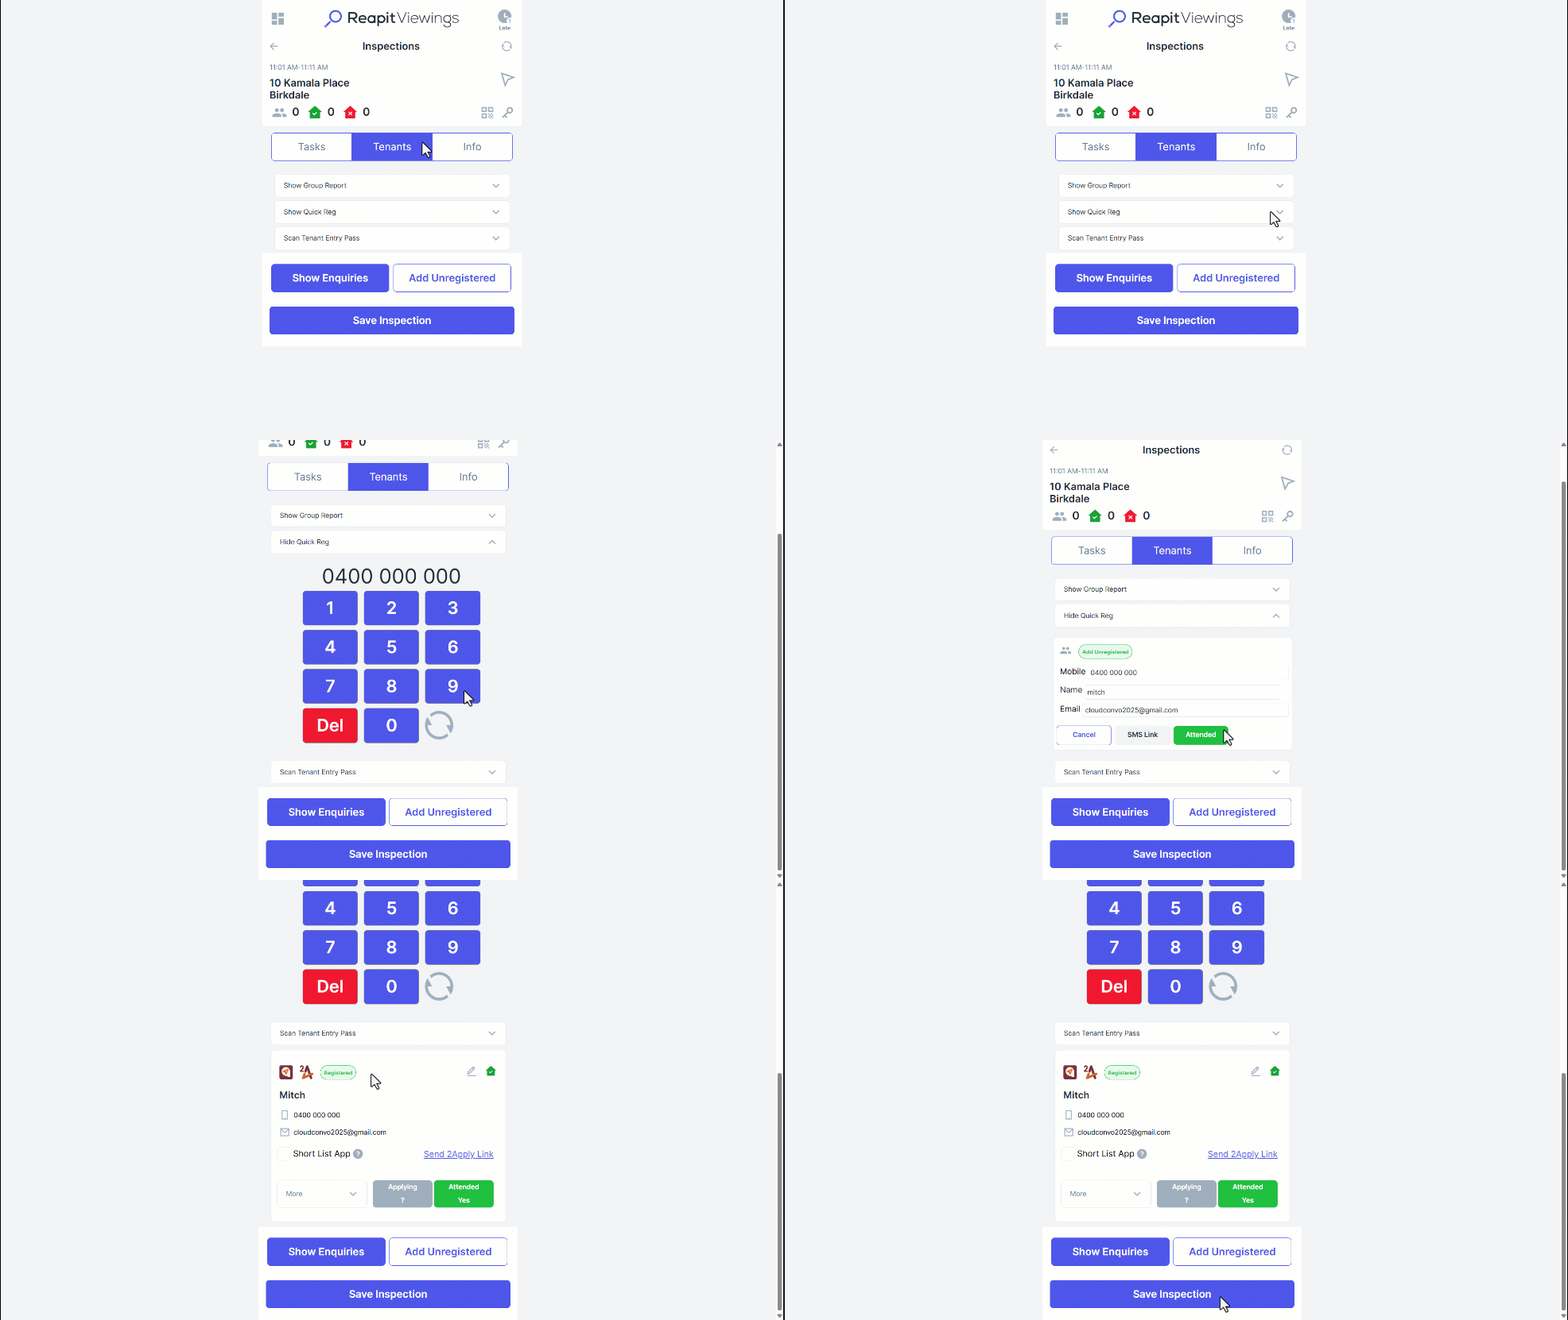
- On this page, you will see every registered tenant and be able to add people who haven’t registered using Quick Reg. To Quick Reg, first tap the Show Quick Reg bar. Once this expands, you can enter their mobile number using the keypad, then tap the green swirl to search for them.
- If they have enquired on one of your agency’s properties before, their details will fill in automatically for you. Otherwise, you can fill in their details then mark them as attended by tapping the green Attended button.
- Once everyone is registered, you can start filling out the information about the attendees. You can mark them as attended or no show and if they intend to apply for the property by tapping on their respective buttons.
- Then you can record results to some questions you can ask them by tapping the More button.
Note: These questions are optional and will appear on a report you can send to the owner (unless you specify otherwise in your account settings).
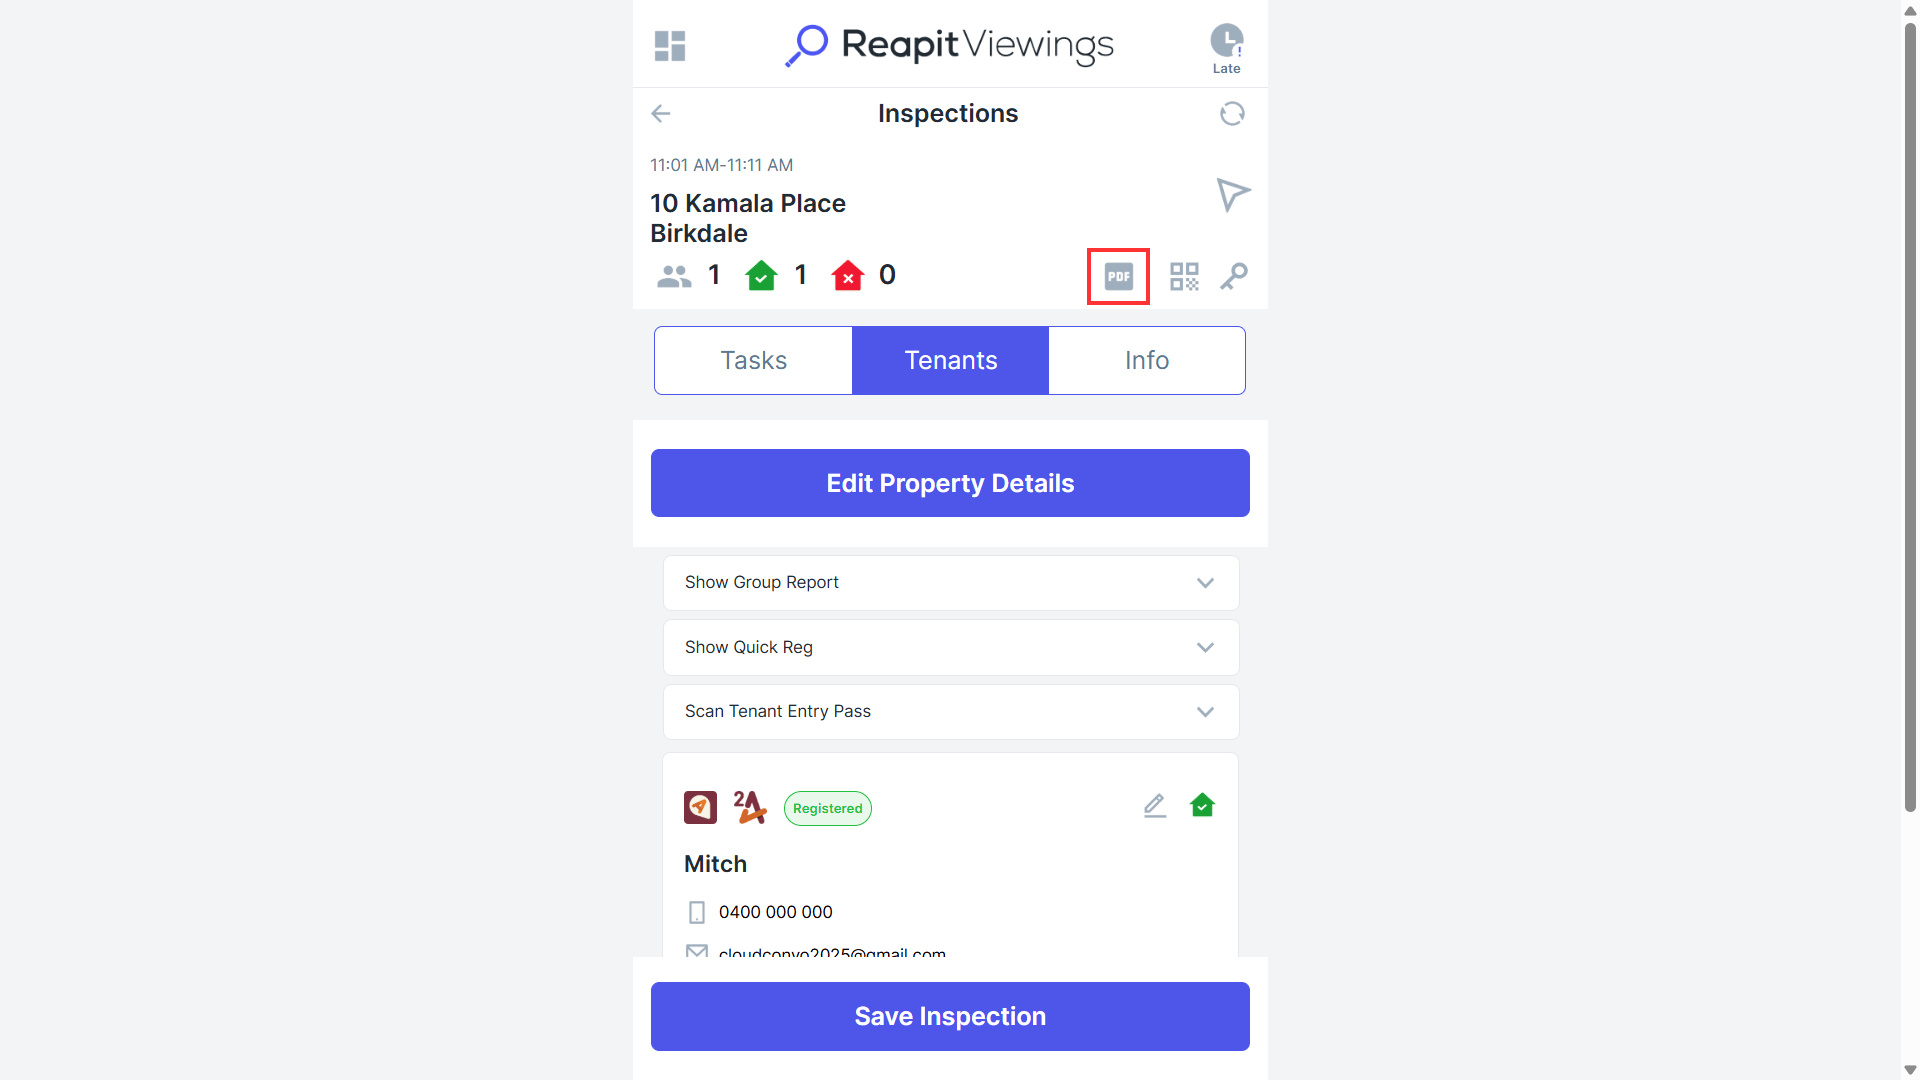
- Once the inspection has concluded, click the Save Inspection button.
- You will then also notice the reports button show up. Click the Report Icon button. This will open a list of reports that can be sent.
- Click the Tenant Messages button to send follow up messages to the registered tenants.
- Select the tenants you would like to send to then click the Send Selected Post Inspection Messages button.
- Click the Close button to go back to the Reports screen. If you like you can send any additional reports to yourself or the owner by clicking into the remaining report buttons.
How to Use the QR Code in Reapit Viewings
Note: Each staff member will have their own QR code, as each code is assigned to the staff member completing the inspection and not the property.
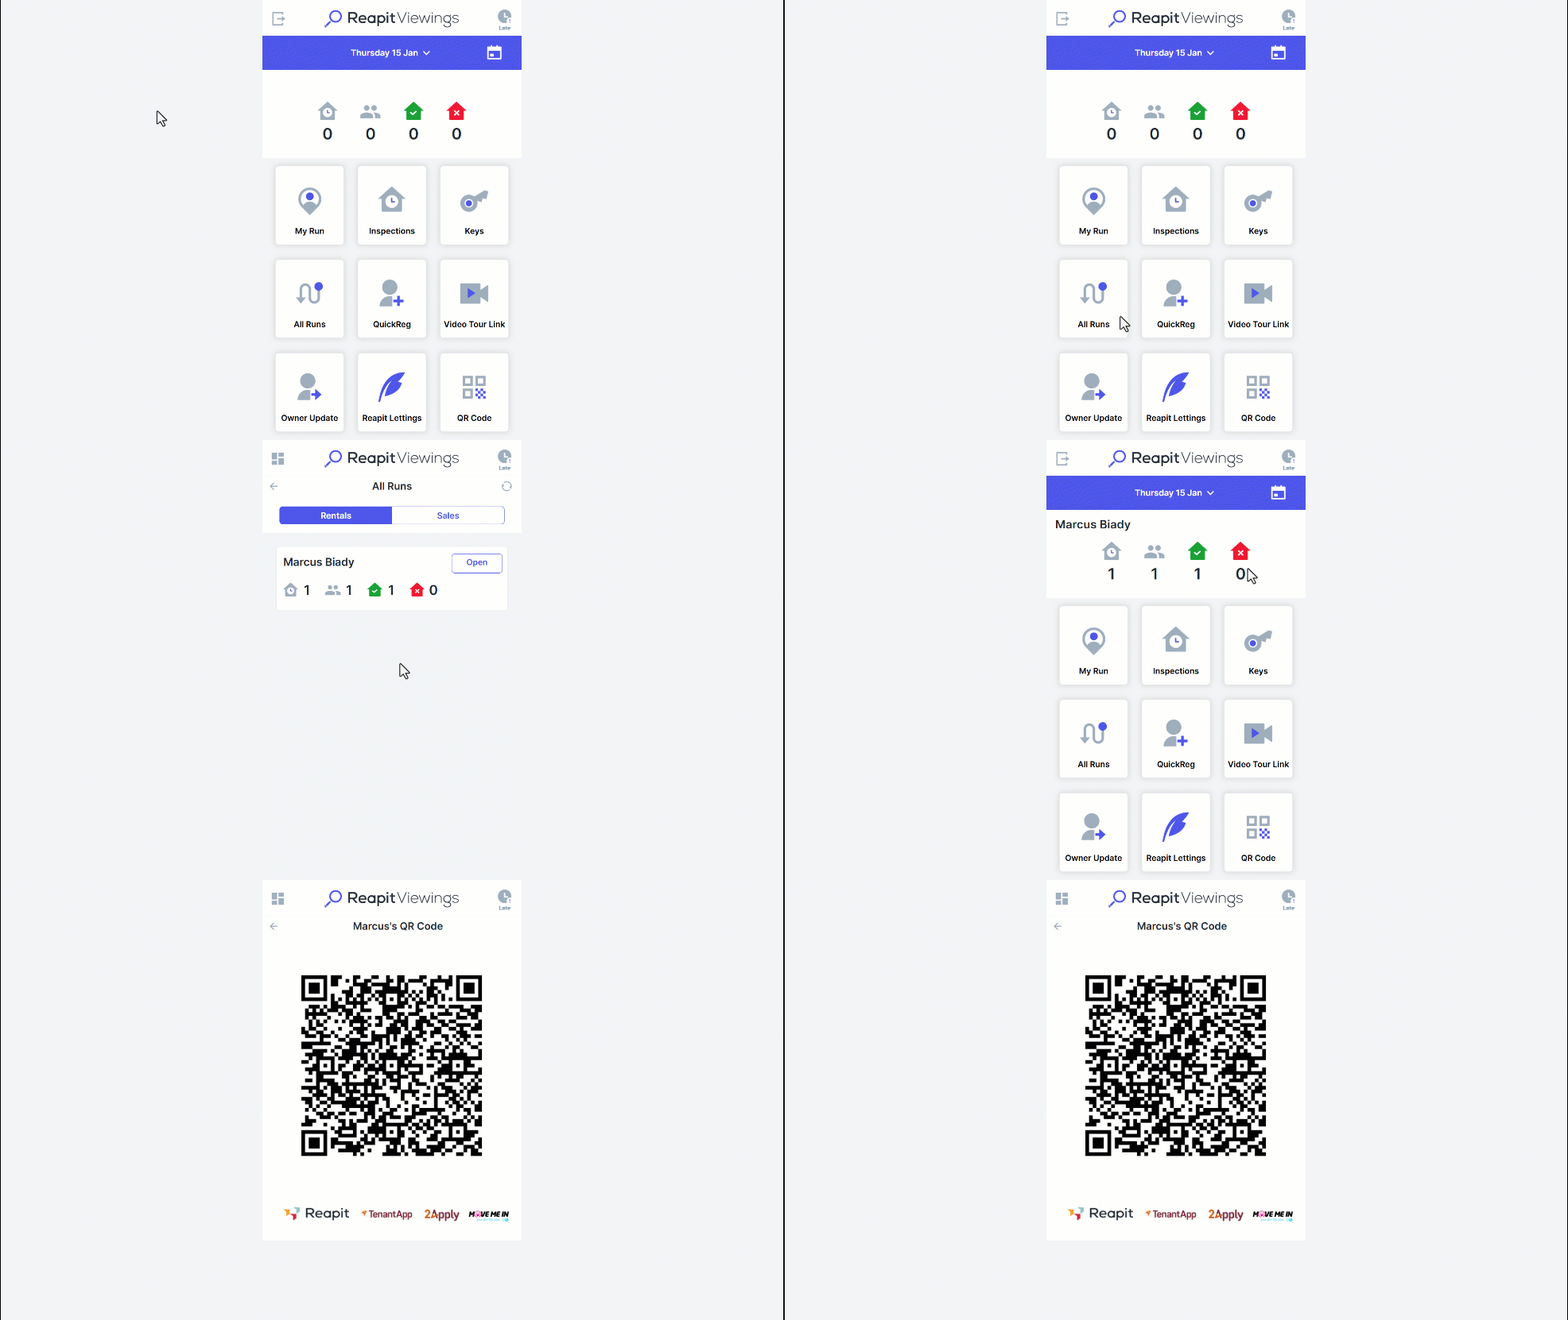
- Once you have logged into Reapit Viewings, navigate to All Runs and select the agent you wish to view the QR code for.
- You can then access the QR code for the agent by navigating to the QR Code section.
- This will then provide you with either a QR code or a notification that there are no agents selected if you did not previously select the agent in the All Runs section in Reapit Viewings.
- Alternatively, you can access the QR code in the inspection for a property by navigating to the specific inspection and selecting the following QR code button shown below.
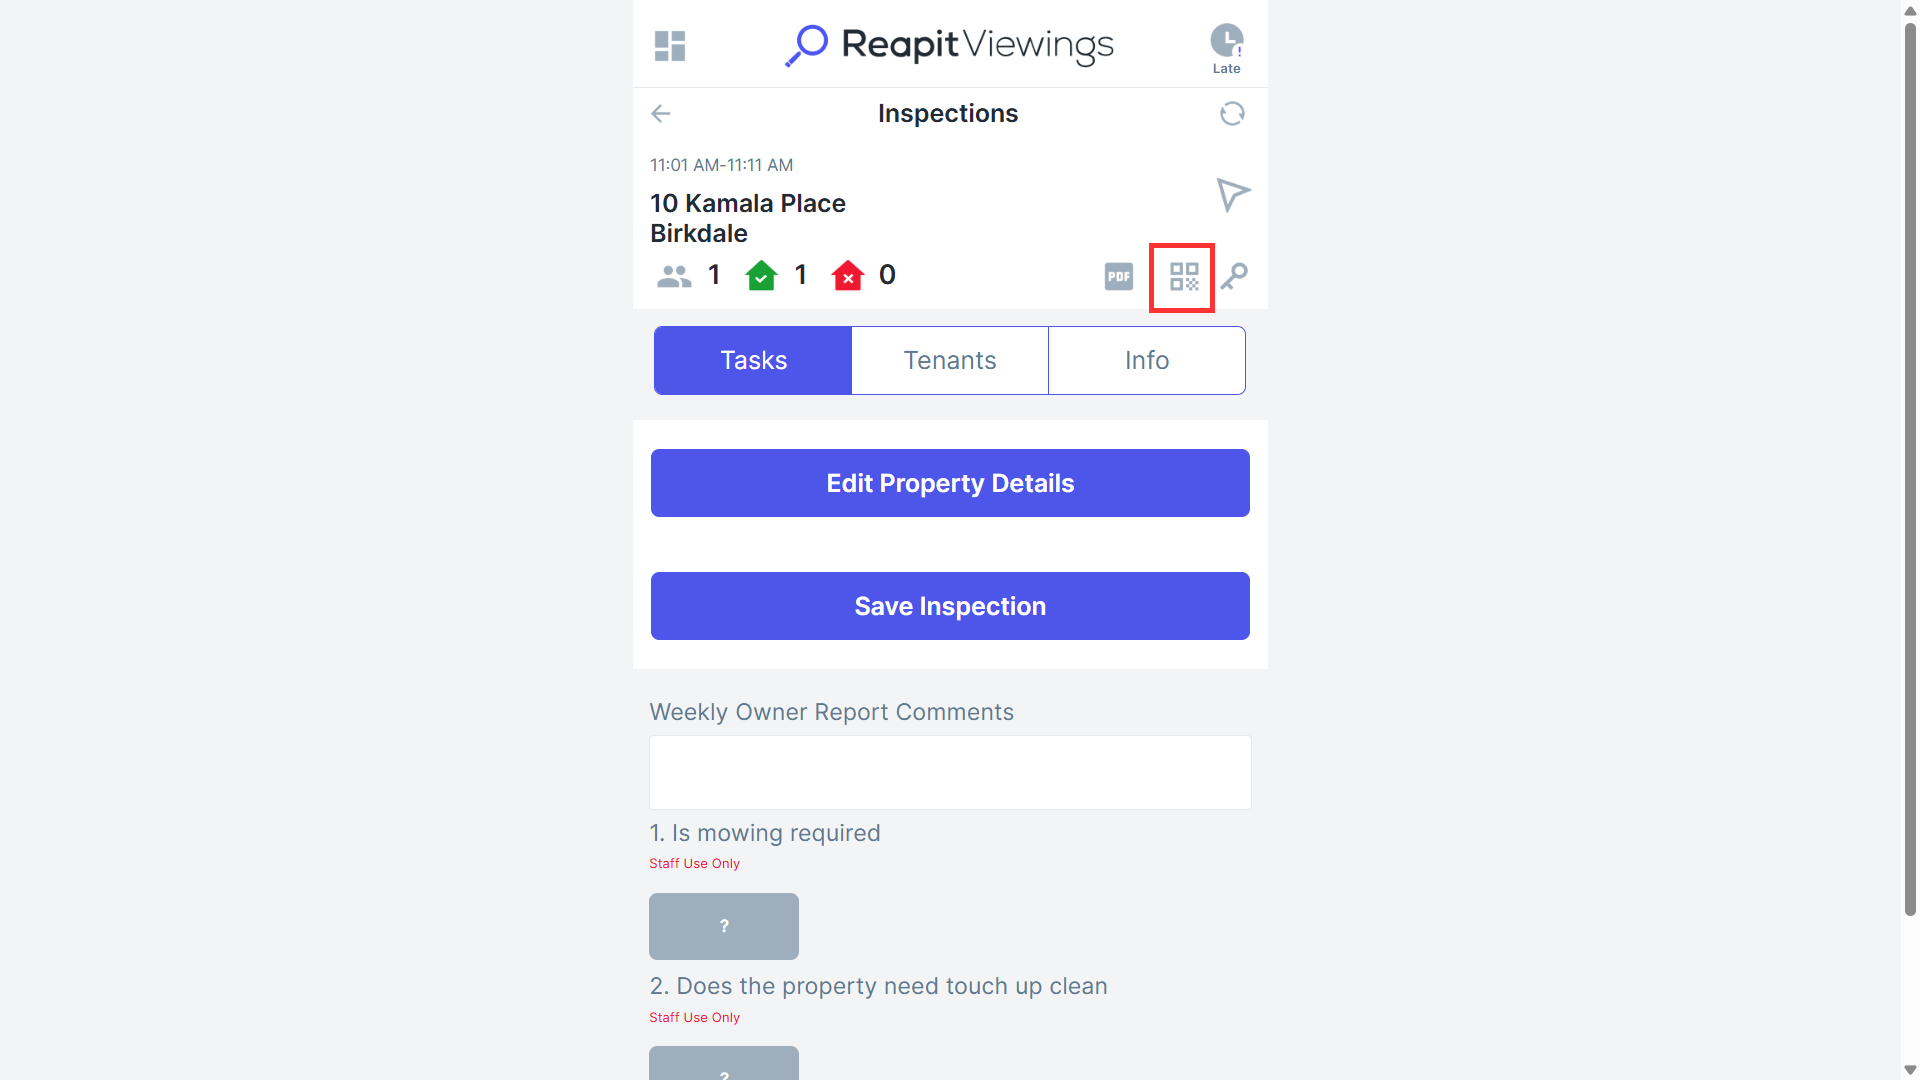
Note: When accessing the QR codes, only the next most recent inspection will show for the QR code until that inspection time has passed.
How do Prospects use the QR code?
Tenants can use their phone camera or QR Scanner to scan the barcode. Once scanned, the tenant will be prompted to check-in, this will open in either Tenant App or their web browser.
The tenant can then fill out their details, including their preferred move in date, contact details and any comments they may wish to include.
Once the Prospect has registered, if they are not already registered into the inspection, they will be included as a new attendee for the inspection. If the Prospect is already included for the inspection, upon completing the QR code, they will now be marked as attended instead of a new Prospect being entered as long as the viewers details matches the details of the original prospect.