'%20d='M0%208a8%208%200%200%201%208-8h24a8%208%200%200%201%208%208v24a8%208%200%200%201-8%208H8a8%208%200%200%201-8-8V8Z'/%3e%3cpath%20fill='%23fff'%20d='M32.576%206C12.293%206%208.776%2025.887%207.424%2034H9.1c.45-2.977%203.493-14.748%2010.899-20.287%200%200-5.633%206.976-6.572%2015.051%203.426-.652%2013.845-3.372%2016.056-12.927l-3.84-.61c1.352-1.351%204.909-5.17%206.931-9.226V6Z'/%3e%3cdefs%3e%3clinearGradient%20id='reapit-lettings__a'%20x1='20.702'%20x2='20.702'%20y1='.351'%20y2='31.228'%20gradientUnits='userSpaceOnUse'%3e%3cstop%20stop-color='%235573FD'/%3e%3cstop%20offset='.575'%20stop-color='%234E56EA'/%3e%3c/linearGradient%3e%3c/defs%3e%3c/svg%3e)
Creating and Managing Inspections
This article contains the processes for creating and managing Inspections within Reapit Lettings. The processes in this article include: How to Create a New Inspection How to add an Inspection through Applications How To Cancel an Inspection How To Edit An Existing Inspection How to Merge Two Inspections Together
This article contains the processes for creating and managing Inspections within Reapit Lettings.
The processes in this article include:
- How to Create a New Inspection
- How to add an Inspection through Applications
- How To Cancel an Inspection
- How To Edit An Existing Inspection
- How to Merge Two Inspections Together
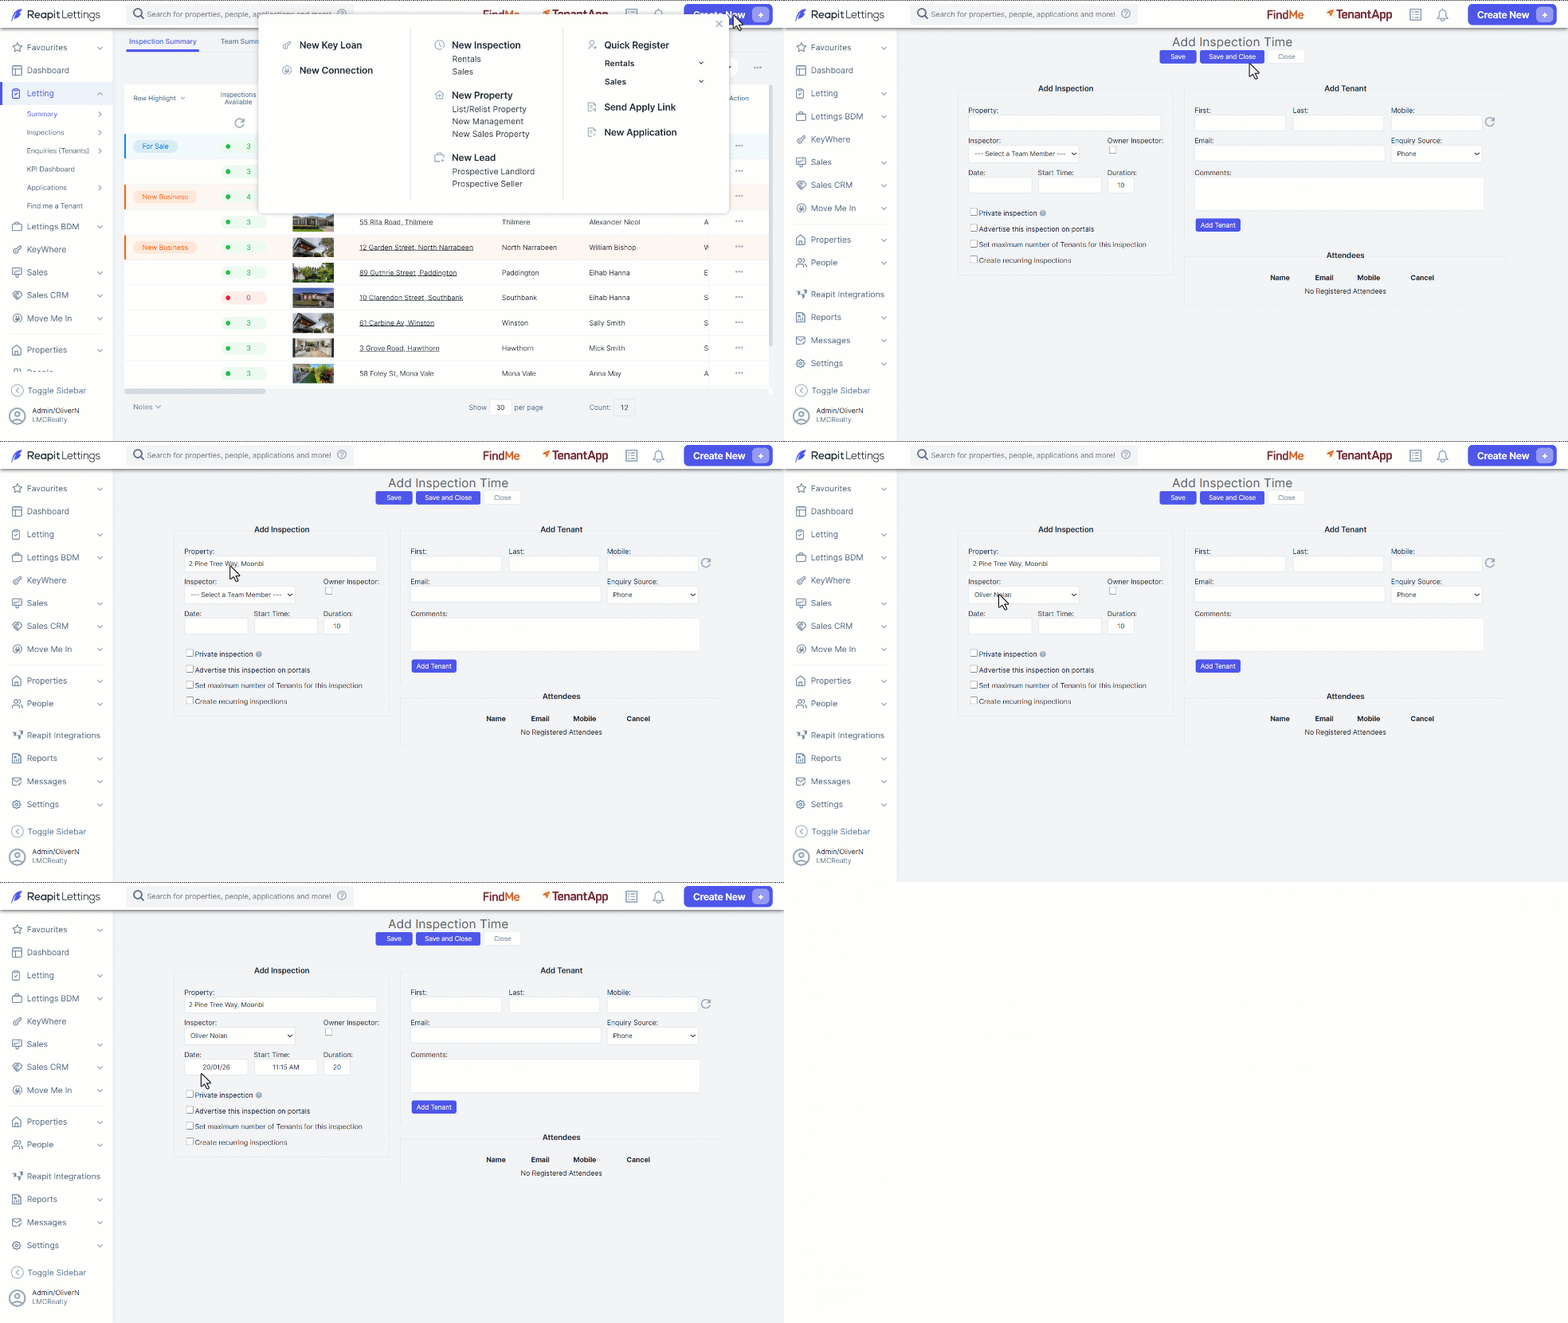
How to Create a New Inspection
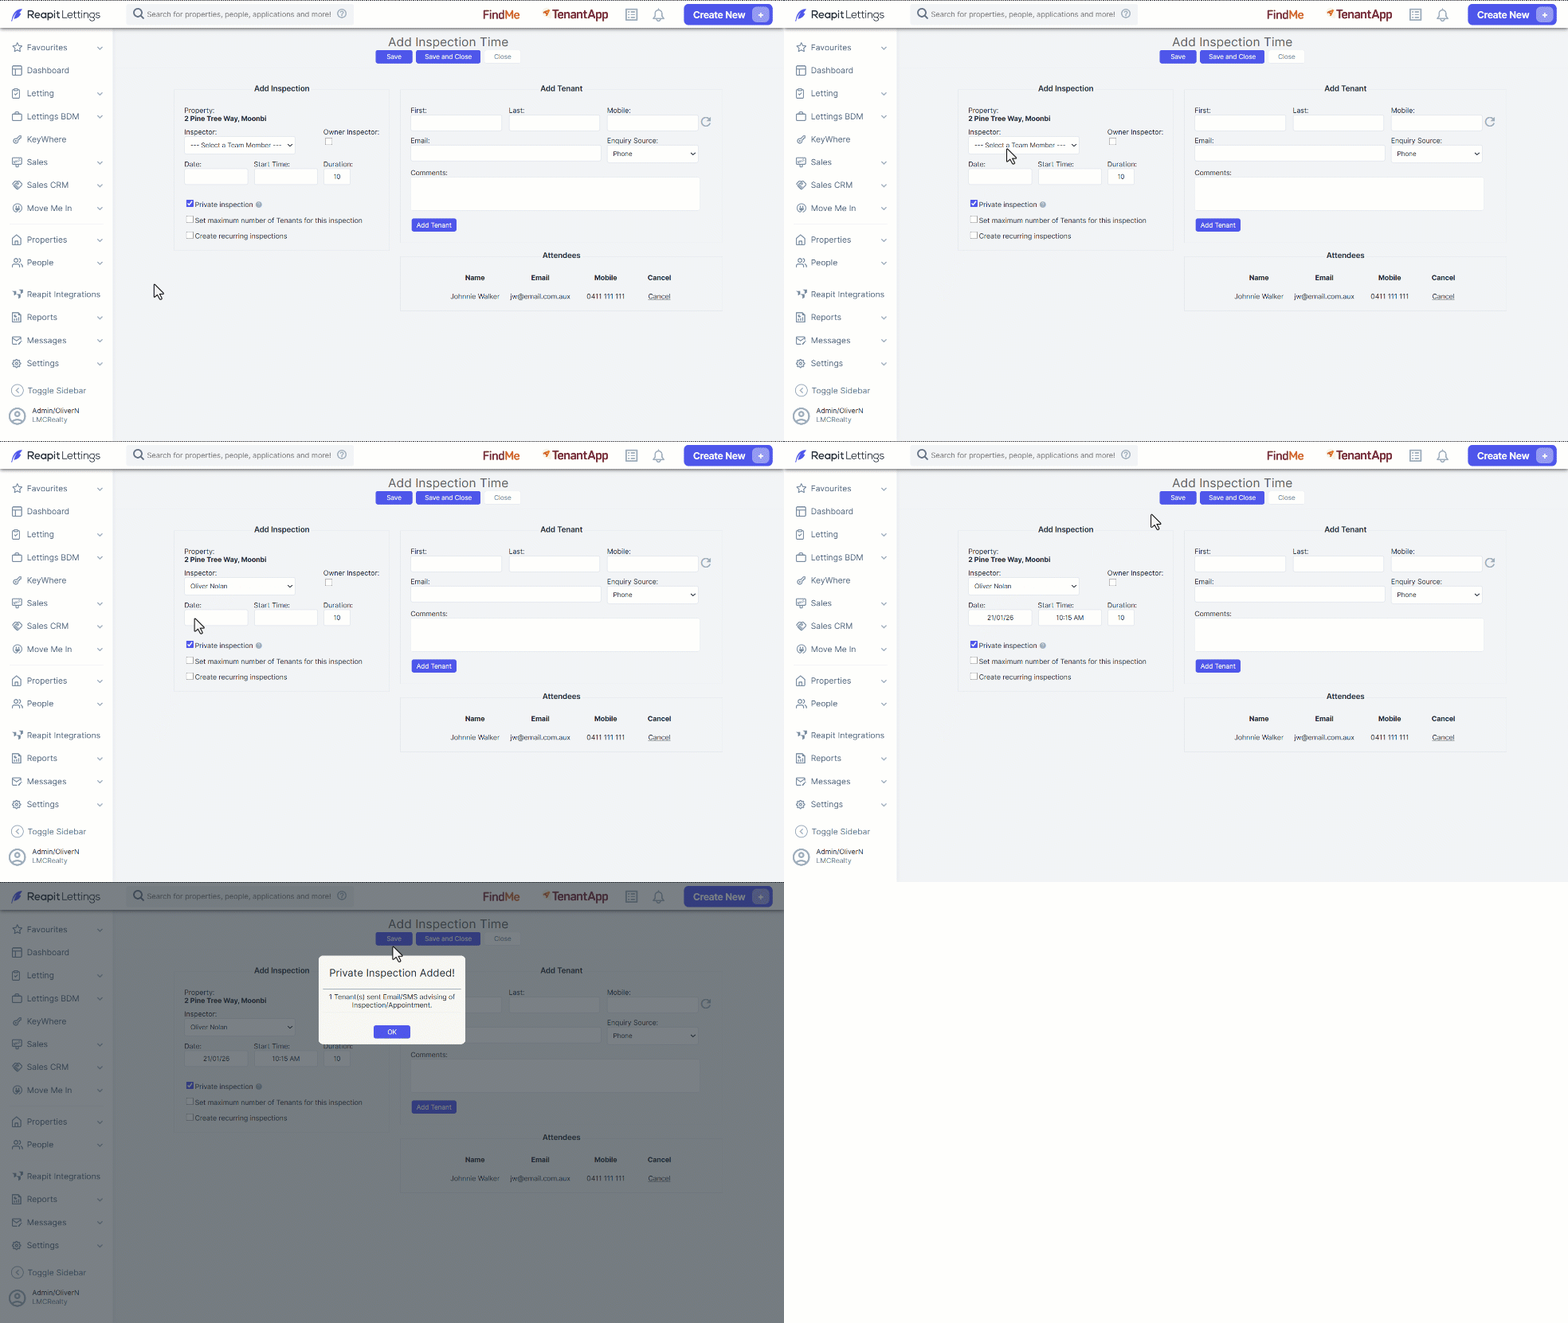
- Navigate to Create New.
- Select New Rentals Inspection.
- Search and select the property address.
- Select an Inspector from the dropdown.
- Click in the Date field, and select a date from the calendar.
- Click in the Start-Time field and use the slider to input a time.
- Enter a Duration for the inspection.
Note: Create Recurring Inspections:
Create recurring inspections allow for recurring inspections to be created for the property. When enabled, it will require you to put in the occurring frequency for the inspections and how many days, weeks or fortnights it will end after. Recurring inspection attendees will only be added on the initial inspection. They will need to be added on any recurring inspections.
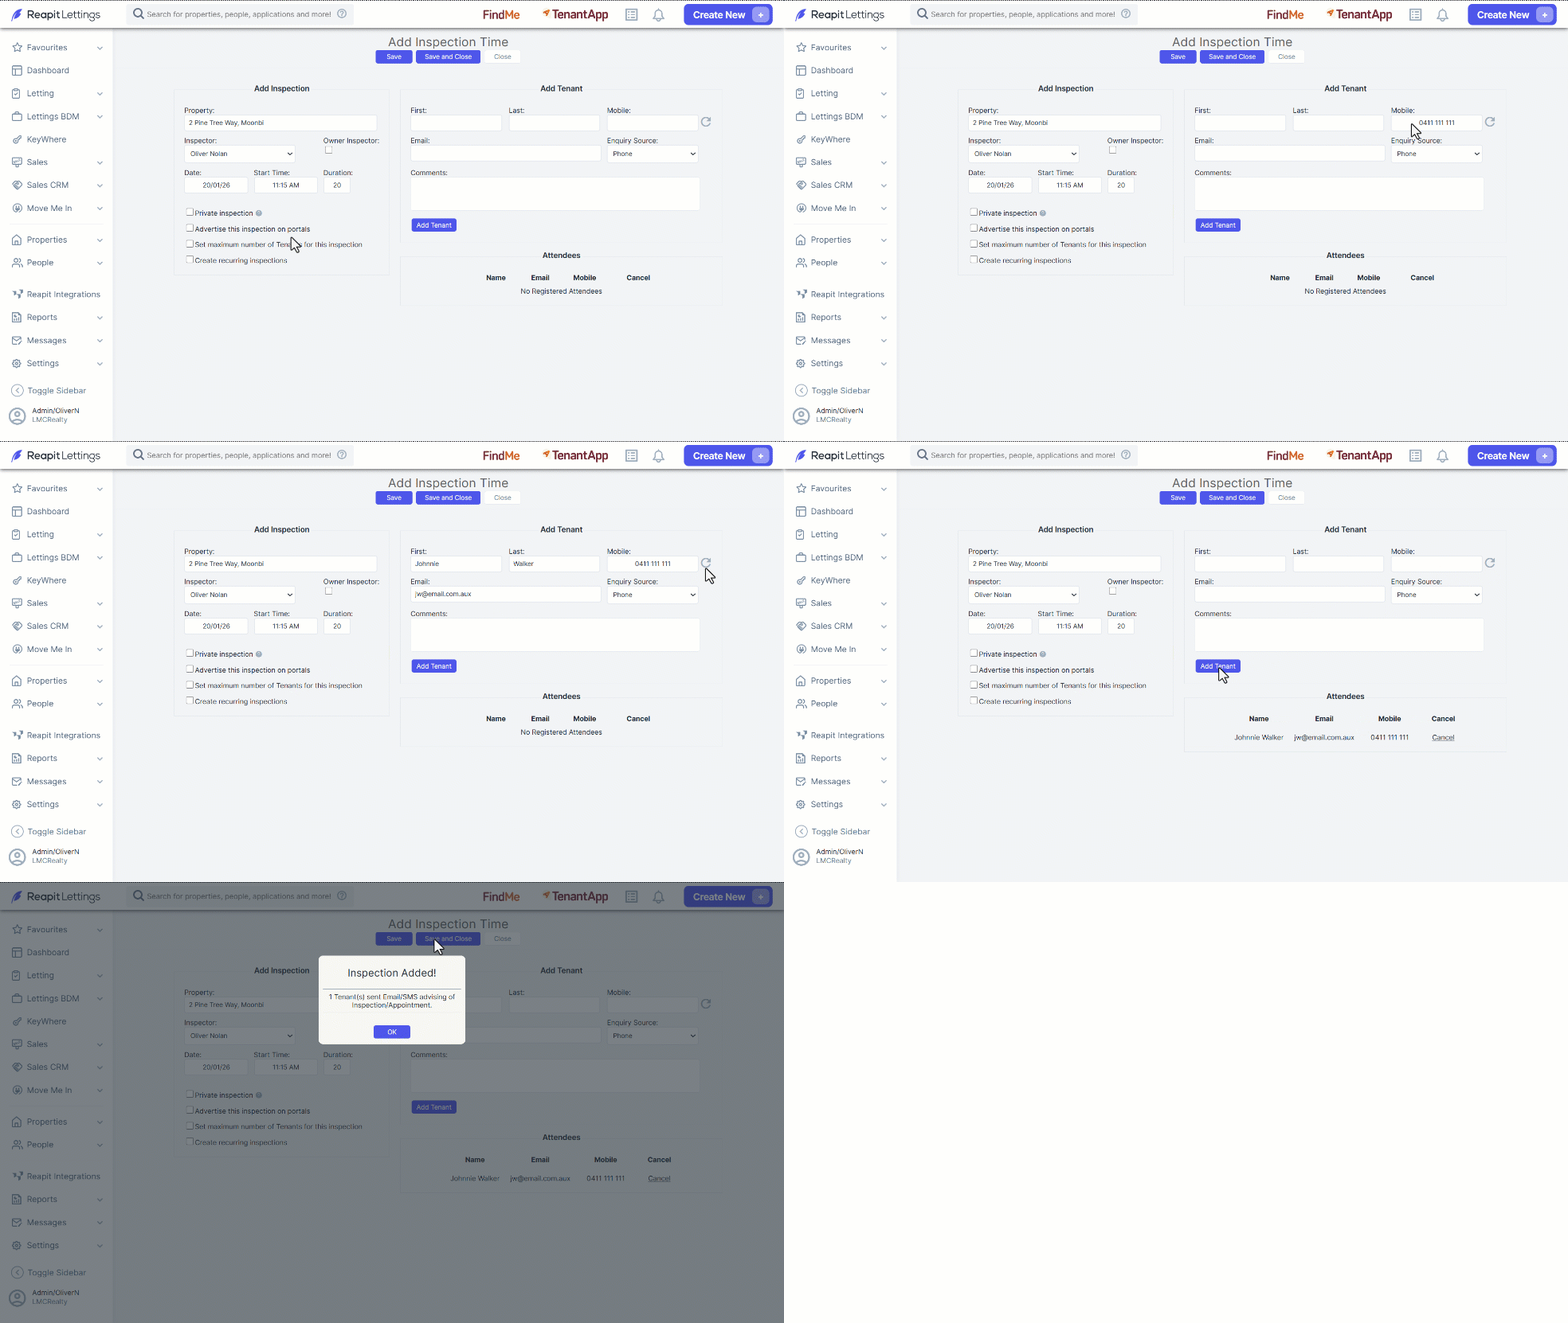
- If you are not directly registering attendees, click on Save or Save and Close.
- To add attendees at the time of creating the inspection, Enter prospective tenant’s mobile number and click the refresh icon.
- If their number is already in the system, their personal details will populate. Otherwise, capture first, last names, mobile, email address followed by the enquiry source.
- Click Add Tenant.
- For adding additional prospective tenants, capture their details as listed within the Add Tenant fields, click Add Tenant.
- Once you have made all the required changes, click Save, or Save and Close.
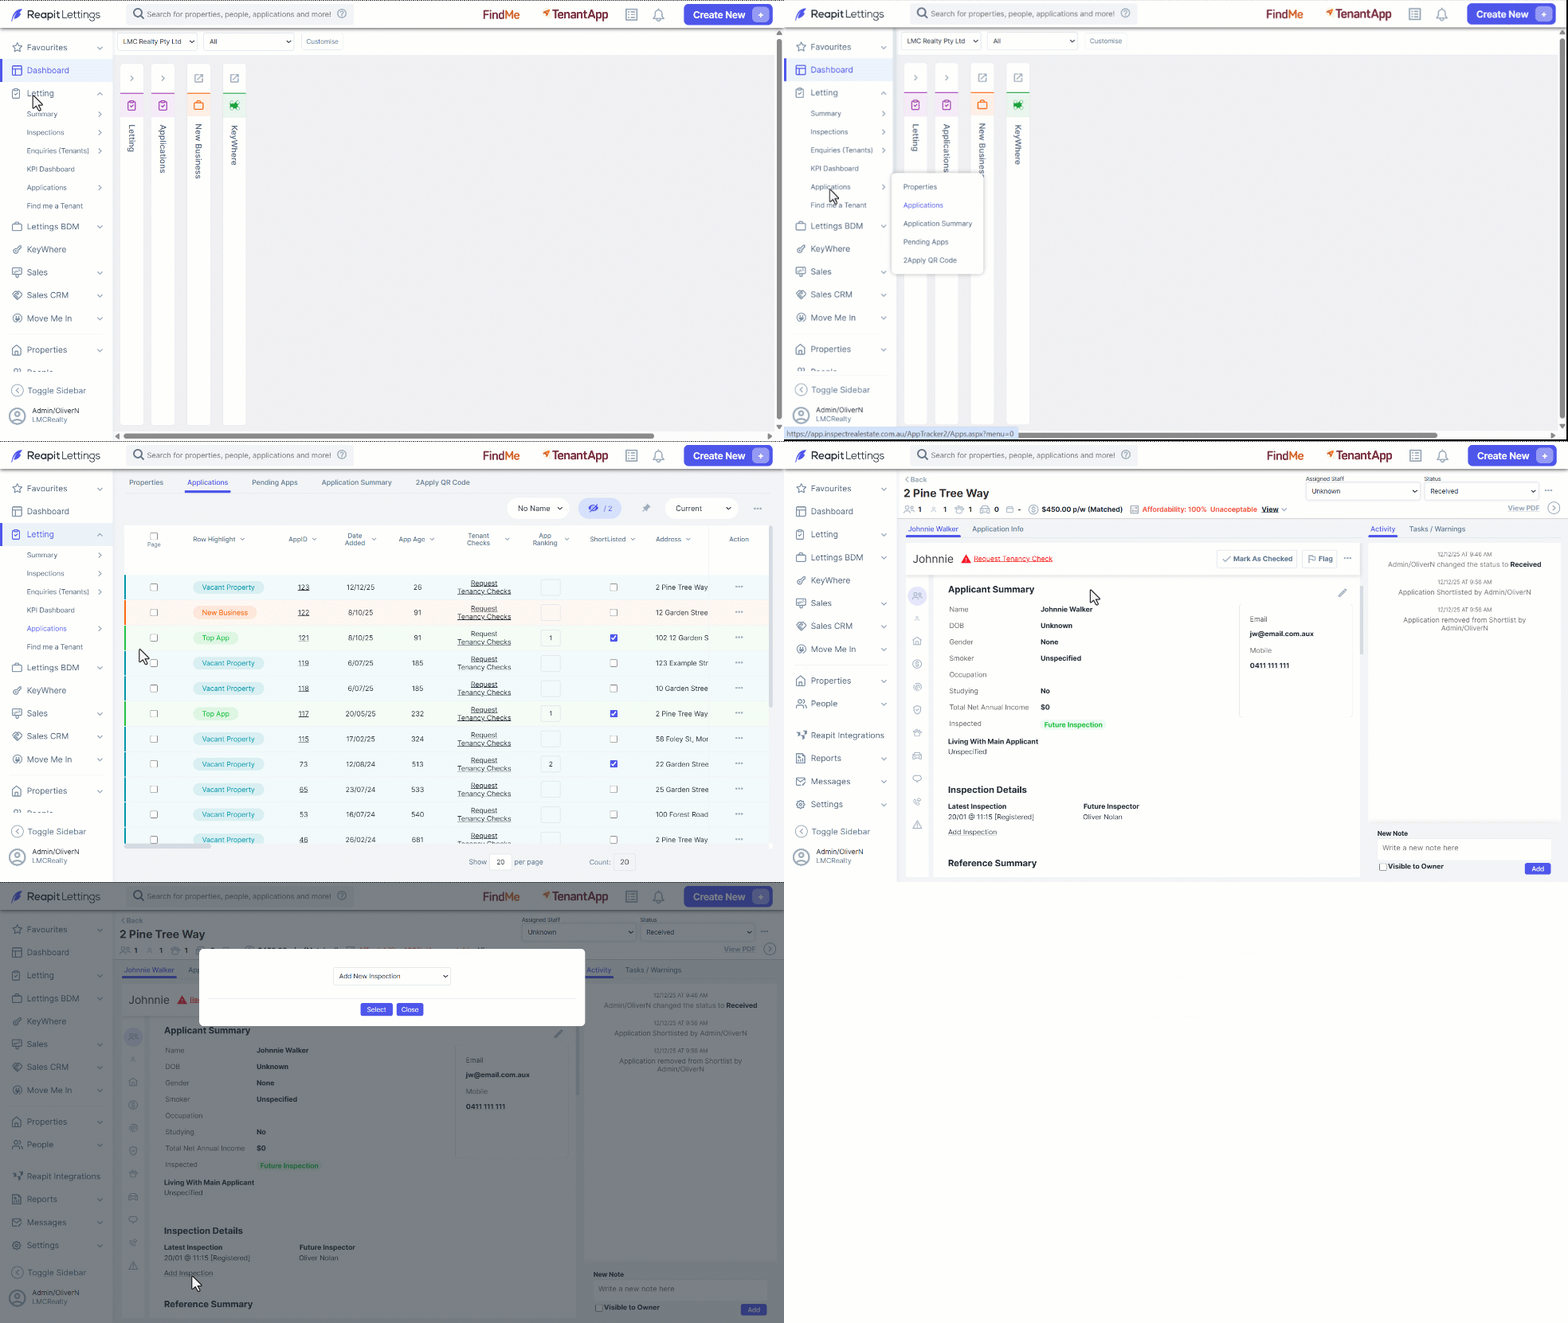
How to add an Inspection through Applications
- Click on Lettings.
- Click on Applications.
- Click Applications.
- Navigate to and select the required AppID.
- From the Inspection Details section, click on Add Inspection.
- Click on Select.
- Select the Inspector.
- Enter the date, start time and duration.
- If you untick the Private Inspections checkbox, an additional checkbox will appear underneath where you can advertise this inspection on portals.
- To add additional attendees, enter in the details and click Add Tenant.
- Click Save or Save and Close.
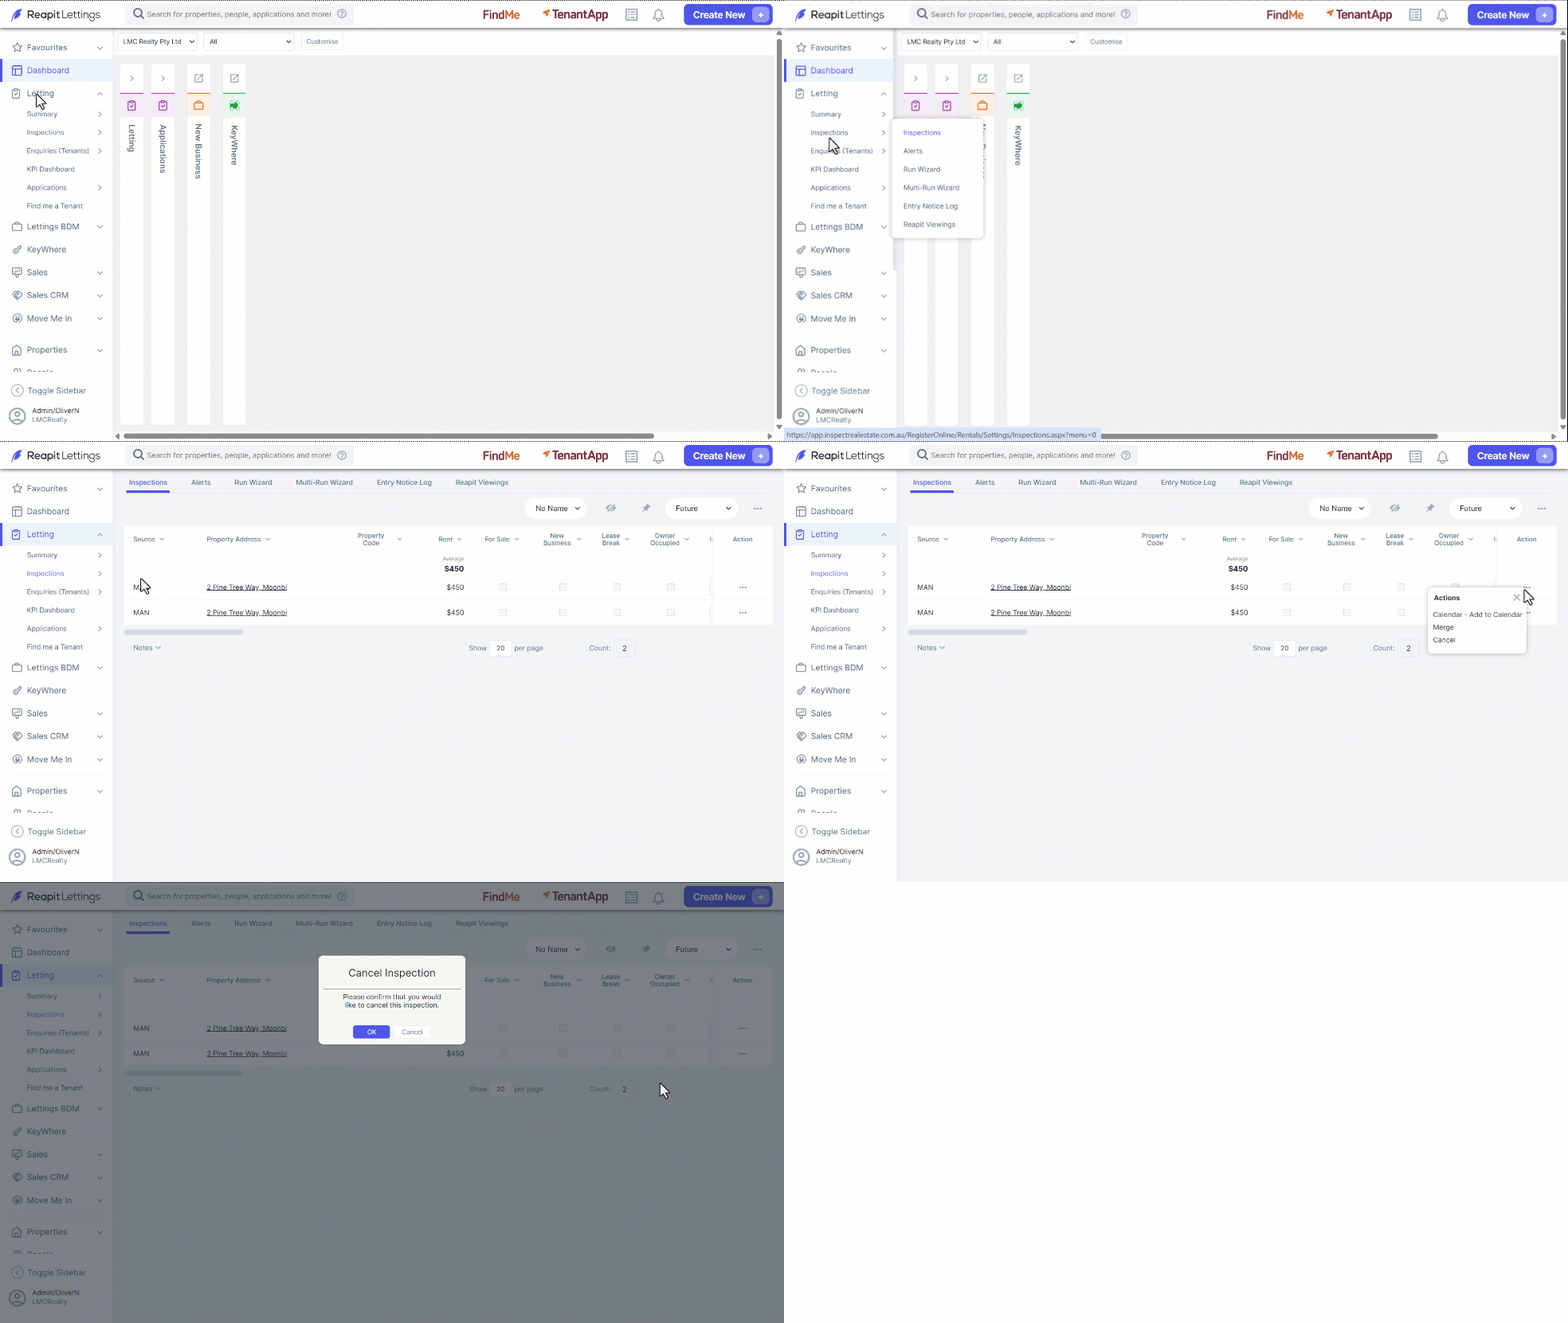
How To Cancel an Inspection in Reapit Lettings
Note: Performing a cancelation in the same platform where the inspection was initially created is required. For inspections facilitated through uploaders like Rex, VaultRE, AgentBox, and similar platforms, the cancelation must be executed directly within those systems.
- Click on Lettings.
- Click on Inspections.
- Click on Inspections.
- Navigate to the Inspection to be cancelled and select the 3-dots.
- Click on Cancel.
- Click OK to confirm the cancellation.
How To Edit An Existing Inspection
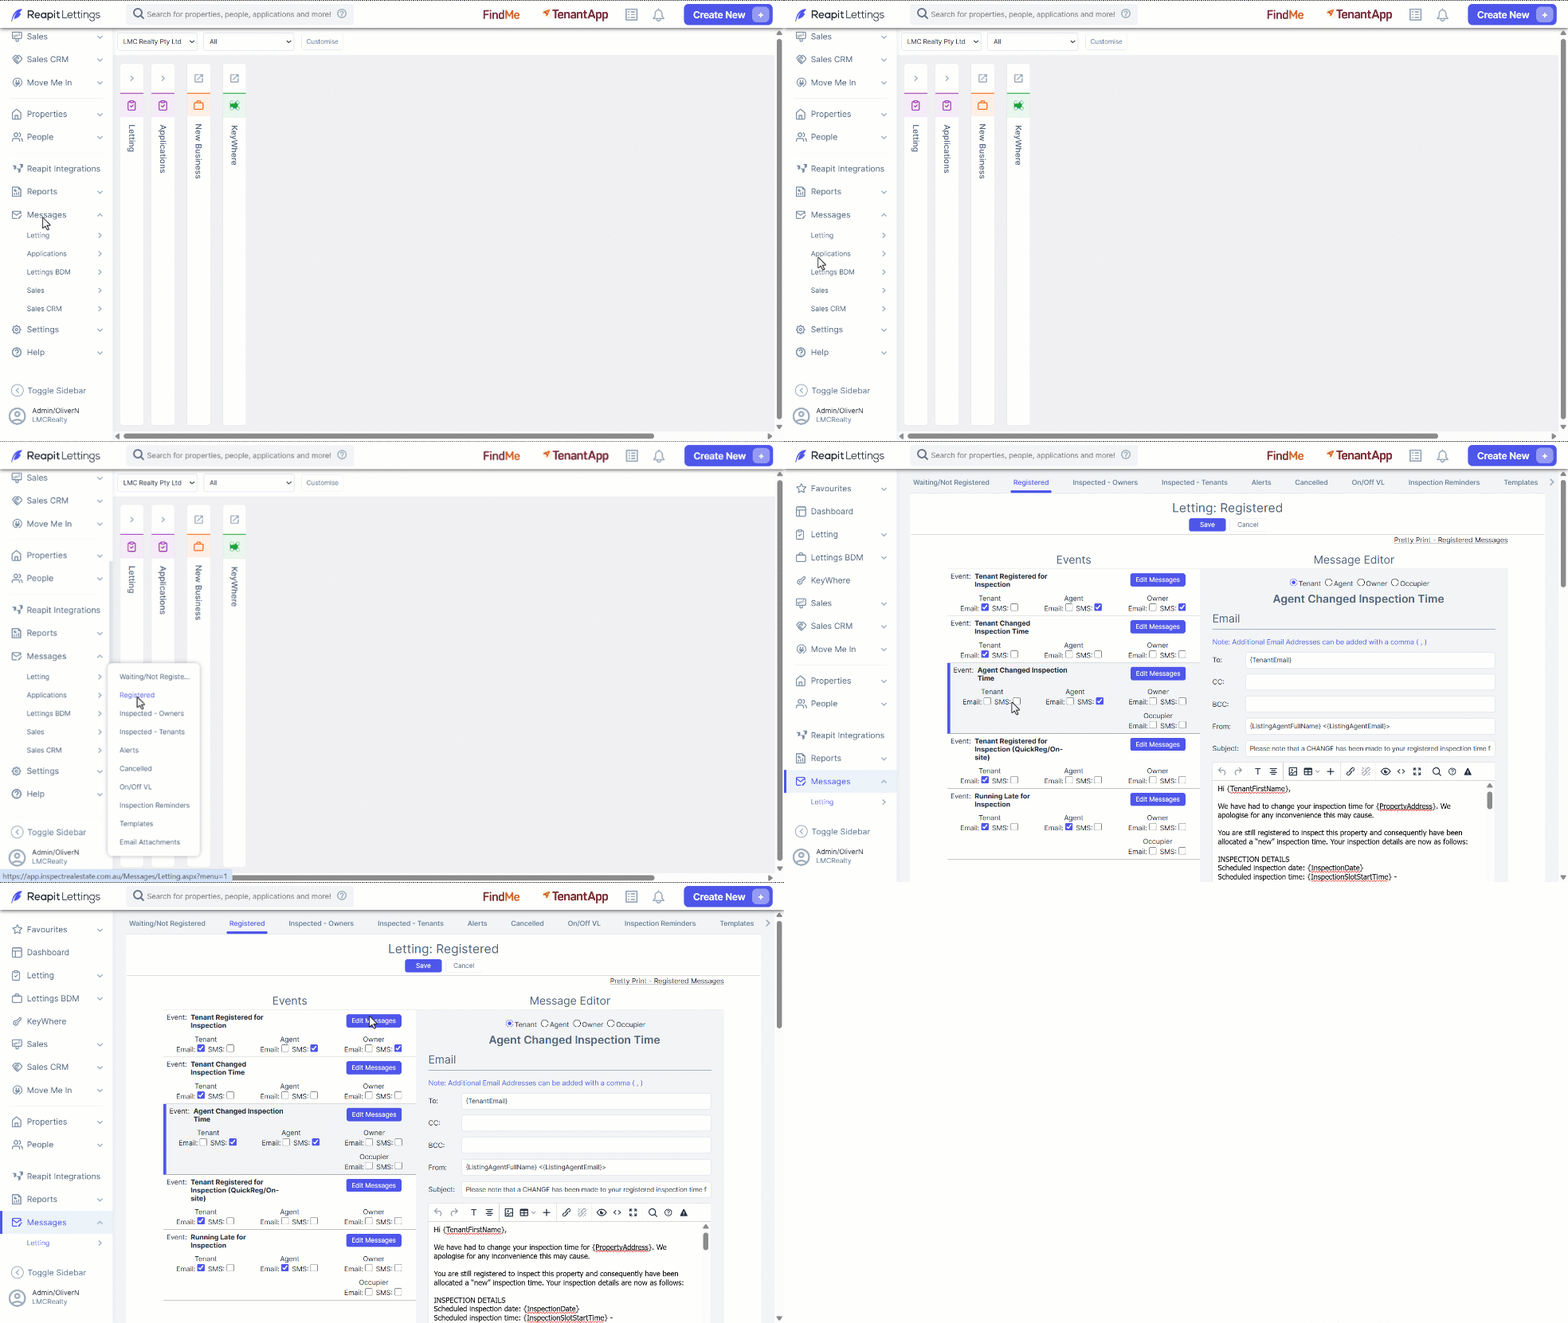
Prior to editing an existing inspection, ensure the associated messaging is correctly set up by following Steps 1 - 5. For instruction on how to Edit an Existing Inspection, follow steps 6 - 10.
- Click on Messages.
- Click on Letting.
- Click on Registered.
- Navigate to Agent Changed Inspection Time and make changes as required.
- Click on Save.
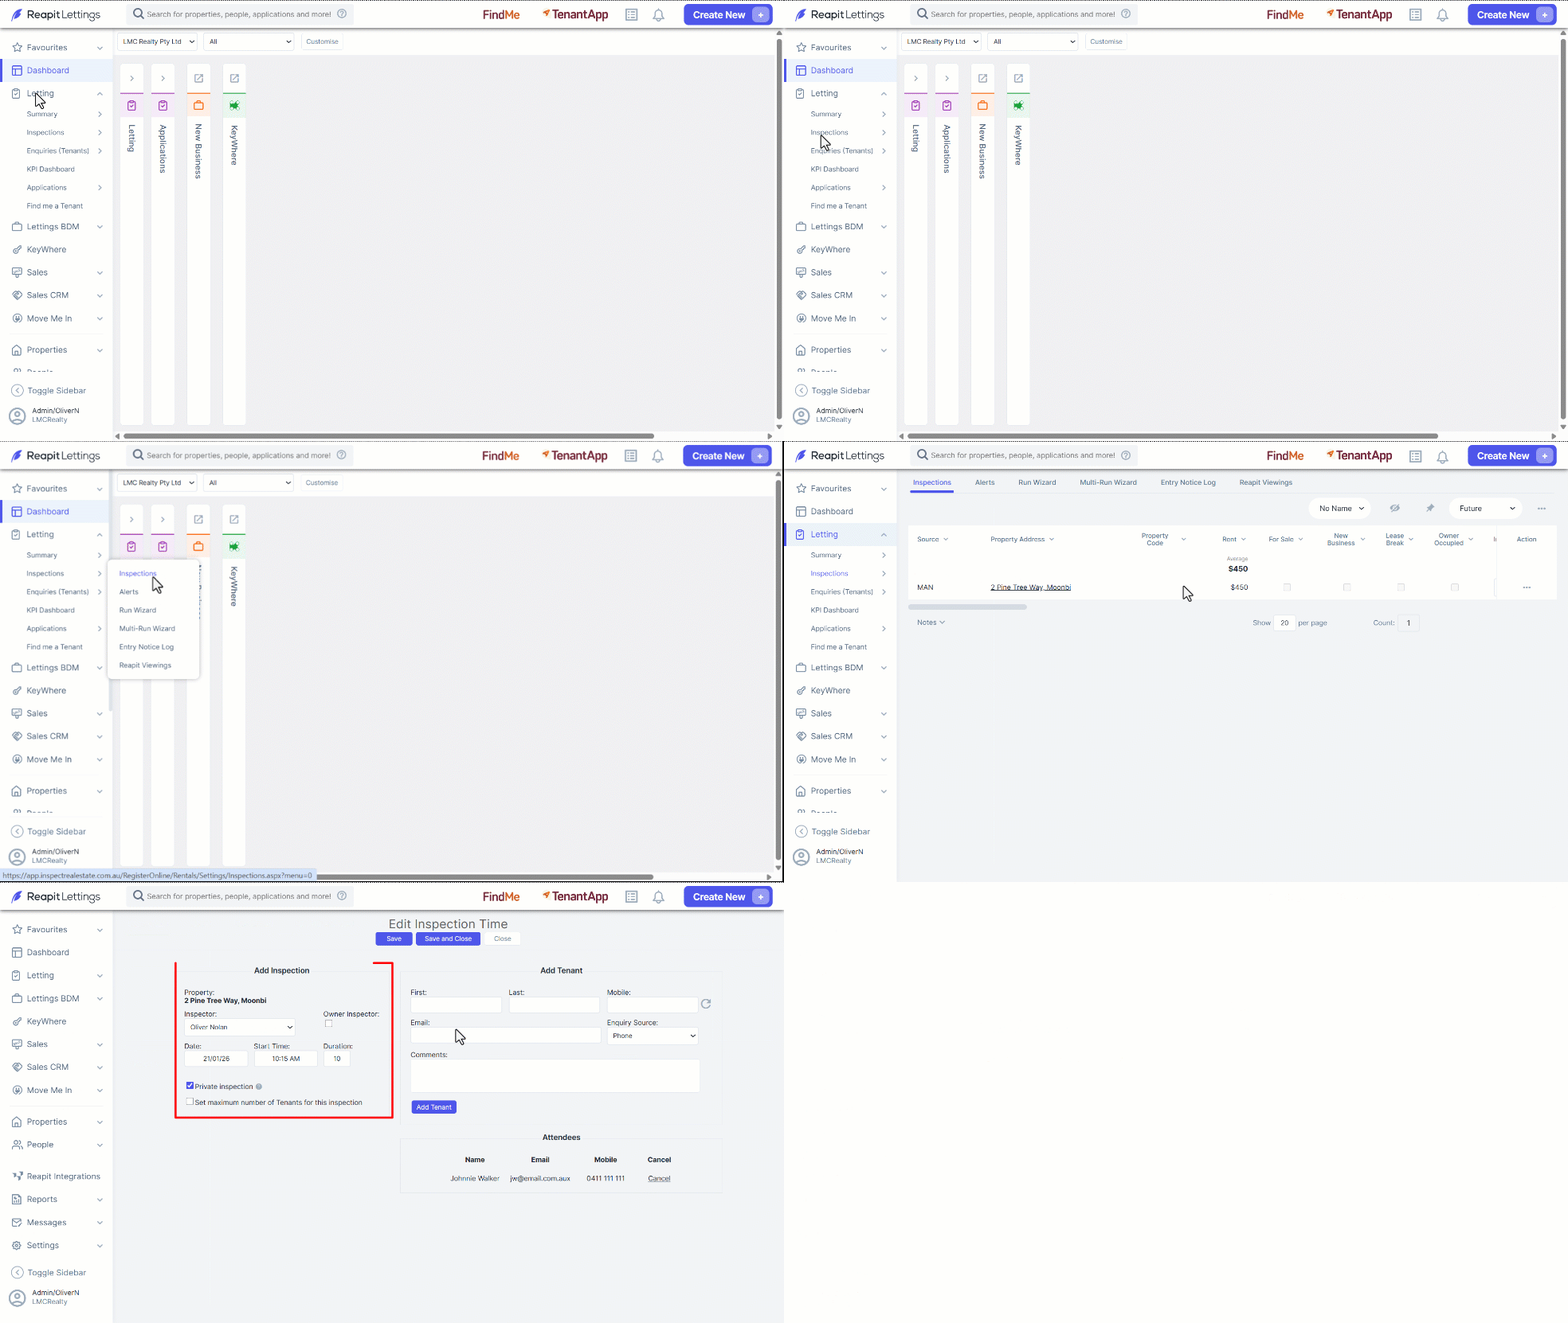
- Click on Lettings.
- Click on Inspections
- Click on Inspections.
- Click on the Rent amount of the inspection you wish to edit.
- Make the required changes to the Add Inspection section and select Save or Save and Close.
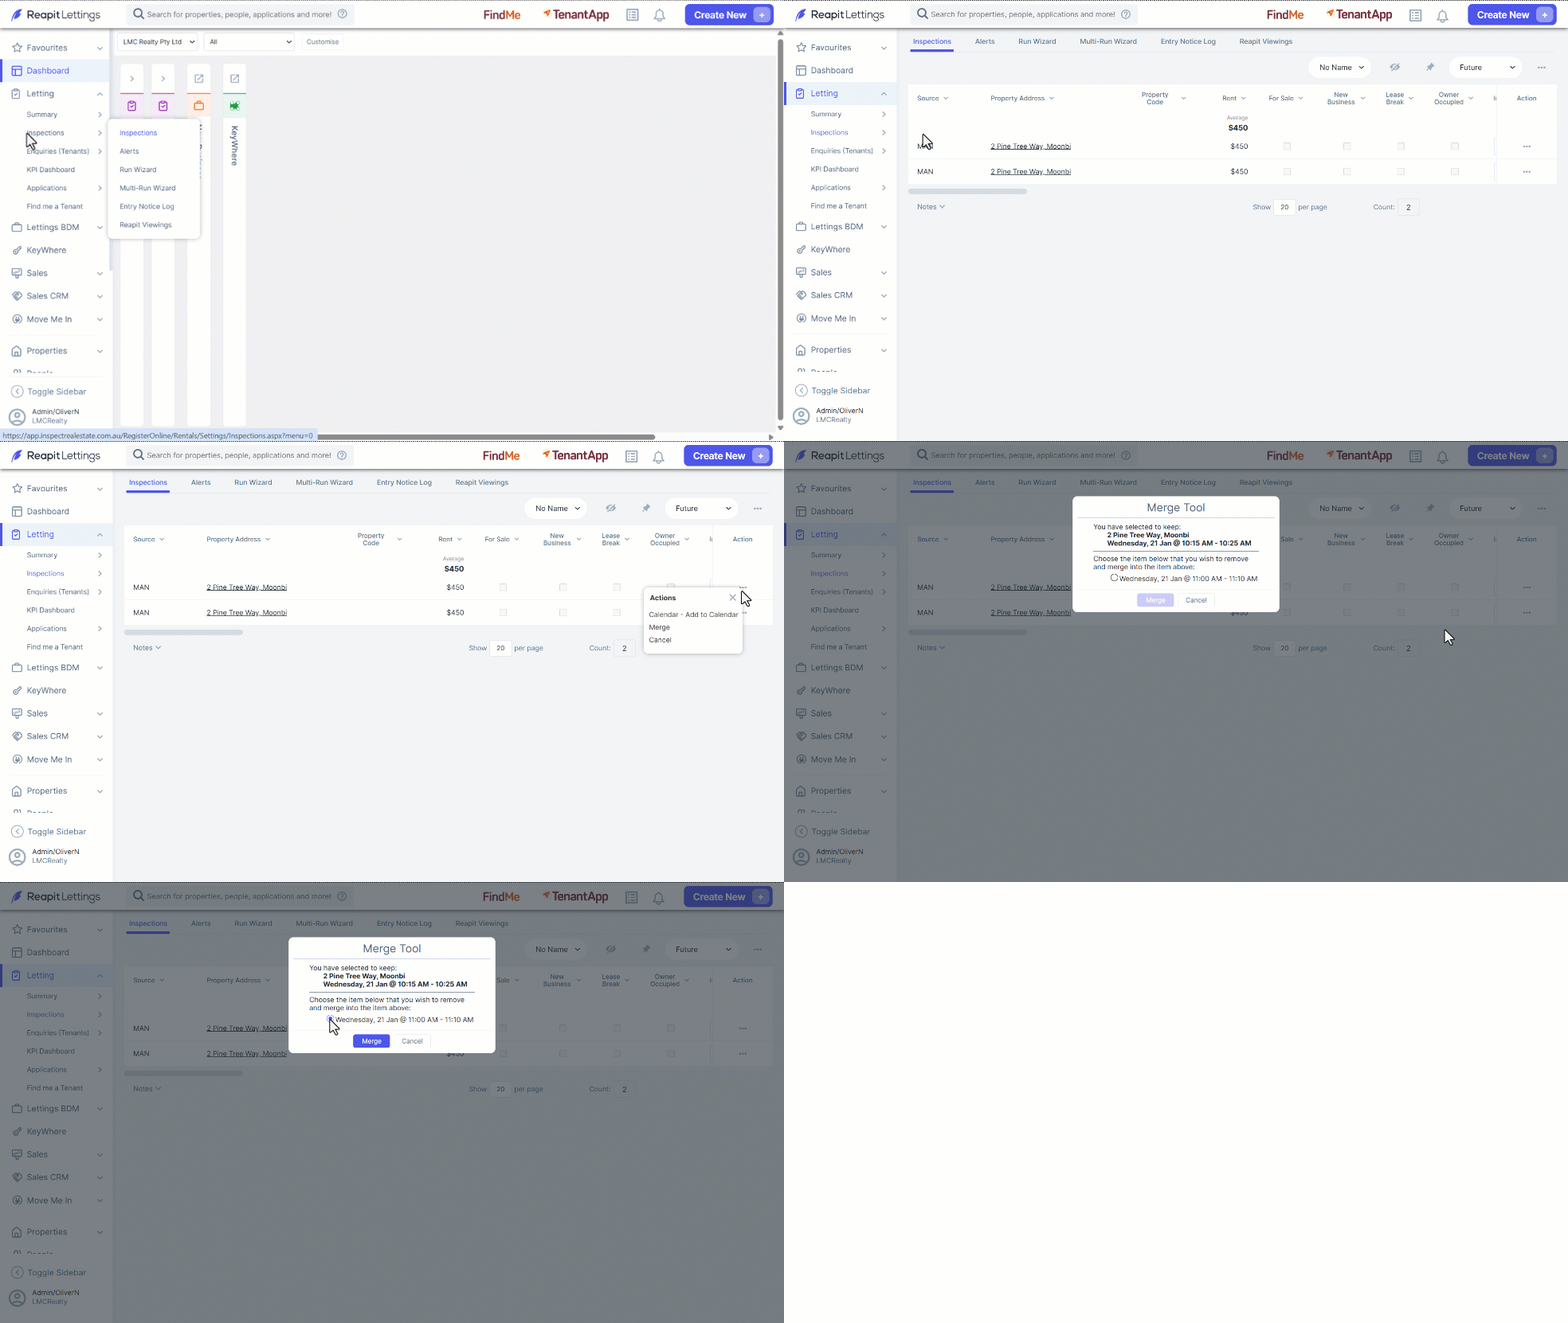
How to Merge Two Inspections Together
Note: Merging inspections can only be actioned for future inspections, therefore it’s important to confirm the dropdown selector displays Future.
- Click on Letting.
- Click on Inspections.
- Click on Inspections.
- Navigate to the Inspection to be retained and click on the 3 Dots.
- Select Merge.
- Select the Inspection to merge.
- Click on Merge.
- Click on OK to confirm.