'%20d='M0%208a8%208%200%200%201%208-8h24a8%208%200%200%201%208%208v24a8%208%200%200%201-8%208H8a8%208%200%200%201-8-8V8Z'/%3e%3cpath%20fill='%23fff'%20d='M32.576%206C12.293%206%208.776%2025.887%207.424%2034H9.1c.45-2.977%203.493-14.748%2010.899-20.287%200%200-5.633%206.976-6.572%2015.051%203.426-.652%2013.845-3.372%2016.056-12.927l-3.84-.61c1.352-1.351%204.909-5.17%206.931-9.226V6Z'/%3e%3cdefs%3e%3clinearGradient%20id='reapit-lettings__a'%20x1='20.702'%20x2='20.702'%20y1='.351'%20y2='31.228'%20gradientUnits='userSpaceOnUse'%3e%3cstop%20stop-color='%235573FD'/%3e%3cstop%20offset='.575'%20stop-color='%234E56EA'/%3e%3c/linearGradient%3e%3c/defs%3e%3c/svg%3e)
Airtable Integration - BDM Leads
In this guide we will go through how to ensure your Airtable account is setup correctly to receive the API feed of Reapit Lettings - BDM (Rental Leads) data. The process in this article include: Enabling Send BDM Lead Data to Airtable. Data Setup How to create a Personal Access Token
In this guide we will go through how to ensure your Airtable account is setup correctly to receive the API feed of Reapit Lettings - BDM (Rental Leads) data.
The process in this article include:
- Enabling Send BDM Lead Data to Airtable.
- Data Setup
- How to create a Personal Access Token
For assistance with Airtable integrations, please visit https://support.airtable.com/
Enabling Send BDM Lead Data to Airtable.
NOTE: Director user level is required to enable the ‘Send Application Data to Airtable’ setting.
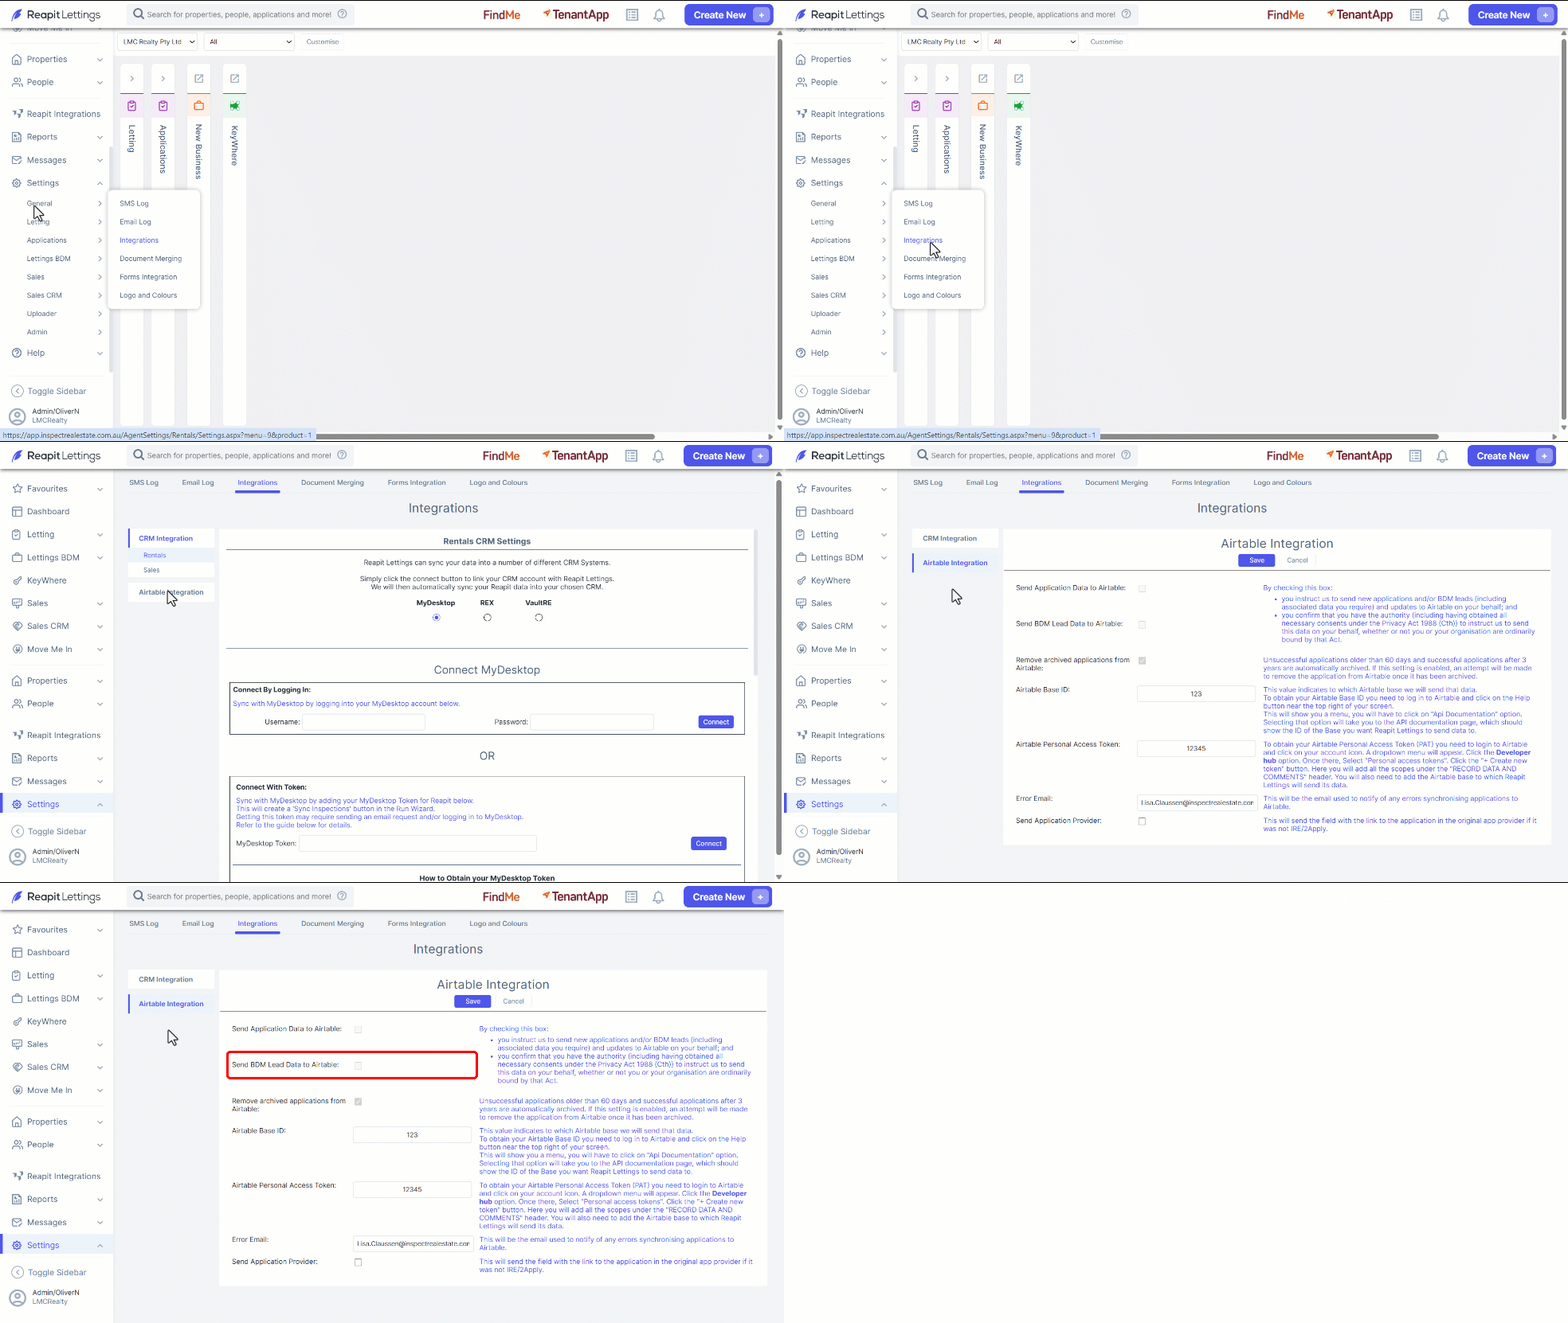
- Click on Settings.
- Click on General.
- Click on Integrations.
- Select the Airtable Integration tab.
- Enter your Airtable Base ID and Airtable Personal Access Token.
- Enter the Error email for alerts regarding any errors synchronising applications to Airtable.
- Enable the setting Send BDM Lead Data to Airtable.
- Click on Save.
Data Setup
What to name, the table, columns, and what field type to use:
Here we will provide details on what you will need to name your table, the columns, and what field type needs to be selected for the column to ensure the data from Lettings synchronizes to your Airtable base and displays correctly.
Table Name: Pipeline
For Pipeline:
NOTE: That the name of the column is case sensitive, and the name will need to match what's in this table.
| What it is for | What to name it | What Kind of Field |
| Property for the Rental Lead | Address | Single Line Text |
| BDM assigned to the Rental Lead | Staff Member | Single Select |
| PM assigned in Additional Details > Management Information > Property Manager | Property Manager Assigned | Single Select |
| Status of the Rental Lead | Lead Status | Single Select |
| Status selected in in Additional Details > Property Status | Property Status | Single Select |
| Date added in in Additional Details > Appraisal Information > Appraisal Date | Appraisal Date | Date Field |
| Feedback Status on a booked appraisal | Appraisal Letter | Single Select |
| If a booked appraisal has been followed up | Appraisal Follow Up Sent | Checkbox Field |
| Range added in Additional Details > Appraisal Information > Appraisal Range | Appraisal Price Range | Single Line Text |
| Date added in Management Details > Lease > Lease Start/Gained | Expected Gained Month | Single Select |
| Primary Owner Contact Full Name | Primary Owner Name | Single Line Text |
| Primary Owner Contact Mobile | Primary Owner Mobile | Single Line Text |
| Primary Owner Contact Email | Primary Owner Email | Email Field |
| Primary Owner Contact Residential Address if “Same As Above” has been selected or Postal Address | Landlord Postal Address | Single Line Text |
| 2nd Owner Contact Full Name | Secondary Owner Name | Single Line Text |
| 2nd Owner Contact Mobile | Secondary Owner Mobile | Single Line Text |
| 2nd Owner Contact Email | Secondary Owner Email | Email Field |
| Lead Details > General Notes | Notes/Inclusions/Exclusions | Long Text Field |
| If the Primary Owner Contact Type is selected as “Company” and there is a Company Name | Company Name for Management Agreement (if applicable) | Single Line Text |
| Rent added in Financial Details > Current Rent | Price to Advertise/Current Rental | Currency Field |
| In Financial Details > Management Fee > Offered (Sub Total) | Management Fee (Excluding GST) | Currency Field |
| The Property Type selected in Details > Property Type | Property Type | Single Select |
| If “Body Corporate” is selected in Details > Property Category and there is a “Body Corporate Number” | Body Corporate Details | Long Text Field |
| New Follow Up date on the Rental Lead | Next Follow Up Date | Date Field |
| Status in Management Details > Insurance > Status | Insurance BDM | Single Select |
| Last Contacted Date | Last Contact | Date Field |
How to create a Personal Access Token
NOTE: You will need to be an Owner/Creator of the base to complete the below steps.
Within Airtable, click on your account in the top right-hand corner of the screen. And then click the "<> Developer hub" option.

Once in Personal Access Tokens page, click on the blue Create token.

This will open configuration options for the PAT that you are creating.
Add a Name to the PAT, then select the following Scopes that are required to allow Lettings to update your base.

Lastly you will need to select your Lettings Application in Access by clicking on the + Add a base and then on the blue Create token.
