'%20d='M0%208a8%208%200%200%201%208-8h24a8%208%200%200%201%208%208v24a8%208%200%200%201-8%208H8a8%208%200%200%201-8-8V8Z'/%3e%3cpath%20fill='%23fff'%20d='M8.375%2013v14L20.5%2034l12.124-7v-7.737l-1.687-.975-2.806-1.62-1.082-.624v4.83l-.002%204.83H13.95V16.07l3.275-1.89%202.192-1.265%201.082-.625%203.275%201.877%202.192%201.256%201.083.62V9.782L20.5%206%208.376%2013Z'/%3e%3cdefs%3e%3clinearGradient%20id='reapit-pm__a'%20x1='20.702'%20x2='20.702'%20y1='.351'%20y2='31.228'%20gradientUnits='userSpaceOnUse'%3e%3cstop%20stop-color='%235573FD'/%3e%3cstop%20offset='.575'%20stop-color='%234E56EA'/%3e%3c/linearGradient%3e%3c/defs%3e%3c/svg%3e)
Compliance Management
This article is a guide on how to manage compliance activities in Reapit PM. This article includes the following processes: How to Add a New Compliance Item How to Manage a Compliance Item How to Send a Compliance Item Message How to Add a Compliance Item Note How to Update Details How to Bulk Update Details How to Finalise a Compliance Item How to Setup Compliance Workflow Automation How to use the Compliance Dashboard
Compliance Management
This article is a guide on how to manage compliance in Reapit PM.
Reapit PM's Compliance feature, maintaining a property's safety can be done through a simple emailing function that automatically advises creditors, owners, or body corporate managers.
This way, you won't ever have to miss another compliance check or put your tenants in unsafe environments again.
All of these communications are tracked in the Compliance Workflow and consequential events are listed in the property timeline. Any compliance items due to expire within 30 days, or have already expired, and their relevant actions are clearly listed in the timeline.
This article includes the following processes:
- How to Add a New Compliance Item
- How to Manage a Compliance Item
- How to Send a Compliance Item Message
- How to Add a Compliance Item Note
- How to Update Details
- How to Bulk Update Details
- How to Finalise a Compliance Item
- How to Setup Compliance Workflow Automation
- How to use the Compliance Dashboard
How to Add a New Compliance Item
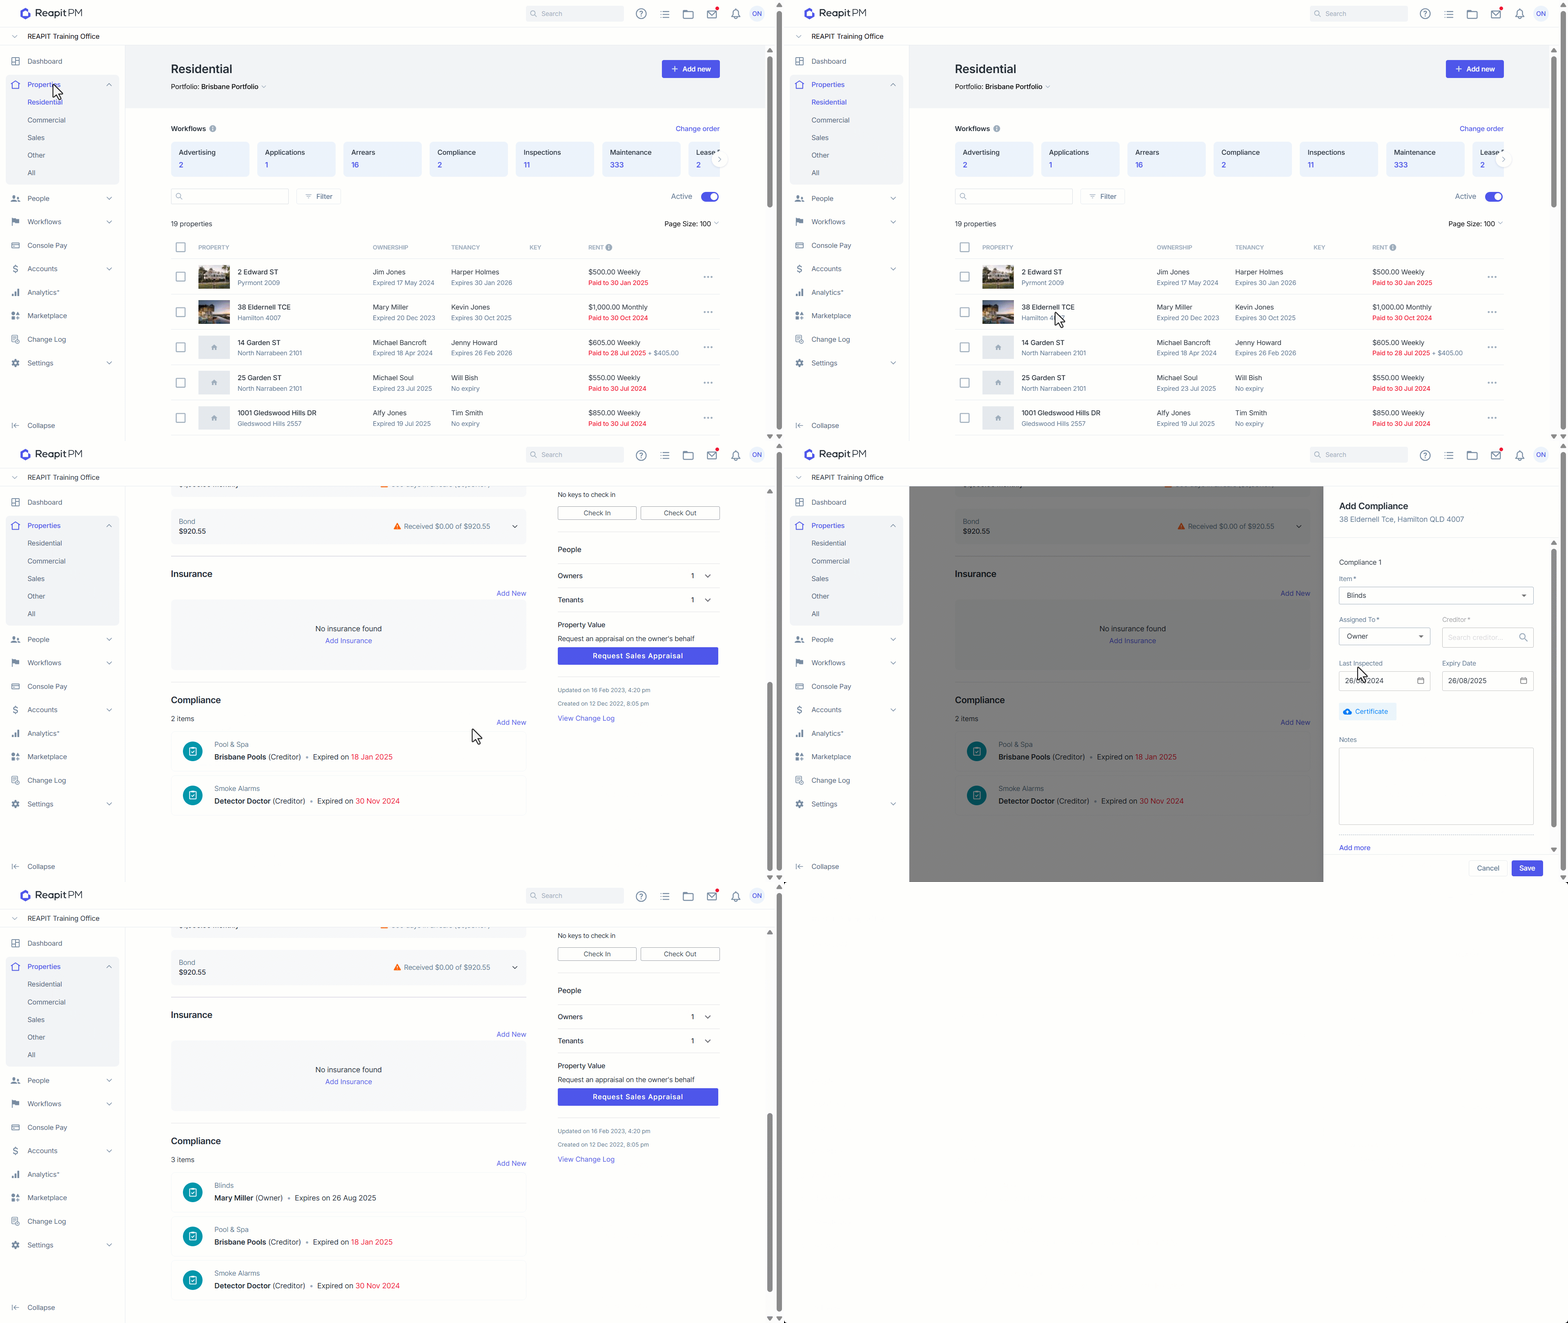
- Click on Properties.
- Click on Residential.
- Search, Filter or Scroll to locate the required property. Click on the Property line
- Navigate to the Compliance section. Click on Add New.
- Select the Item form the dropdown and complete required fields. Mandatory fields are identified by *.
- Click on Save.
How to Manage a Compliance Item
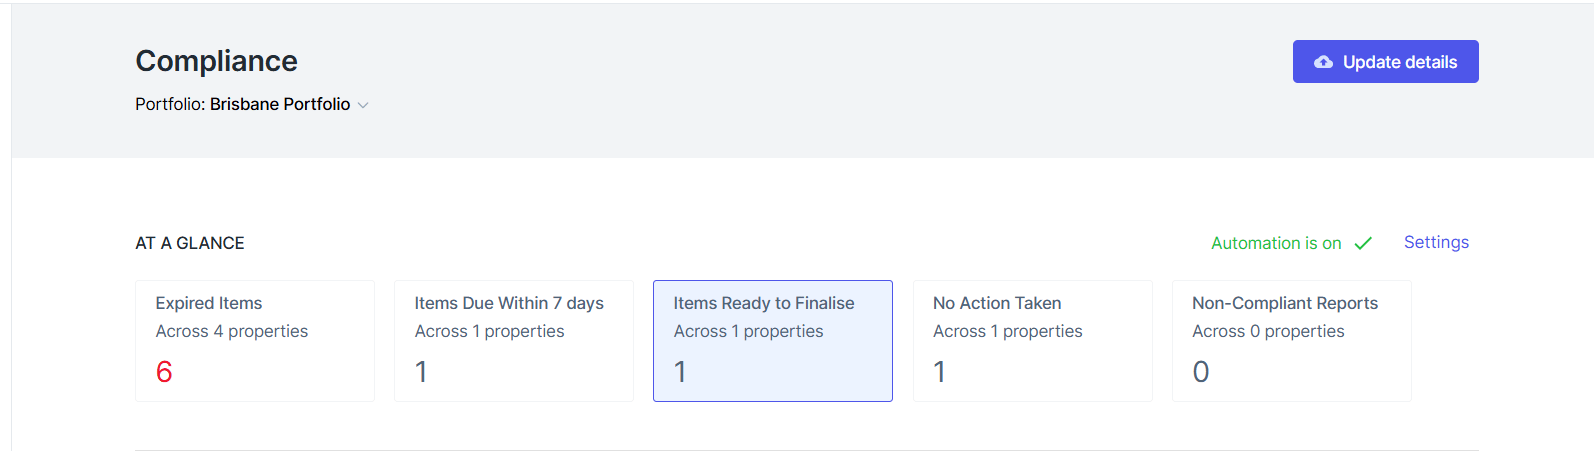
Once you access the Compliance workflow, you will see the compliance workflow's "At a Glance" panel, which provides you with the number of compliance actions within each of the following categories:
- Items that have expired.
- Items that are expiring within the next 7 days.
- Items that are ready to finalise.
- Items that haven't had any action taken yet.
Clicking on any of these tabs will filter the list (known as the Insights Panel) to only display properties that contain compliance items within the category you selected. To remove the filter, Select the tab again
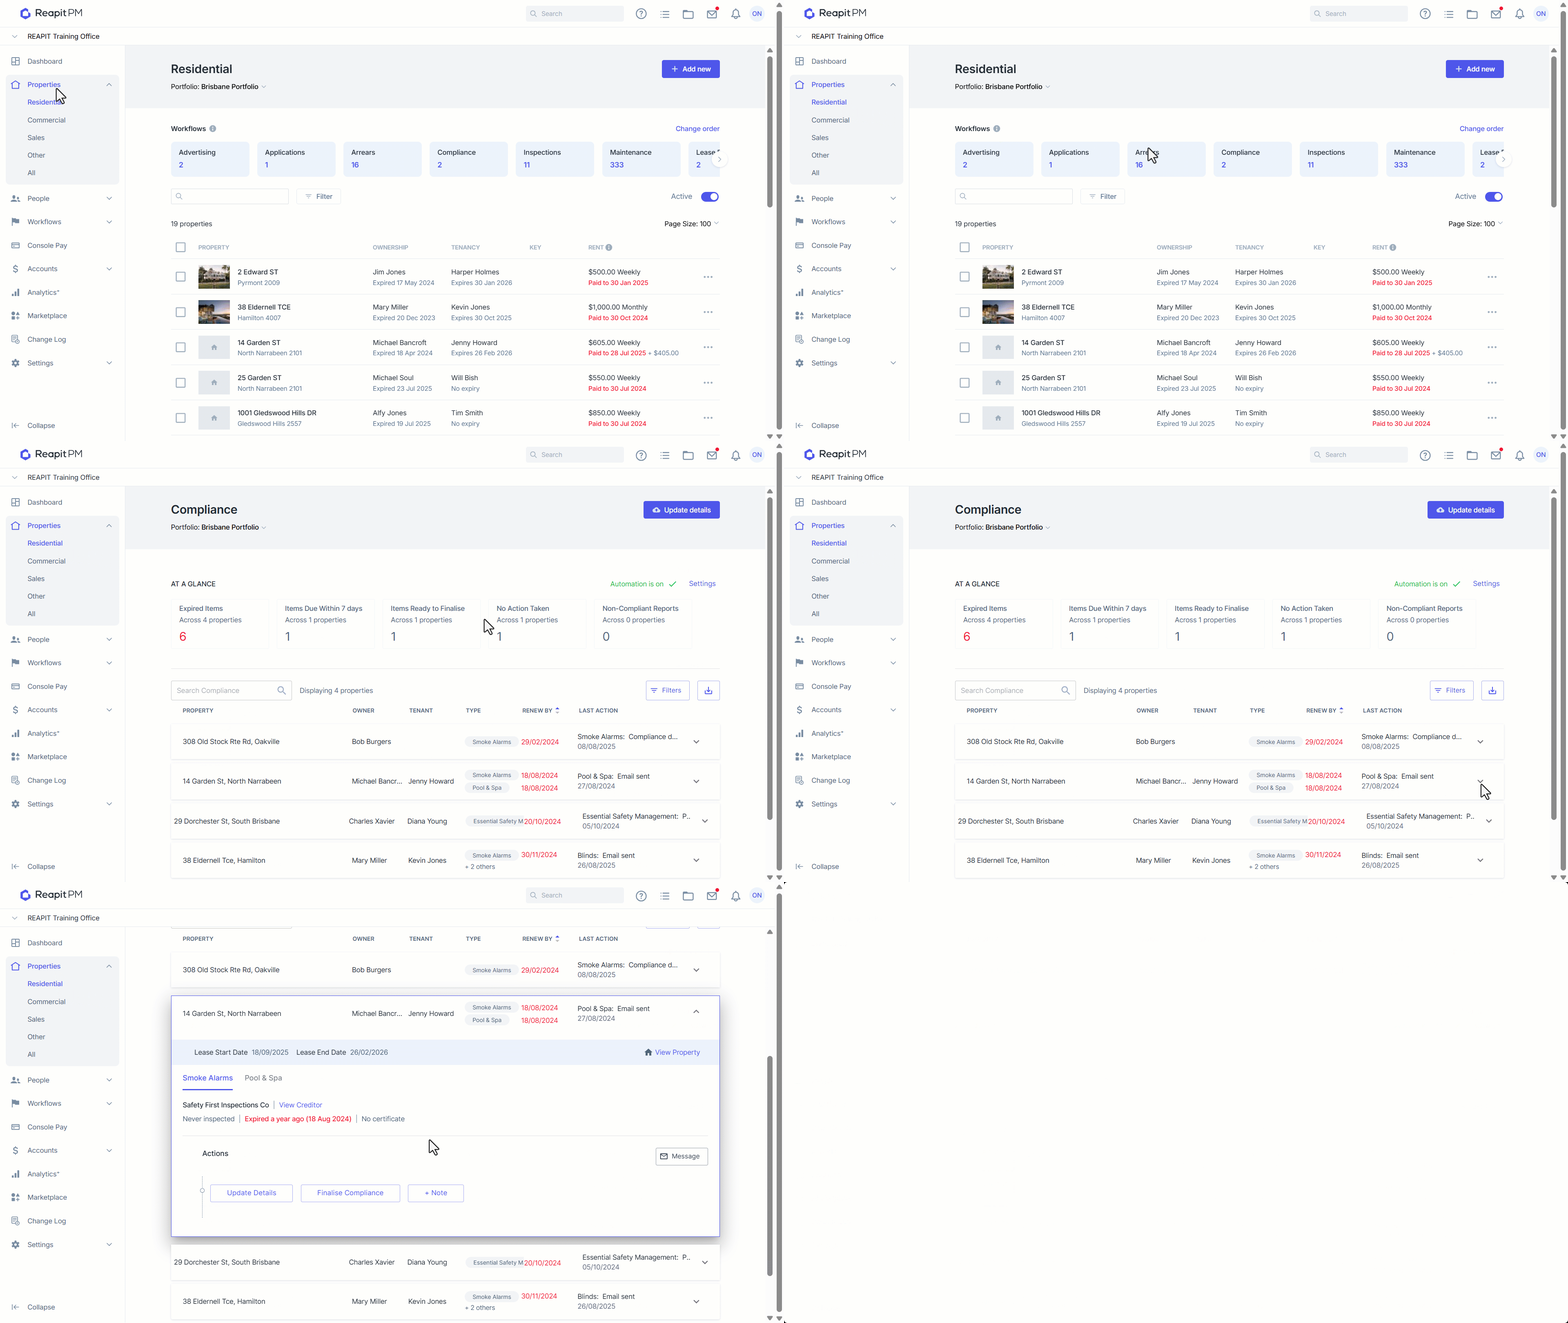
- Click on Properties
- Click on Residential or Commercial.
- Click on the Compliance workflow.
- Select the arrow located to the right of the listing. This will open up a drop-down within the Insights Panel showing the set of compliance items that are currently associated with the property.
- Select the compliance item you are wanting to progress.
How to Send a Compliance Item Message
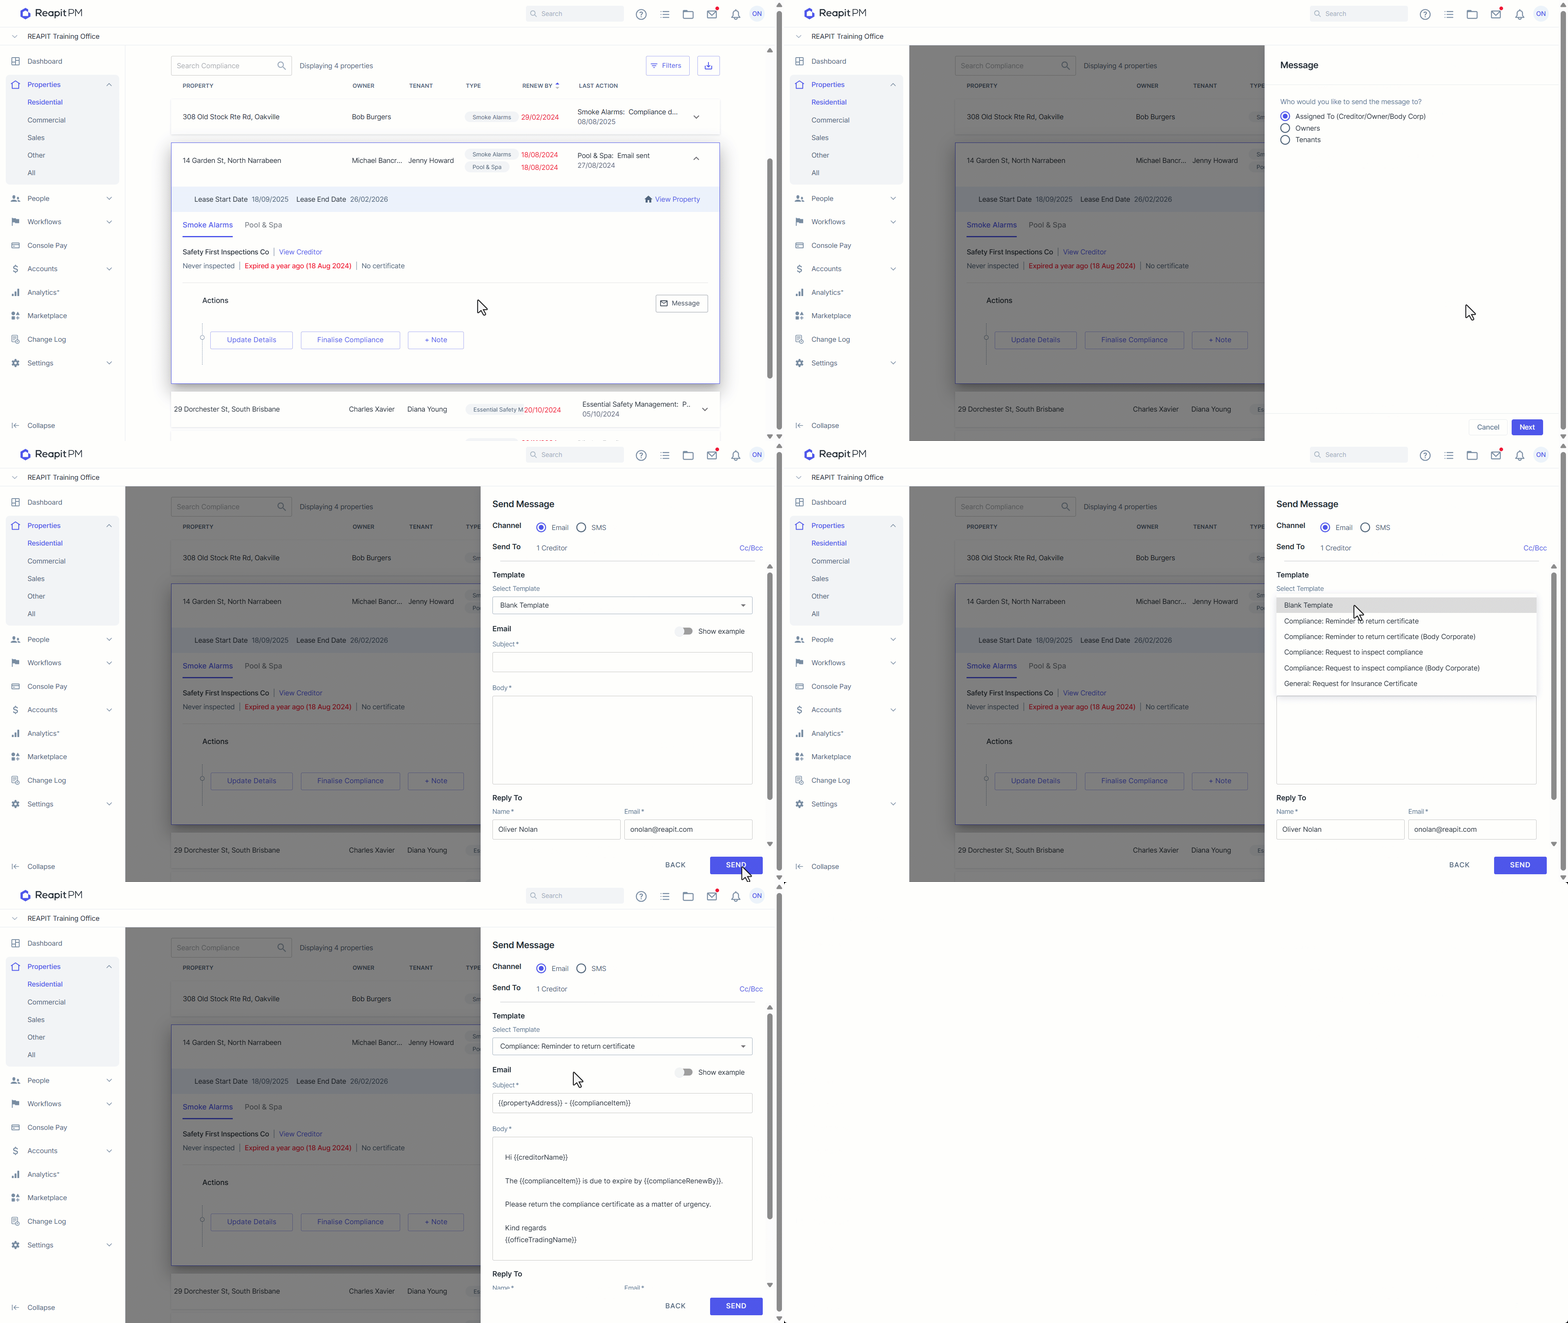
Reapit PM's Compliance feature enables you to send messages to the assigned party (Creditor/Owner/Body Corp), Owner or Tenant, depending on who has been associated with the property. Messages can be sent via SMS or Email using a range of templated or self composed messages. If sending an email, the "Reply To" name and email address can be adjusted.
After selecting the compliance item that your message is about:
- Click on M****essage.
- Select the relevant recipient, Click on Next.
- Select your preferred channel for messaging, Email or SMS.
- Select a template or compose a message.
- Attach documents (if applicable).
- Click on Send.
How to Add Compliance Item Note
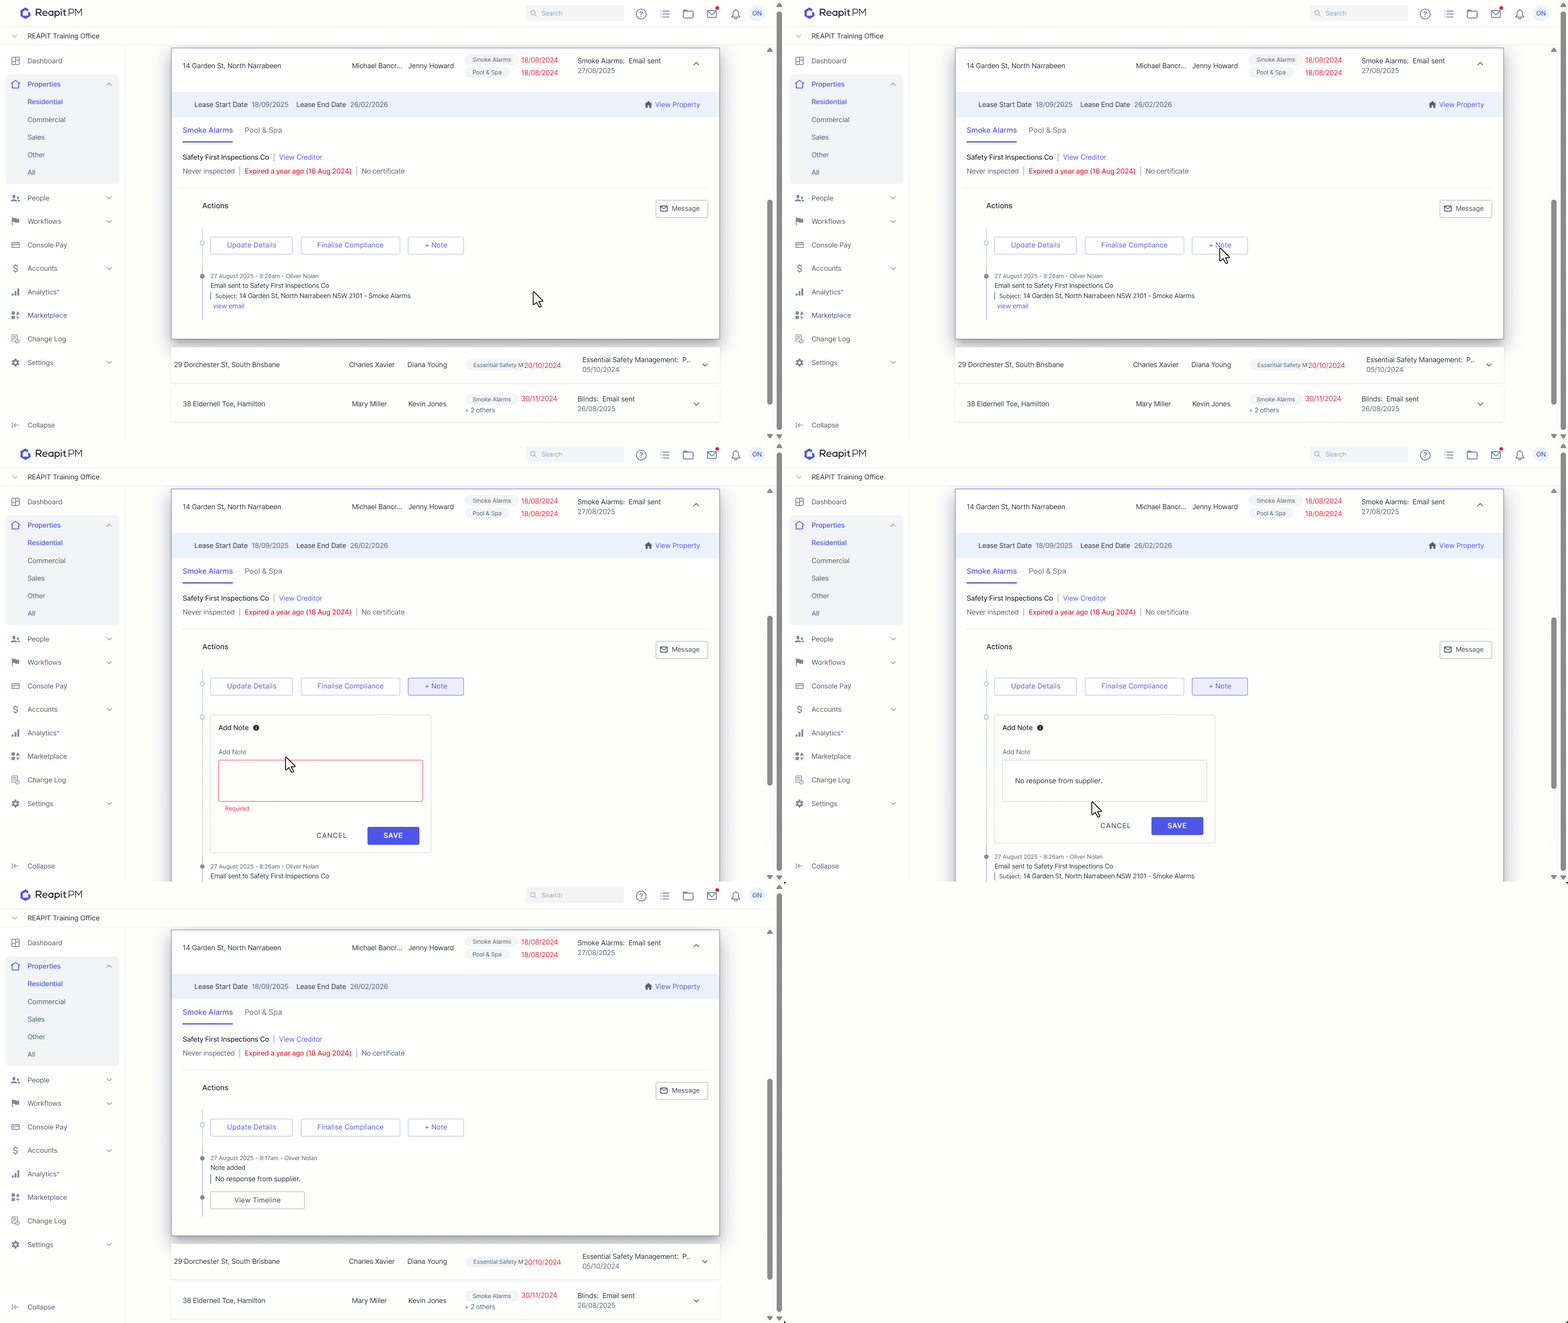
After selecting the compliance item that you wish to make a note on:
- Click on N****ote.
- Type your note into the Add Note field.
- Click on Save.
How to Update Details
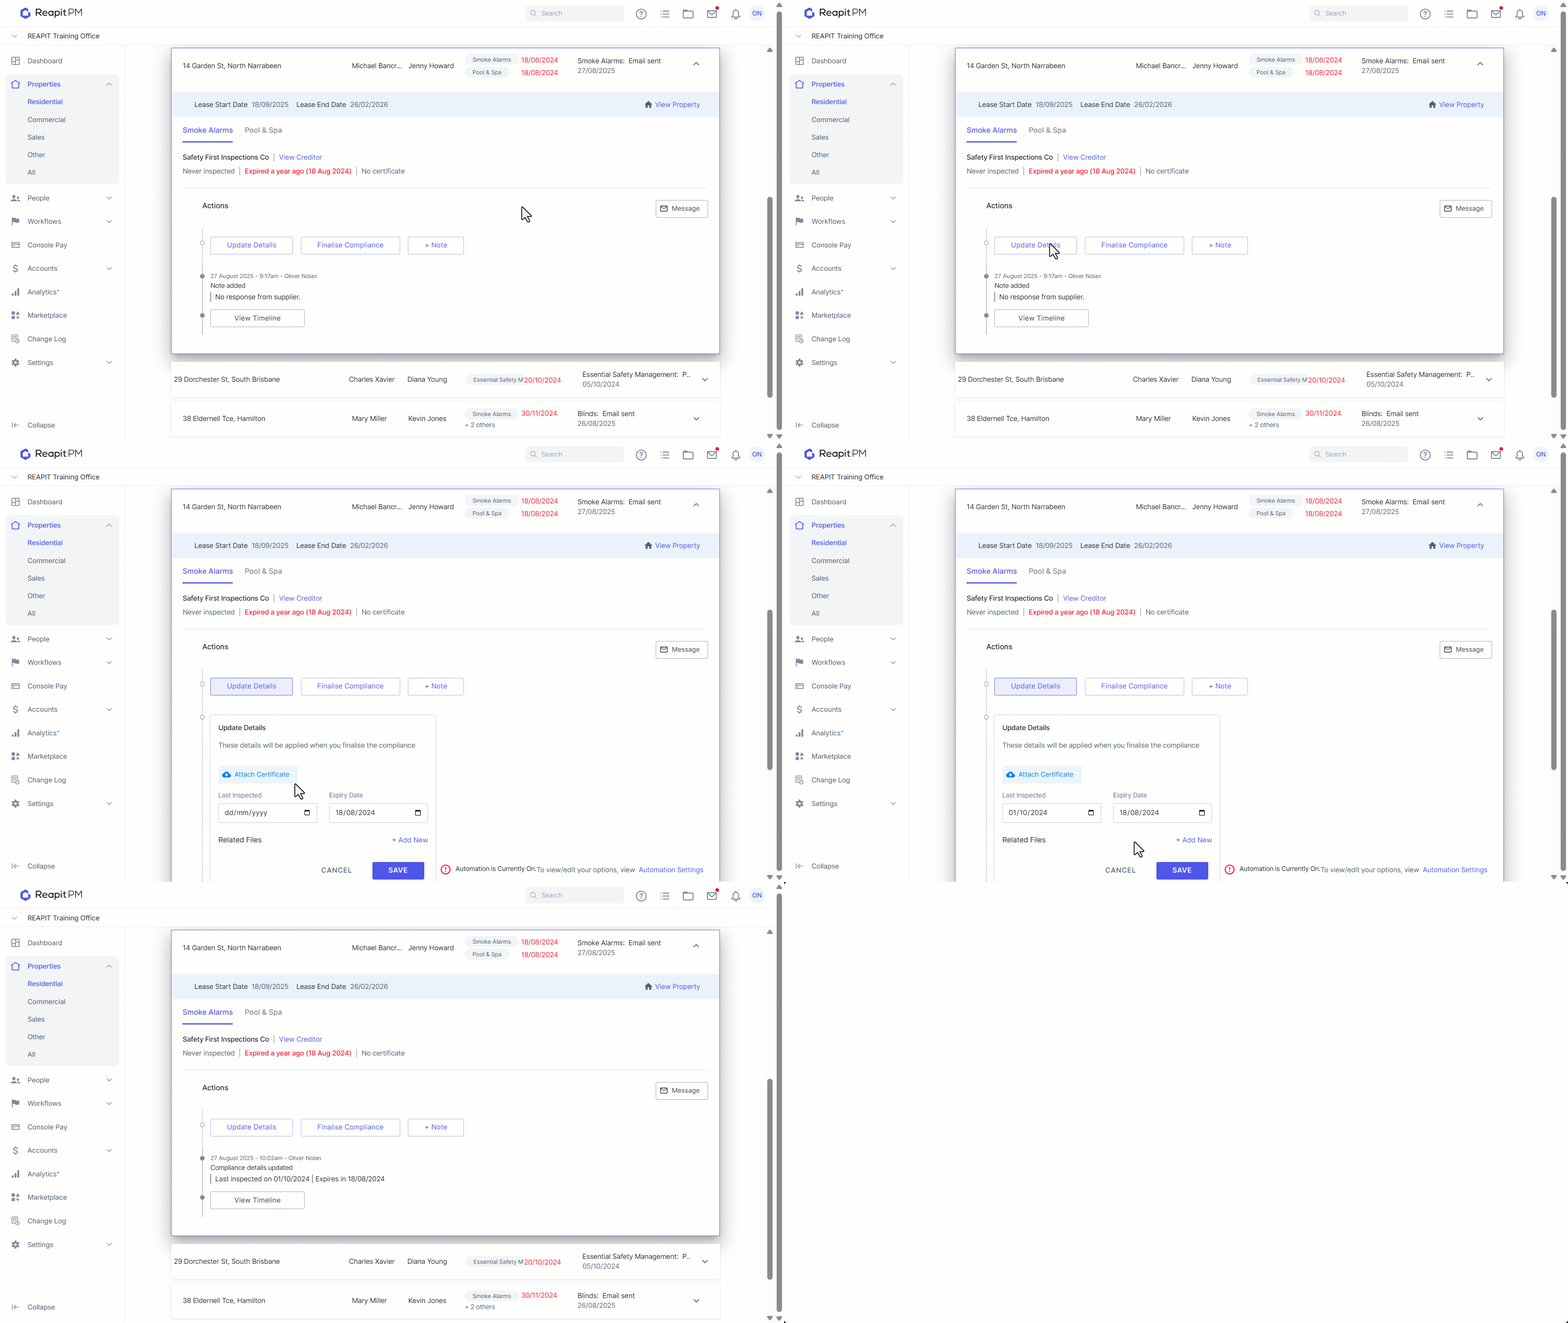
In the drop-down property listing, you can easily update the compliance details. You have the ability to:
- Upload a new certificate or confirmation of compliance.
- Update the last inspected and expiry date.
- Upload a certificate of non-compliance, photos, or other compliance-related documents (if applicable).
Certificates, Confirmations and Dates
After selecting the compliance item:
- Click on Update Details.
- Update the inspection / expiry date or attach certificate as required.
- Click on Save.
Note: Every update or action taken for a compliance listing will be recorded and can be viewed within the timeline.
How to Upload Files
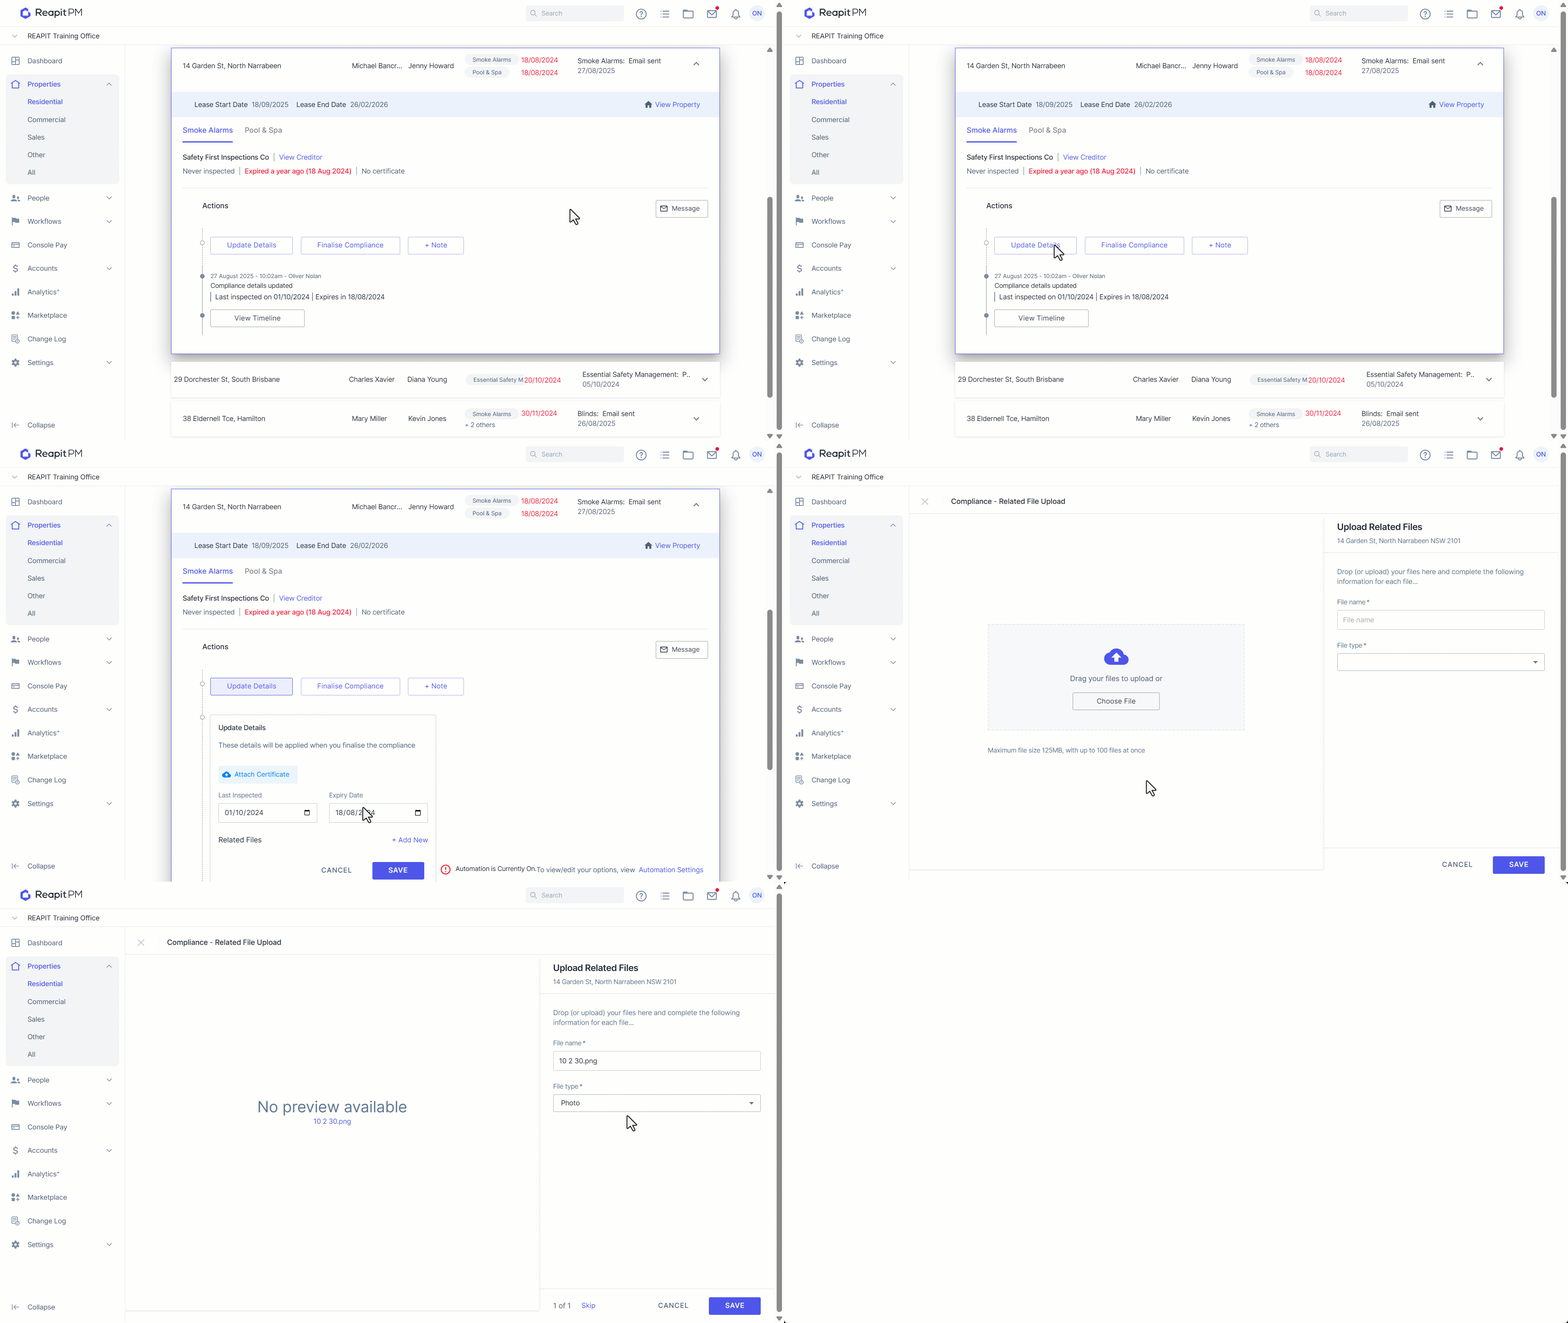
After selecting the compliance item:
- Click on Update Details.
- Click on Add New.
- Either drag and drop or click Choose File.
- Review and update the file name as required
- Set the file type. Compatible files include: Non-compliance report, Photos, Other
- Click on Save.
How to Bulk Update Details
Reapit PM has a bulk update feature that enables you to more efficiently update the compliance item details for a number of properties.
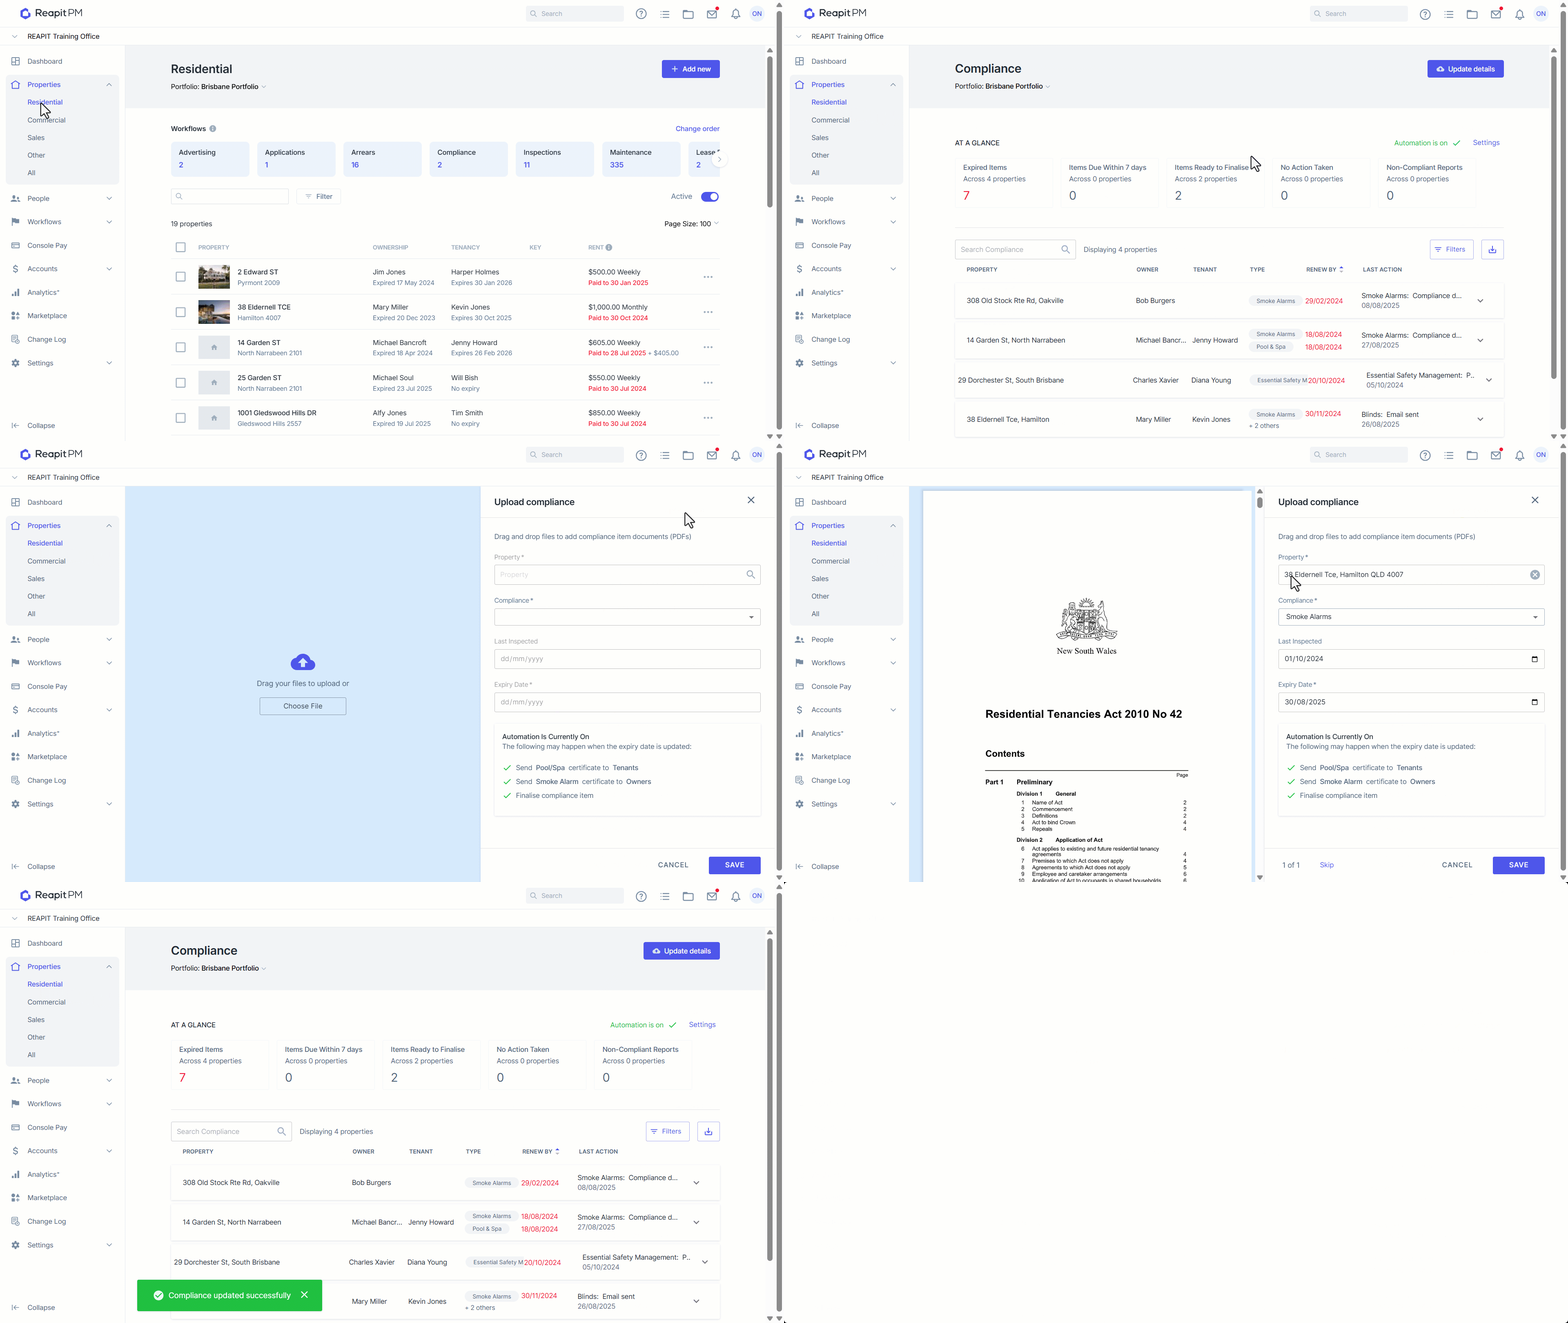
To navigate the Bulk Update screen, the Save and Next button will appear if you upload more than one file. It will take you to the next file so that you can update the details for the related property. The Save button will only appear if this is the last file that you're updating details for. If you have automatic finalisation of compliance items turned on and you enter an updated expiry date, clicking Save and Next or Save will automatically finalise the compliance item.
- Click on Properties.
- Select the Property Type.
- Click on the Compliance workflow.
- Click on Update Details.
- Drag and drop the files you want to upload, or upload files.
- Search and select the property for the file currently displayed in view.
- Select the Compliance item drop down. All existing compliance items associated with the property that have not yet been finalised will appear in the drop down list.
- Update the Last Inspected date, update the Expiry Date and then click on Save.
How to Finalise a Compliance Item
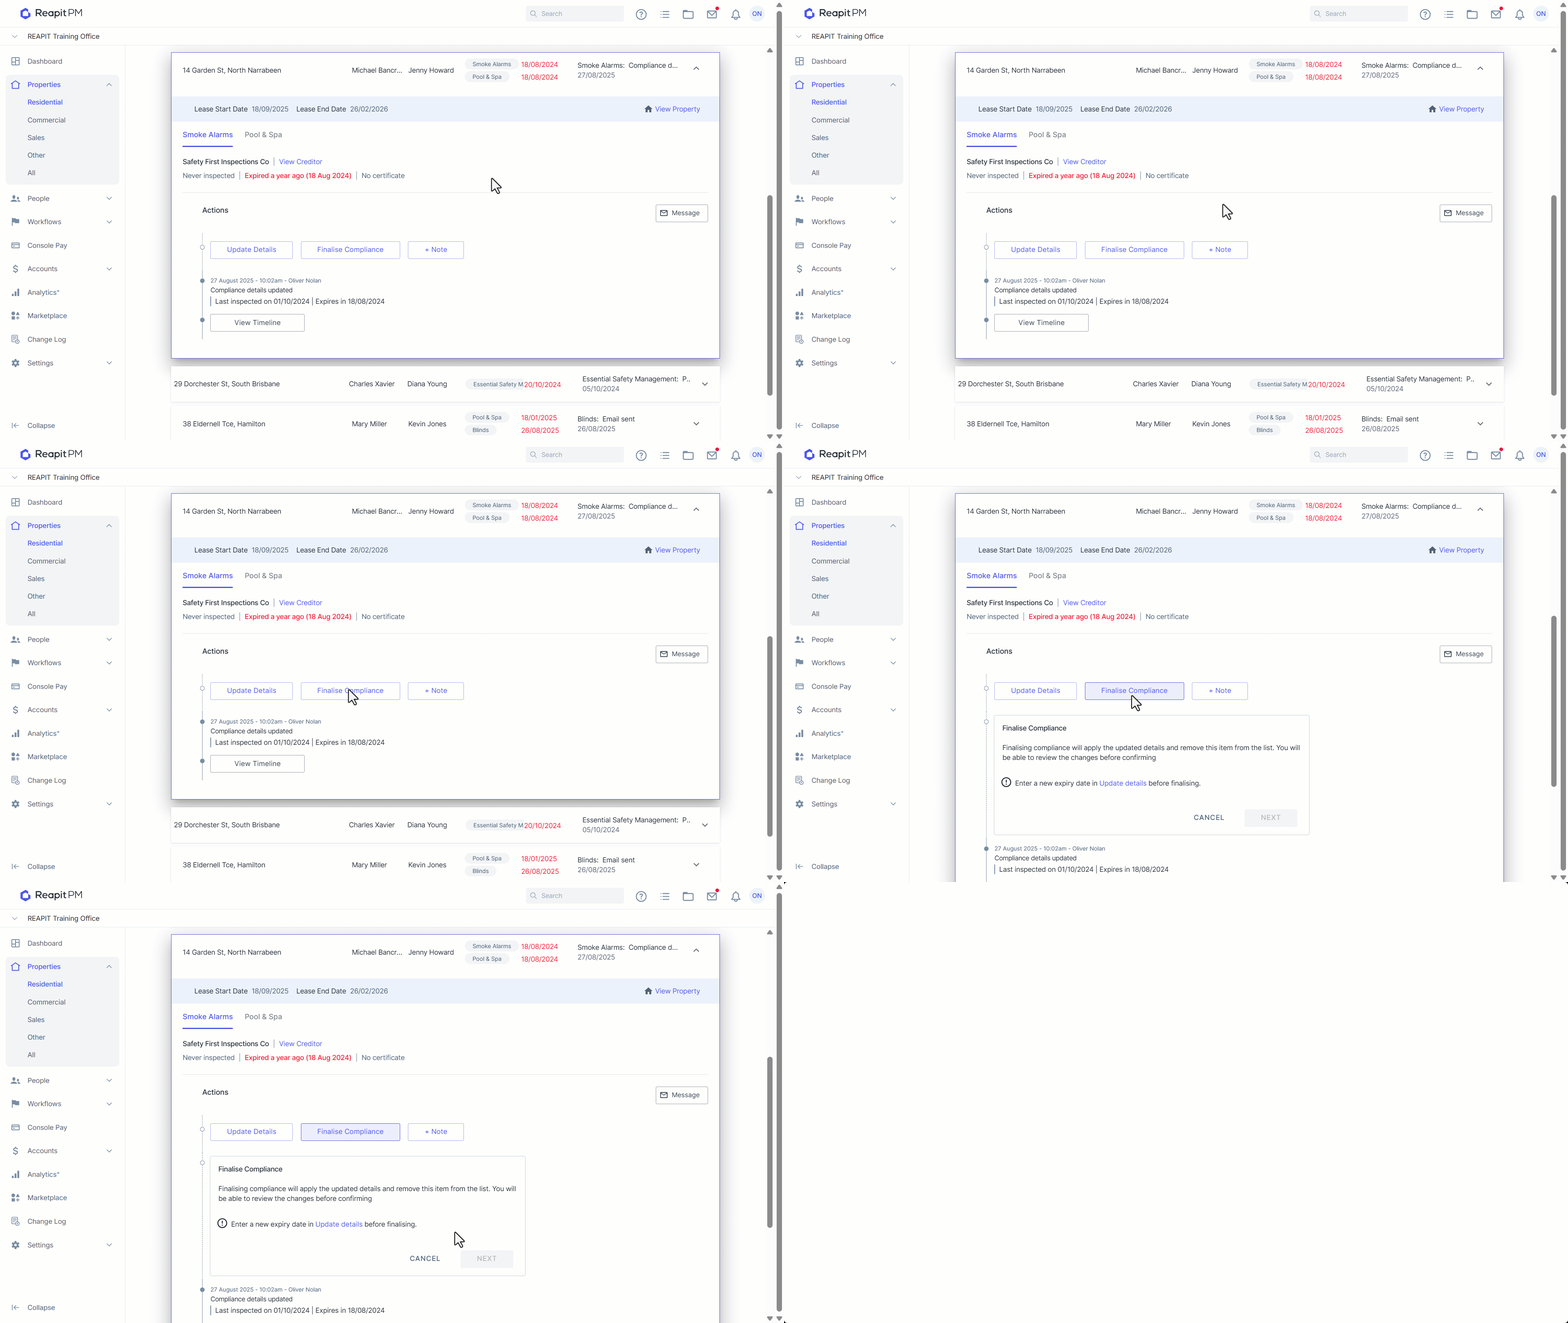
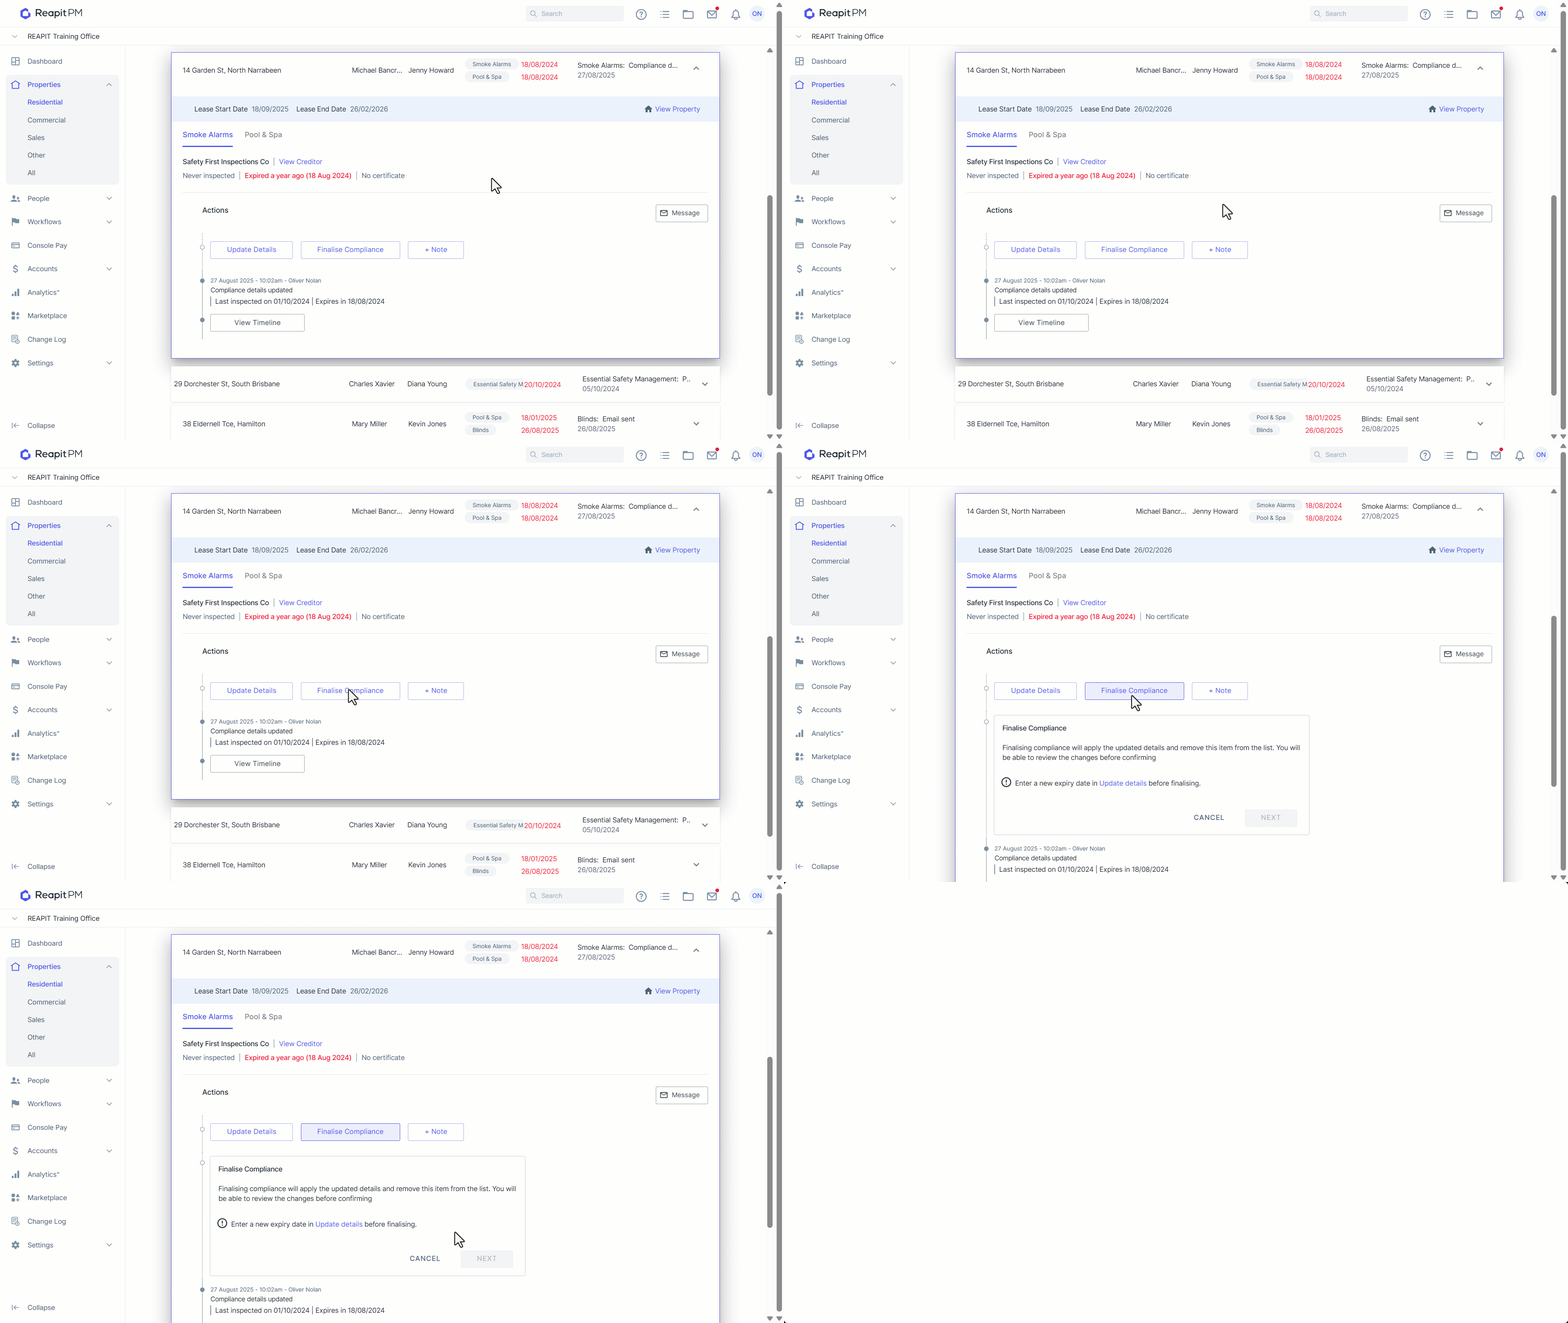
Before you can finalise a compliance item in Reapit PM you are required to update the details of the compliance item first.
Once this information has been inputted, you can then finalise the compliance action by following these steps:
- Select the compliance item
- Click on Finalise Compliance.
- Click on Next to confirm and finalise the item or click on Cancel if the new details are incorrect and need to be updated.
How to Setup a Compliance Workflow Automation
Automation settings allow Reapit PM to automatically do the following tasks on your behalf:
- Automatically enter a compliance item into the compliance workflow as soon as the date it's due to expire is within the next 30 days (Default Setting).
- Automatically send an initial email request to the assigned person (owner, creditor or body corporate), at a defined date and time prior to the current expiry date. (Days before expiry and the Send emails after Settings)
- Automatically send a reminder email to the assigned person, at a defined time and number of days after the initial email request was sent. (Days after renewal request and the Send emails after Settings)
- Automatically send certificates once you have updated the expiry date.
- Automatically finalise the compliance item once you have updated the expiry date.
When you Select Save emails might be sent immediately, depending on the current date of expiry of each of the compliance items and the settings that you have applied.
You can automate the items specified above by doing the following:
- Click on Properties
- Click on the Property Type.
- Click on the Compliance workflow.
- Click on Settings.
- Set the number of Days before expiry and the Send emails after.
- Set the Days after renewal request and the Send emails after.
- Set automatic sending of compliance certificates to on or off as required.
- Set automatic finalisation of compliance items to on or off as required.
- Click on Save.
How to use the Compliance Dashboard
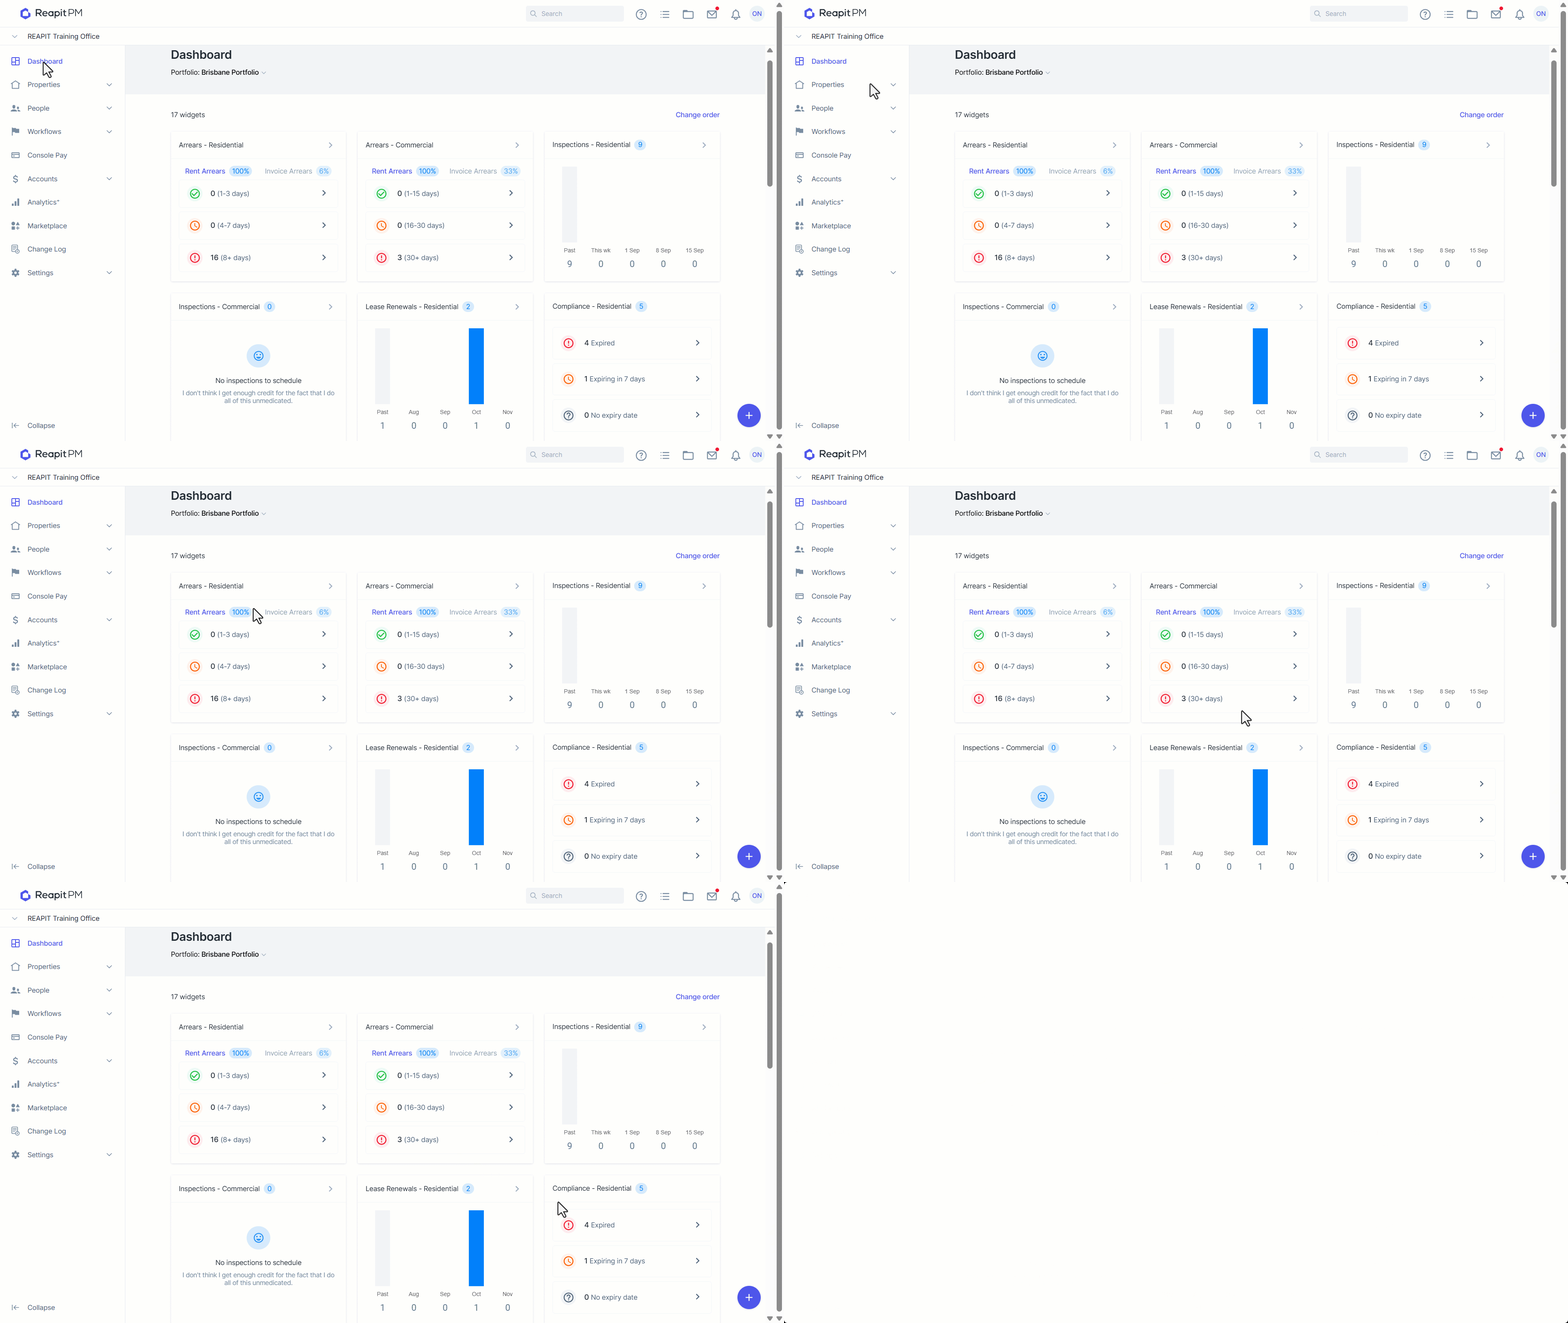
The compliance dashboard provides you with a brief overview of:
- Items that have expired.
- Items that are expiring within the next 7 days.
- Items that don't have an expiry date.
- Click on Dashboard.
- Click on the tabs to view the compliance workflow with the respective filter applied.