'%20d='M0%208a8%208%200%200%201%208-8h24a8%208%200%200%201%208%208v24a8%208%200%200%201-8%208H8a8%208%200%200%201-8-8V8Z'/%3e%3cpath%20fill='%23fff'%20d='M8.375%2013v14L20.5%2034l12.124-7v-7.737l-1.687-.975-2.806-1.62-1.082-.624v4.83l-.002%204.83H13.95V16.07l3.275-1.89%202.192-1.265%201.082-.625%203.275%201.877%202.192%201.256%201.083.62V9.782L20.5%206%208.376%2013Z'/%3e%3cdefs%3e%3clinearGradient%20id='reapit-pm__a'%20x1='20.702'%20x2='20.702'%20y1='.351'%20y2='31.228'%20gradientUnits='userSpaceOnUse'%3e%3cstop%20stop-color='%235573FD'/%3e%3cstop%20offset='.575'%20stop-color='%234E56EA'/%3e%3c/linearGradient%3e%3c/defs%3e%3c/svg%3e)
Property Inspection Manager (PIM) Integration
This article is a guide on how to use the Property Inspection Manager (PIM) Integration with Reapit PM. The processes in this article include: How to Activate the Property Inspection Manager Integration Scheduling Inspections Carrying out Inspections Sending Out Inspection Reports Viewing Integration Activity Deactivating the Property Inspection Manager Integration What Data is Shared with Property Inspection Manager
Overview
Property Inspection Manager (PIM) Integration
This article is a guide on how to use the Property Inspection Manager (PIM) Integration with Reapit PM.
The processes in this article include:
- How to Activate the Property Inspection Manager Integration
- Scheduling Inspections
- Carrying out Inspections
- Sending Out Inspection Reports
- Viewing Integration Activity
- Deactivating the Property Inspection Manager Integration
- What Data is Shared with Property Inspection Manager
How to Activate the Property Inspection Manager Integration
****Note: Only office administrators are able to complete this process.
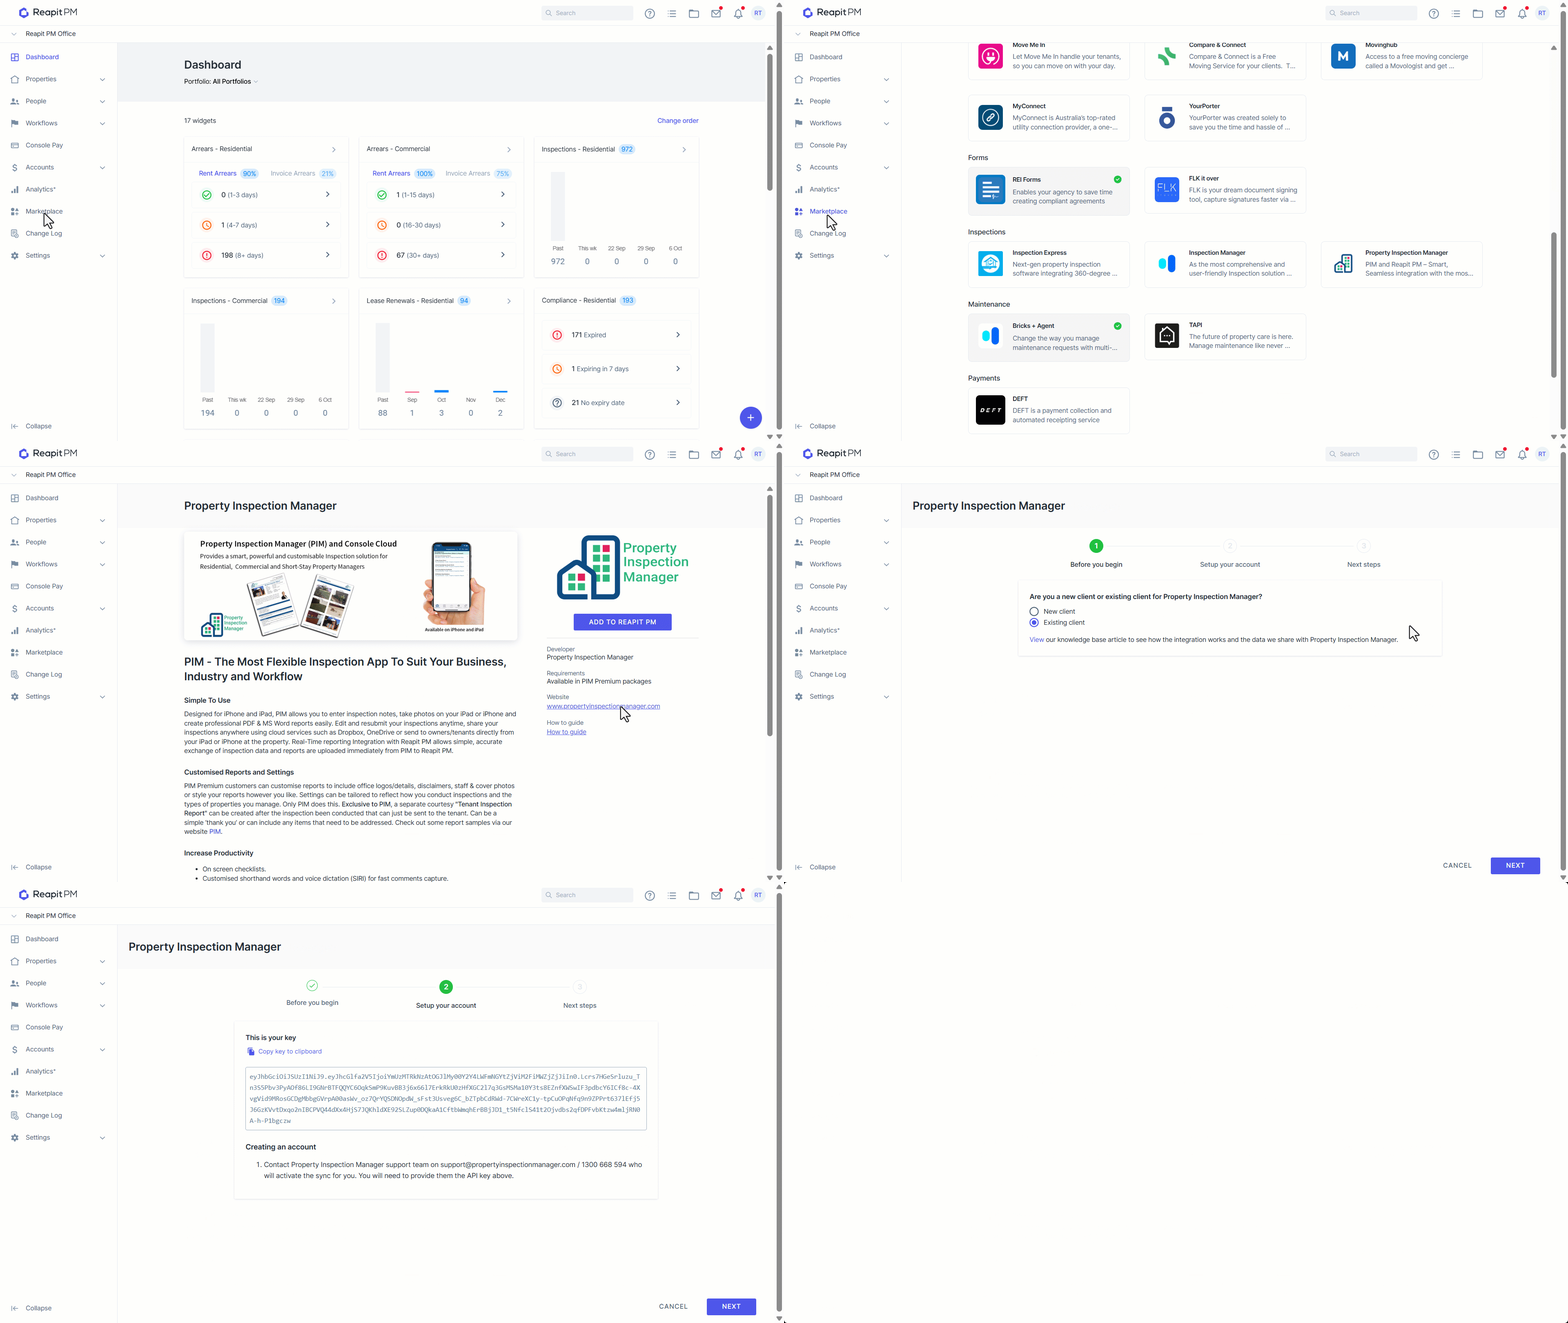
- Click on Marketplace.
- Navigate to Inspections and select Property Inspection Manager.
- Click Add to Reapit PM.
- You will now be guided through the rest of the setup in the activation wizard.
Scheduling Inspections
You should follow the standard Reapit PM process for scheduling, rescheduling and sending entry notices.
All inspections that are upcoming and new will be synced to Property Inspection Manager automatically.
A message will display in the inspection screen within the Reapit PM Inspections workflow when an inspection should be carried out in Property Inspection Manager.
If you want to use the Console Go Inspect App (for inspections) or want to upload an inspection report manually, choose the option to do so.
Note: Inspections created in Property Inspection Manager will not appear in the Console Go Inspect App.
Carrying out Inspection
Inspections that are created by Property Inspection Manager should be completed in the Property Inspection Manager platform. Once the inspection report is finalised it will be synced back to Reapit PM.
Sending Out Inspection Reports
Once the inspection report has synced back to Reapit PM, you can follow the standard PM process for sending and/or downloading the report before closing the inspection.
Viewing Integration Activity
You can see what activity has happened via the integration by viewing the Property Inspection Manager Integration activity log.
- Click on Marketplace.
- Navigate to Inspections and select Property Inspection Manager.
- Click on Activity Log.
- You can now view the activity log and the reports received via the integration.
Deactivating the Property Inspection Manager Integration
Note: Only office administrators are able to complete this process.
- Click on Marketplace.
- Navigate to Inspections and select Property Inspection Manager.
- Click D****eactivate.
- Confirm you want to deactivate. Once deactivated, Reapit PM will no longer sync any information to or from Property Inspection Manager.
What Data is Shared with Property Inspection Manager
We send data from your Reapit PM account to Property Inspection Manager for the intended purpose outlined in this document.
- Console Cloud office ID
- Inspection details
- Property
- Tenant
- Property Management agreement incl owner
- Inspection date time
- Inspector
- Property
- ID
- Display name
- Full address
- Property type
- Property use
- accessDetails
- keyNumber
- legacyReference
- Tenancy Agreement
- tenant agreement id
- leaseName
- legacy reference
- Period
- End date
- Inaugural date
- Start date
- Vacating date
- Rent amount
- property id
- current
- Tenants (see contacts)
- Management Agreement
- maintenance instruction
- management agreement id
- ownership name
- property id
- propertyOwnership
- legacyReference
- owners information (see contacts)
- Console Cloud users information
- User ID
- First name
- Last Name
- Portfolio
- portfolio id
- name
- property ids
- property management id
- legacy reference
- Contact
- Primary contact
- Contact ID
- Type
- Display name
- Title
- First name
- Last Name
- Preferred name
- Salutation
- Date of Birth
- Phone
- Number
- Type
- Primary number
- Number
- Type
- Primary number