'%20d='M0%208a8%208%200%200%201%208-8h24a8%208%200%200%201%208%208v24a8%208%200%200%201-8%208H8a8%208%200%200%201-8-8V8Z'/%3e%3cpath%20fill='%23fff'%20d='M8.375%2013v14L20.5%2034l12.124-7v-7.737l-1.687-.975-2.806-1.62-1.082-.624v4.83l-.002%204.83H13.95V16.07l3.275-1.89%202.192-1.265%201.082-.625%203.275%201.877%202.192%201.256%201.083.62V9.782L20.5%206%208.376%2013Z'/%3e%3cdefs%3e%3clinearGradient%20id='reapit-pm__a'%20x1='20.702'%20x2='20.702'%20y1='.351'%20y2='31.228'%20gradientUnits='userSpaceOnUse'%3e%3cstop%20stop-color='%235573FD'/%3e%3cstop%20offset='.575'%20stop-color='%234E56EA'/%3e%3c/linearGradient%3e%3c/defs%3e%3c/svg%3e)
Tenant Applications Workflow
In this article we will cover how to navigate and use the Applications Workflow.
This article will give you a guide to the Tenant Applications Workflow. It allows you to capture, track and select an applicant all within Reapit PM. The feature helps you to process applications faster, and minimise double handling of applications between staff members in the office.
A property will appear within the Tenant Applications Workflow list if it falls within either of the following categories:
- The property is an existing property and a vacate date has been applied.
- The property has been newly created and no tenant agreement has been added to it yet.
The processes in this article include:
- The Applications Workflow
- Setting Base Rental Information
- Adding Tenant Applications
- Manage Tenant Applications
- Remove Property from the Applications Workflow
The Applications Workflow
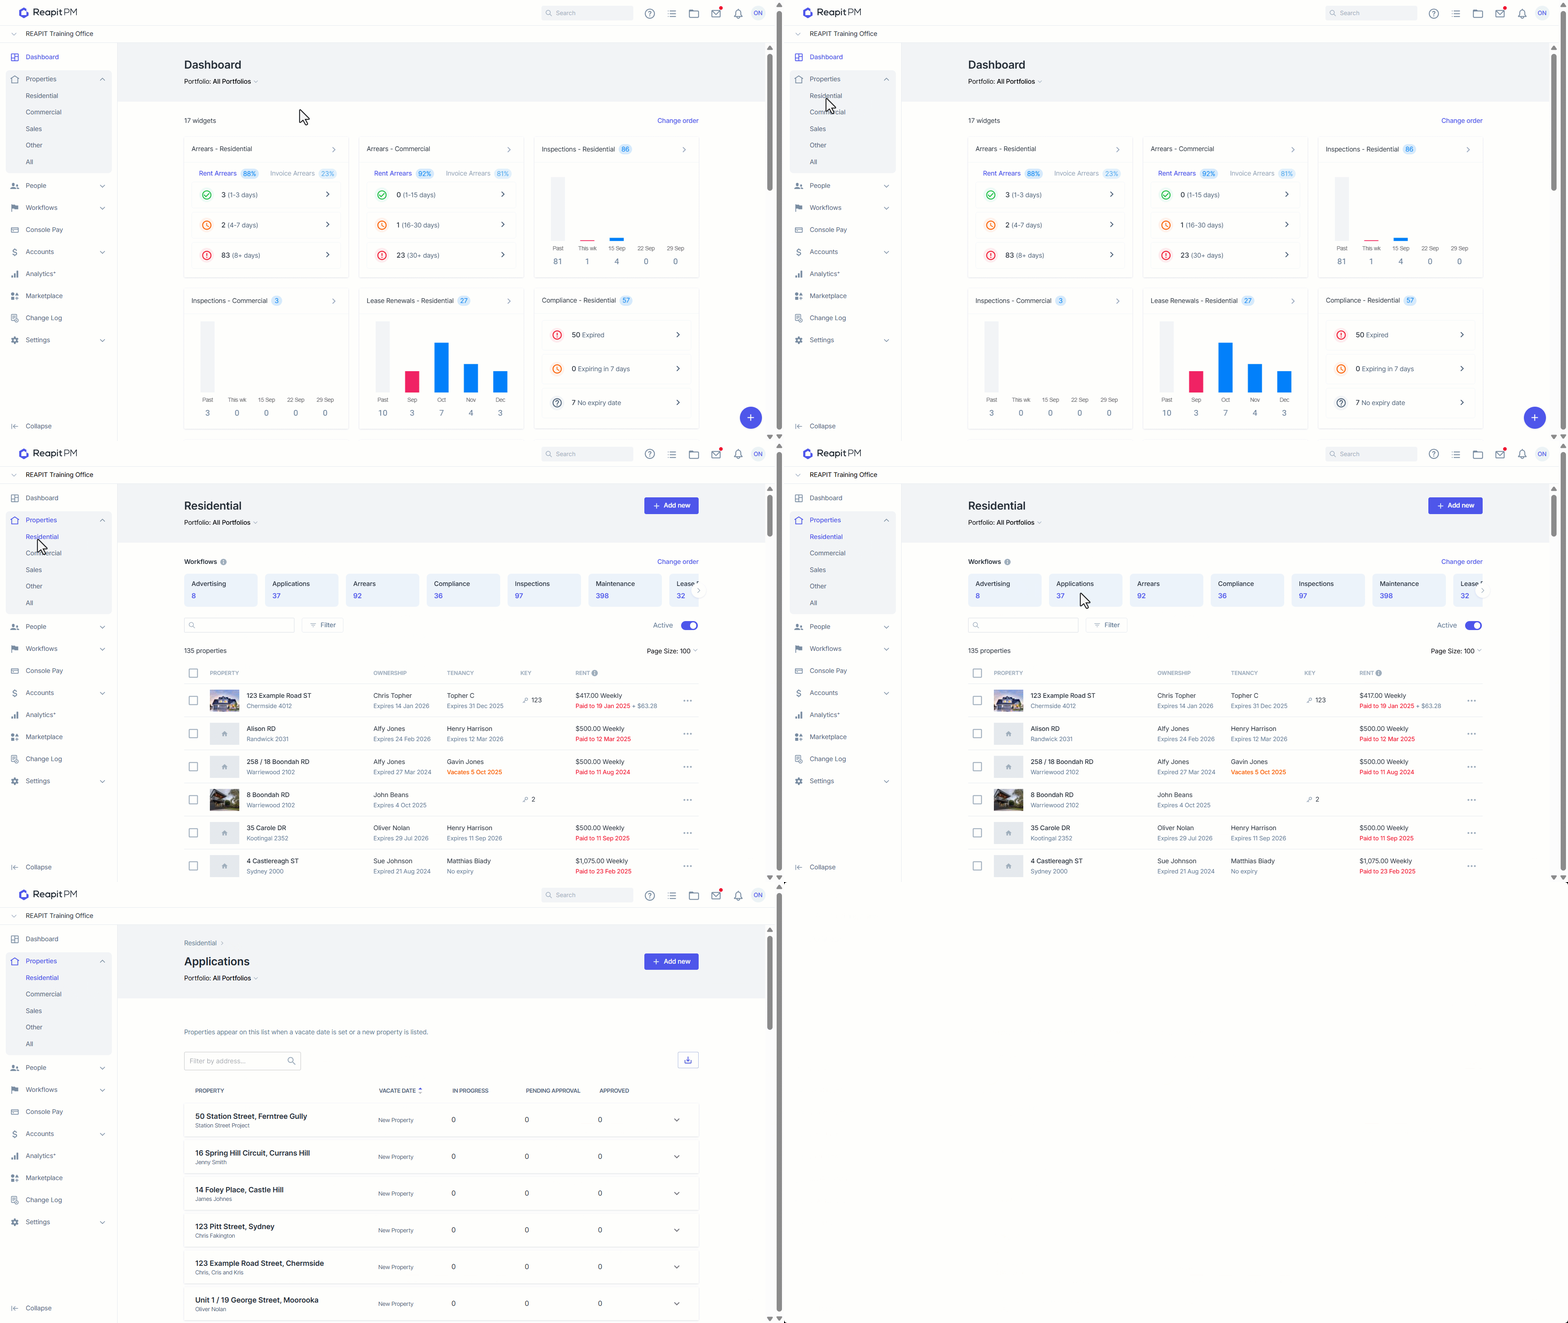
The applications workflow list displays the properties where a tenant application process is currently open. To access the applications list:
- Click on Properties.
- Click on Residential.
- Select the Applications workflow.
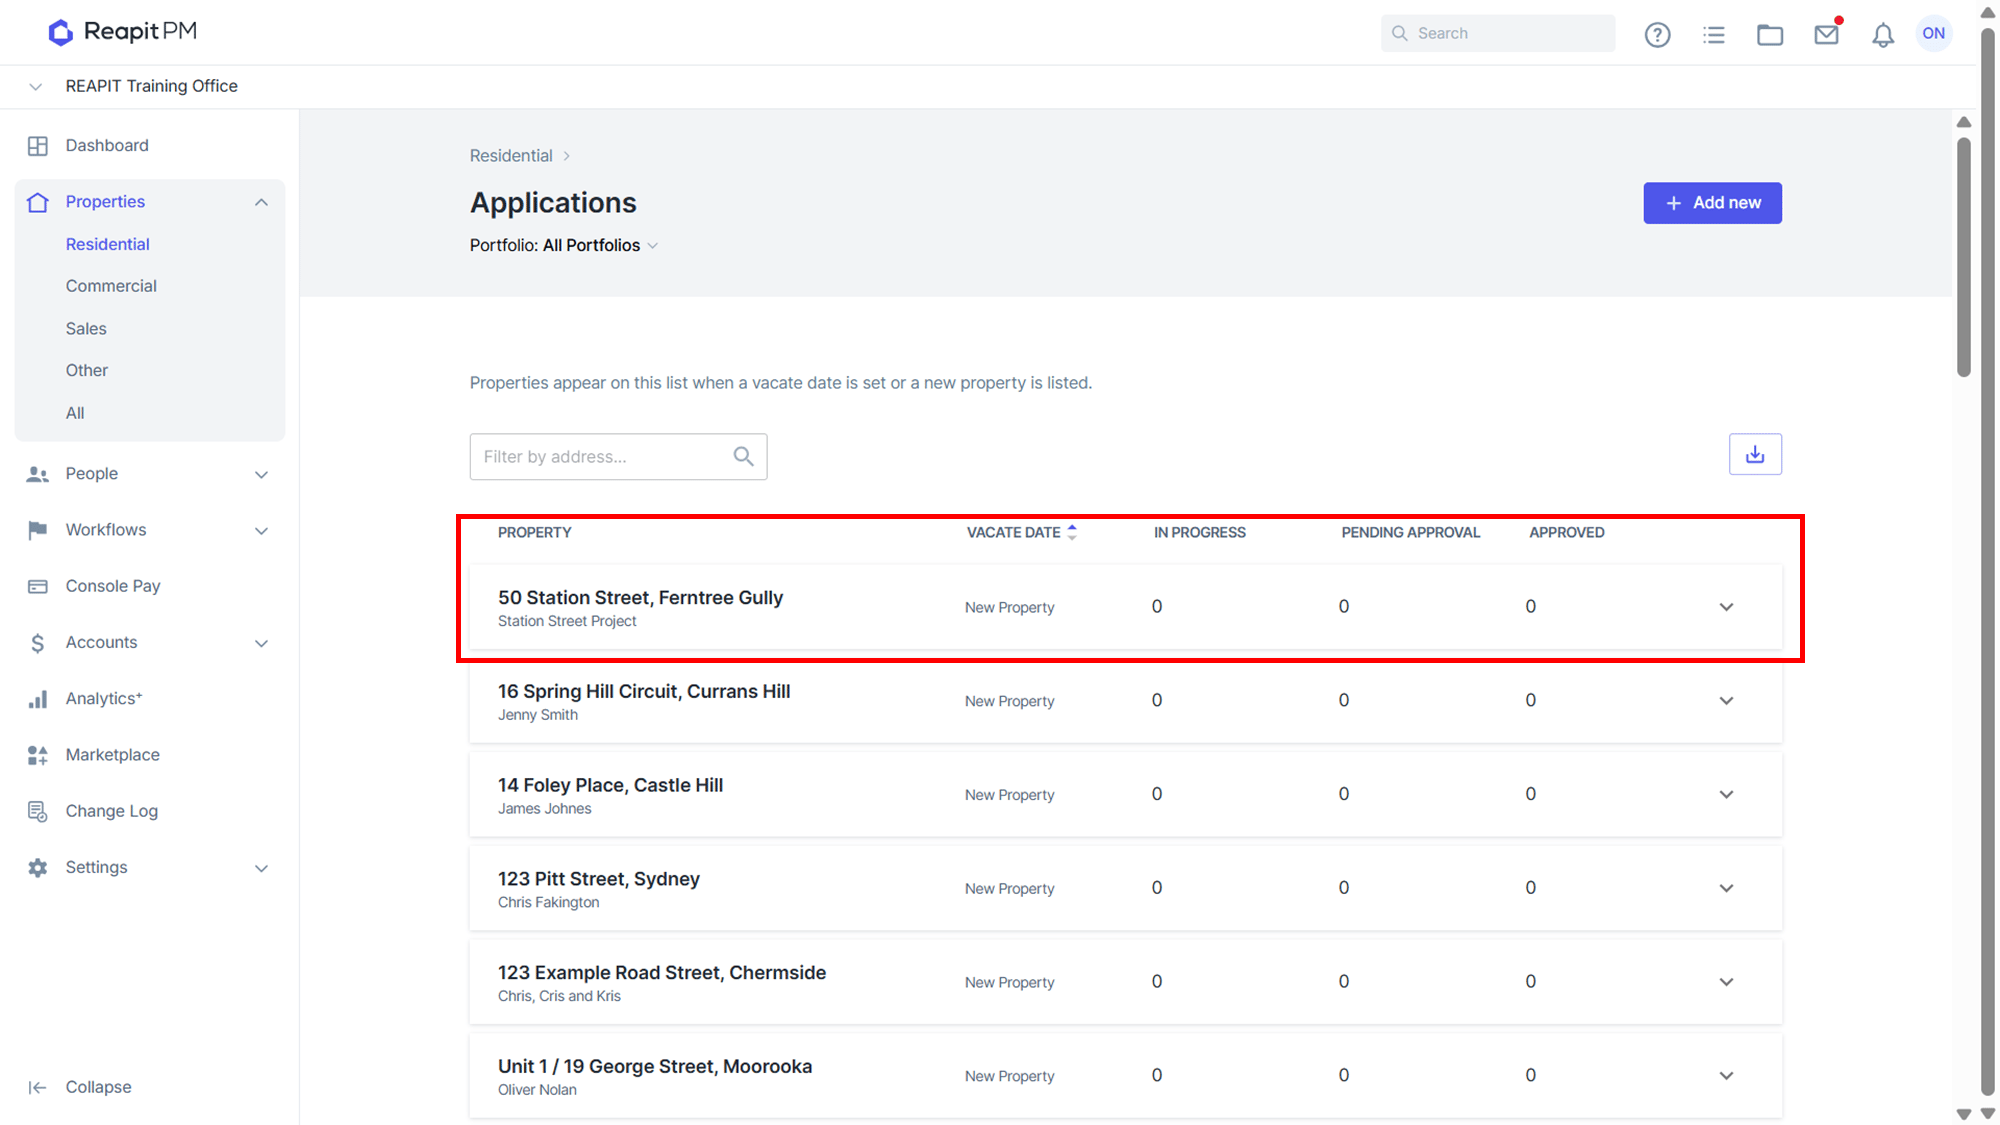
The Status columns will show counts of the number of applications at a specific status for a property.
- In Progress - The number of applications that are currently in progress for the property.
- Pending Approval - The number of applications that are currently pending owner approval.
- Approved - The number of applications that have been approved by the owner.
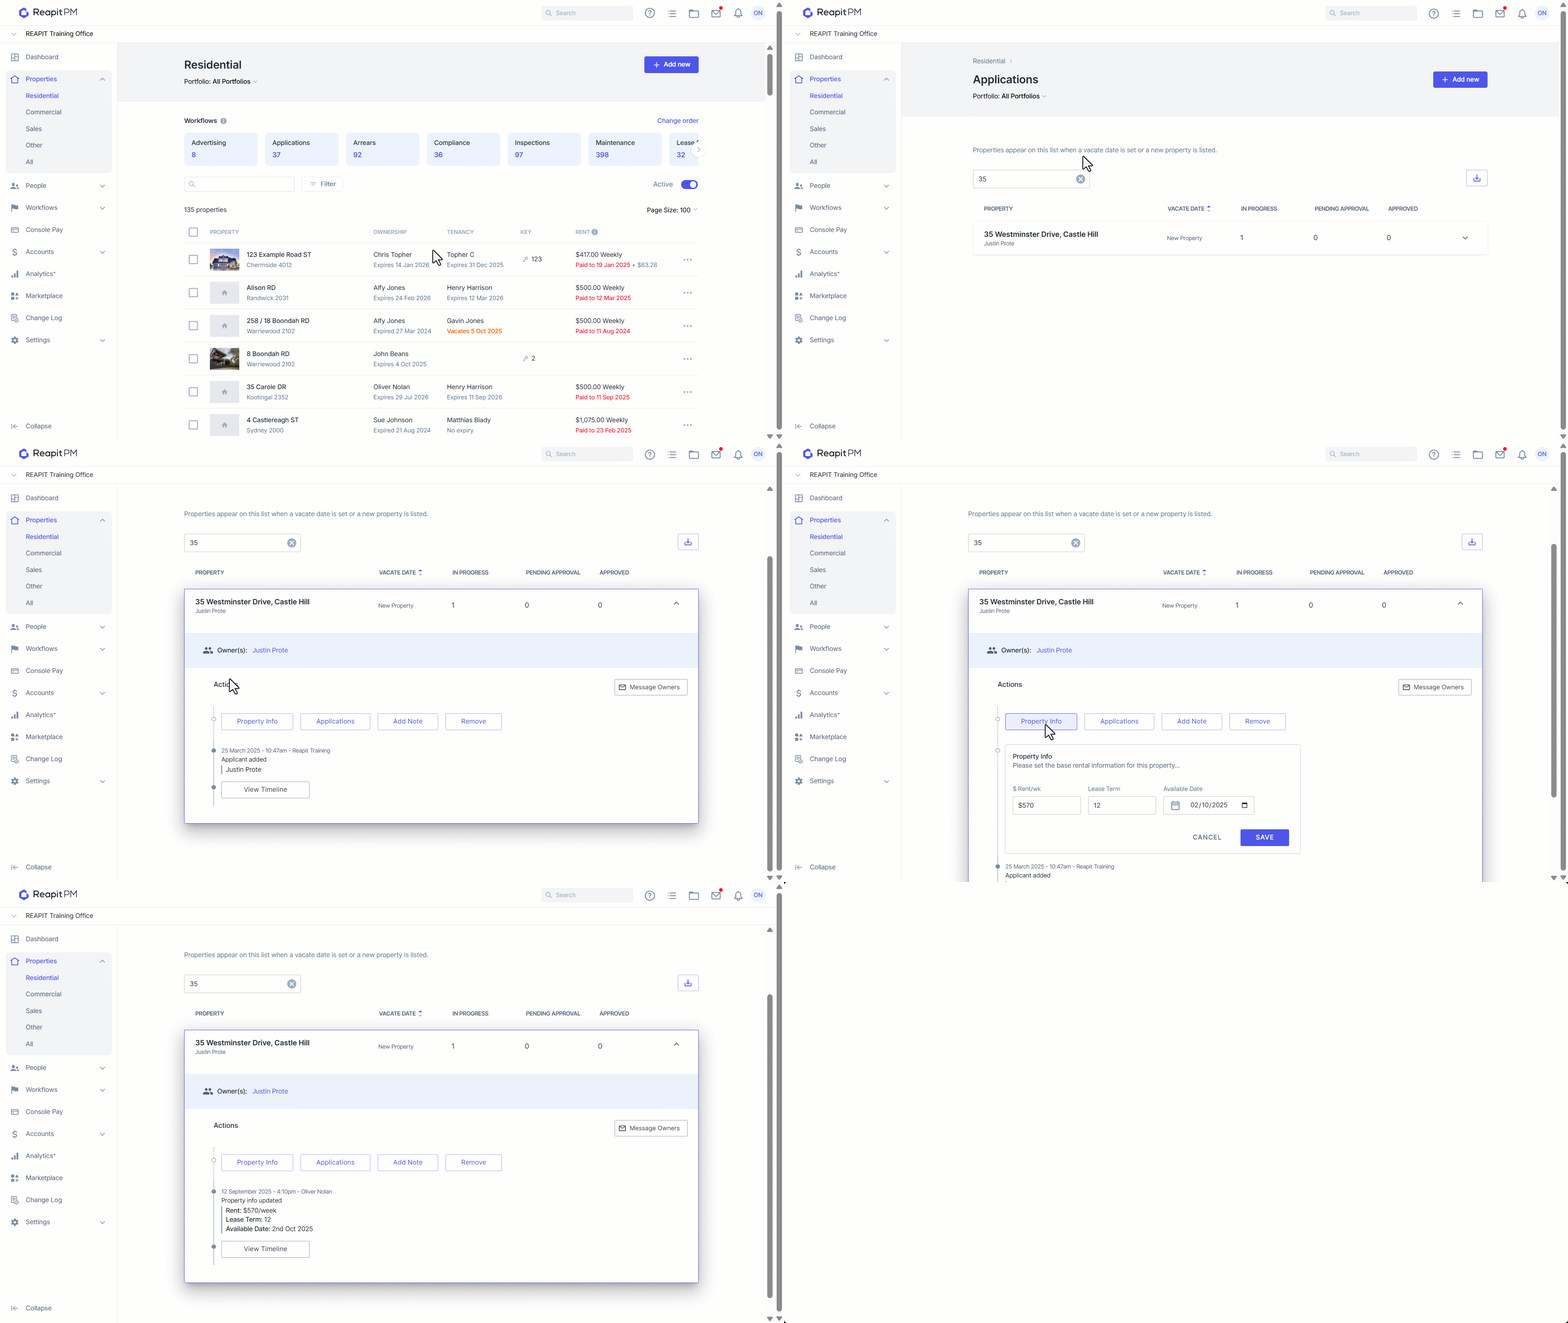
Setting Base Rental Information
- Click on Properties.
- Click on Residential.
- Select the Applications workflow.
- Search and Select a Property
- Specify the owners expectations for Rent/week, Lease Term & Available Date
- Click on Save.
Adding Tenant Applications
- Click on Properties.
- Click on Residential.
- Select the Applications workflow.
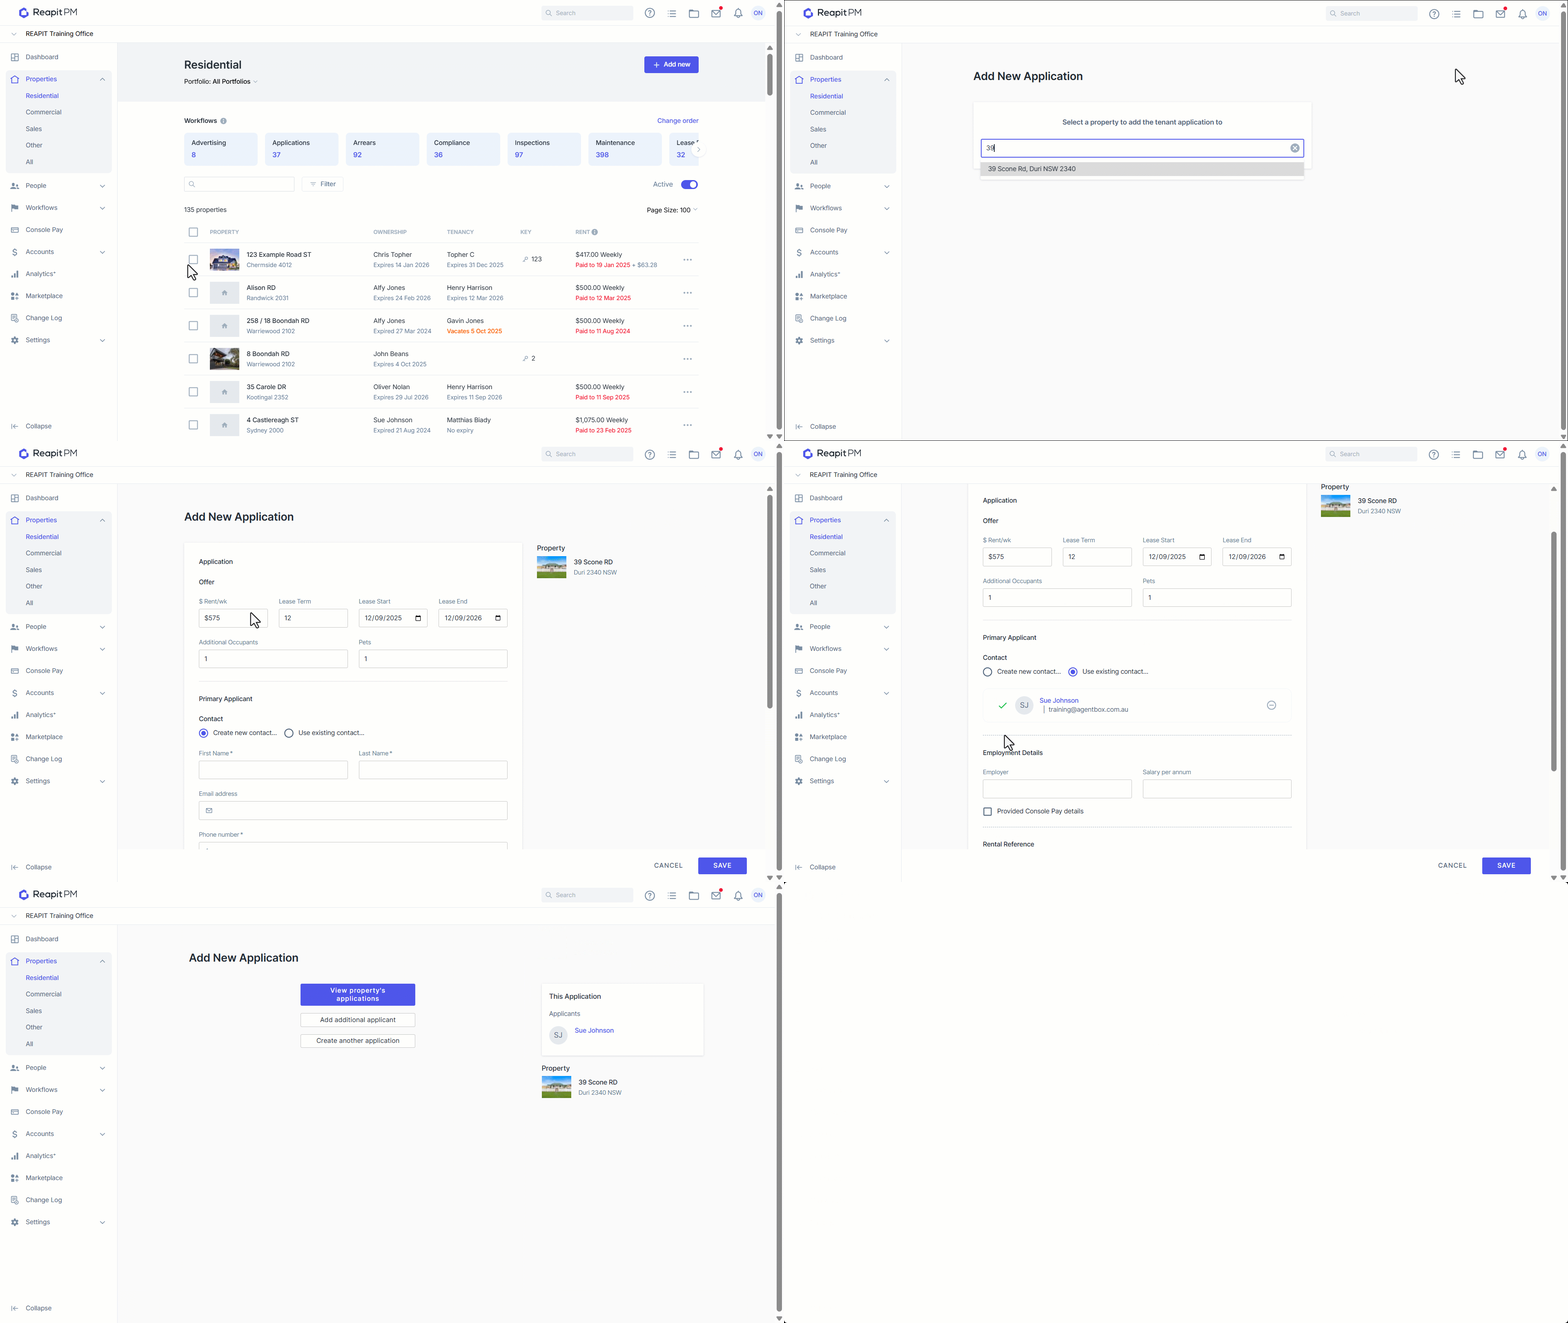
- Click on Add New.
- The Create Application feature will appear and you will be asked to Search and select a property to add to the application.
- Enter the details of the Offer including Rent/week, Lease Term, Start Date, Occupants and Pets.
- Choose to Create a new Contact or Use an existing contact from Reapit PM. New Contacts will require a First Name, Last Name and Phone Number added.
- If the information is available add the applicants Employment Details, Console Pay Details and Rental Reference.
- Click Save.
- From this interface you can then view the selected properties applications, add an additional applicant contact, or create another application.
Manage Tenant Applications
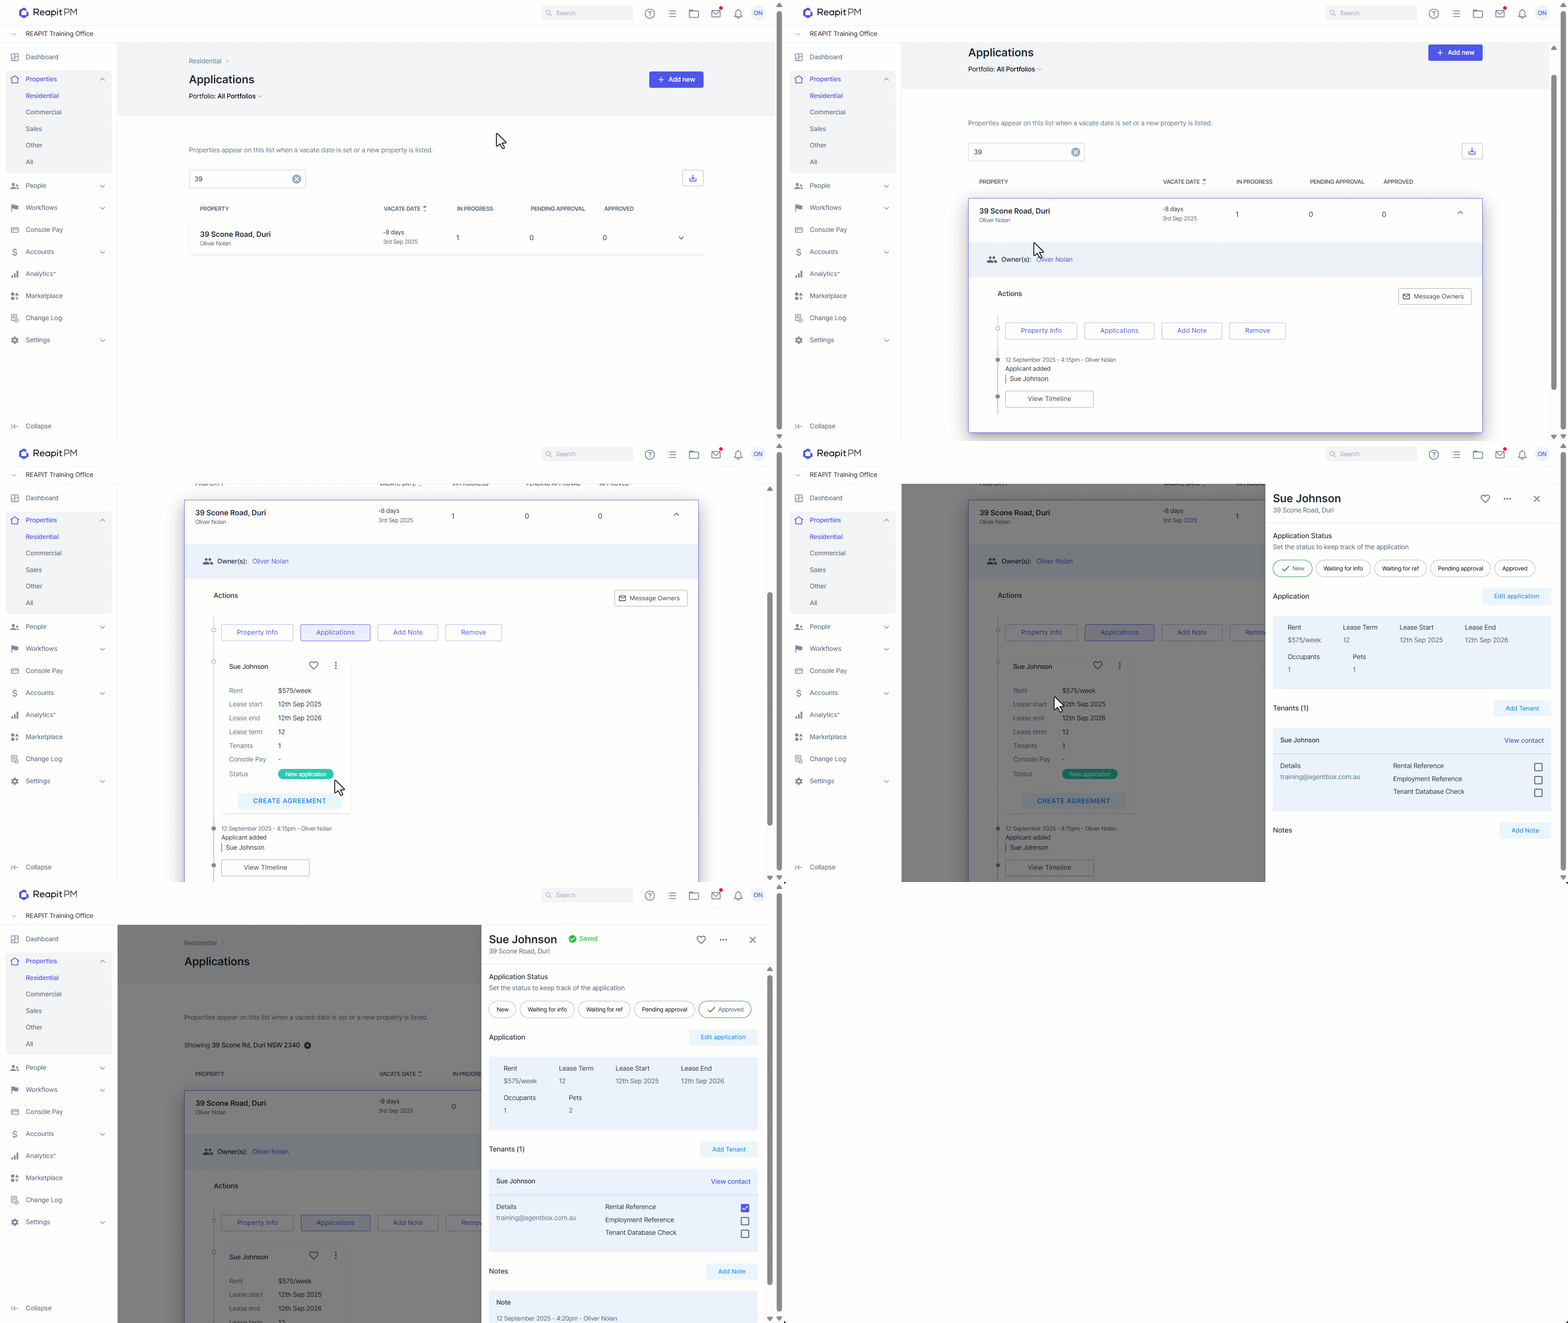
- Navigate to the applications workflow and select the relevant property.
- Select Applications to view any current applications
- Click on an application to open the application drawer.
- Click on the relevant status to update and track the application as either New, Waiting for Info, Waiting for ref, Pending approval or Approved. As the status is updated this will be visible within the workflow.
- Applications can be favorited via the heart icon, withdrawn or rejected via the 3-dots..
- Click Edit Application to update the application rental, lease term, start date, additional occupants or pets information. Update relevant information and click Save when prompted.
- Click Add Tenant to add an additional tenant to the application. Add Additional tenant information and click Save.
- Click View property’s applications once all tenancy contacts are added to return to the workflow.
- Against each tenant track as rental references, employment references and database checks are conducted by selecting the relevant checkbox.
- Once Approval has been granted, mark the application as status approved.
- If approval is not granted or it is withdrawn, update the status via the ellipses within the applications workflow or the application drawer.
12. For the approved Tenancy click Create Agreement to create a tenancy agreement. A warning message will popup requesting your confirmation.
13. Select Continue to confirm your action.
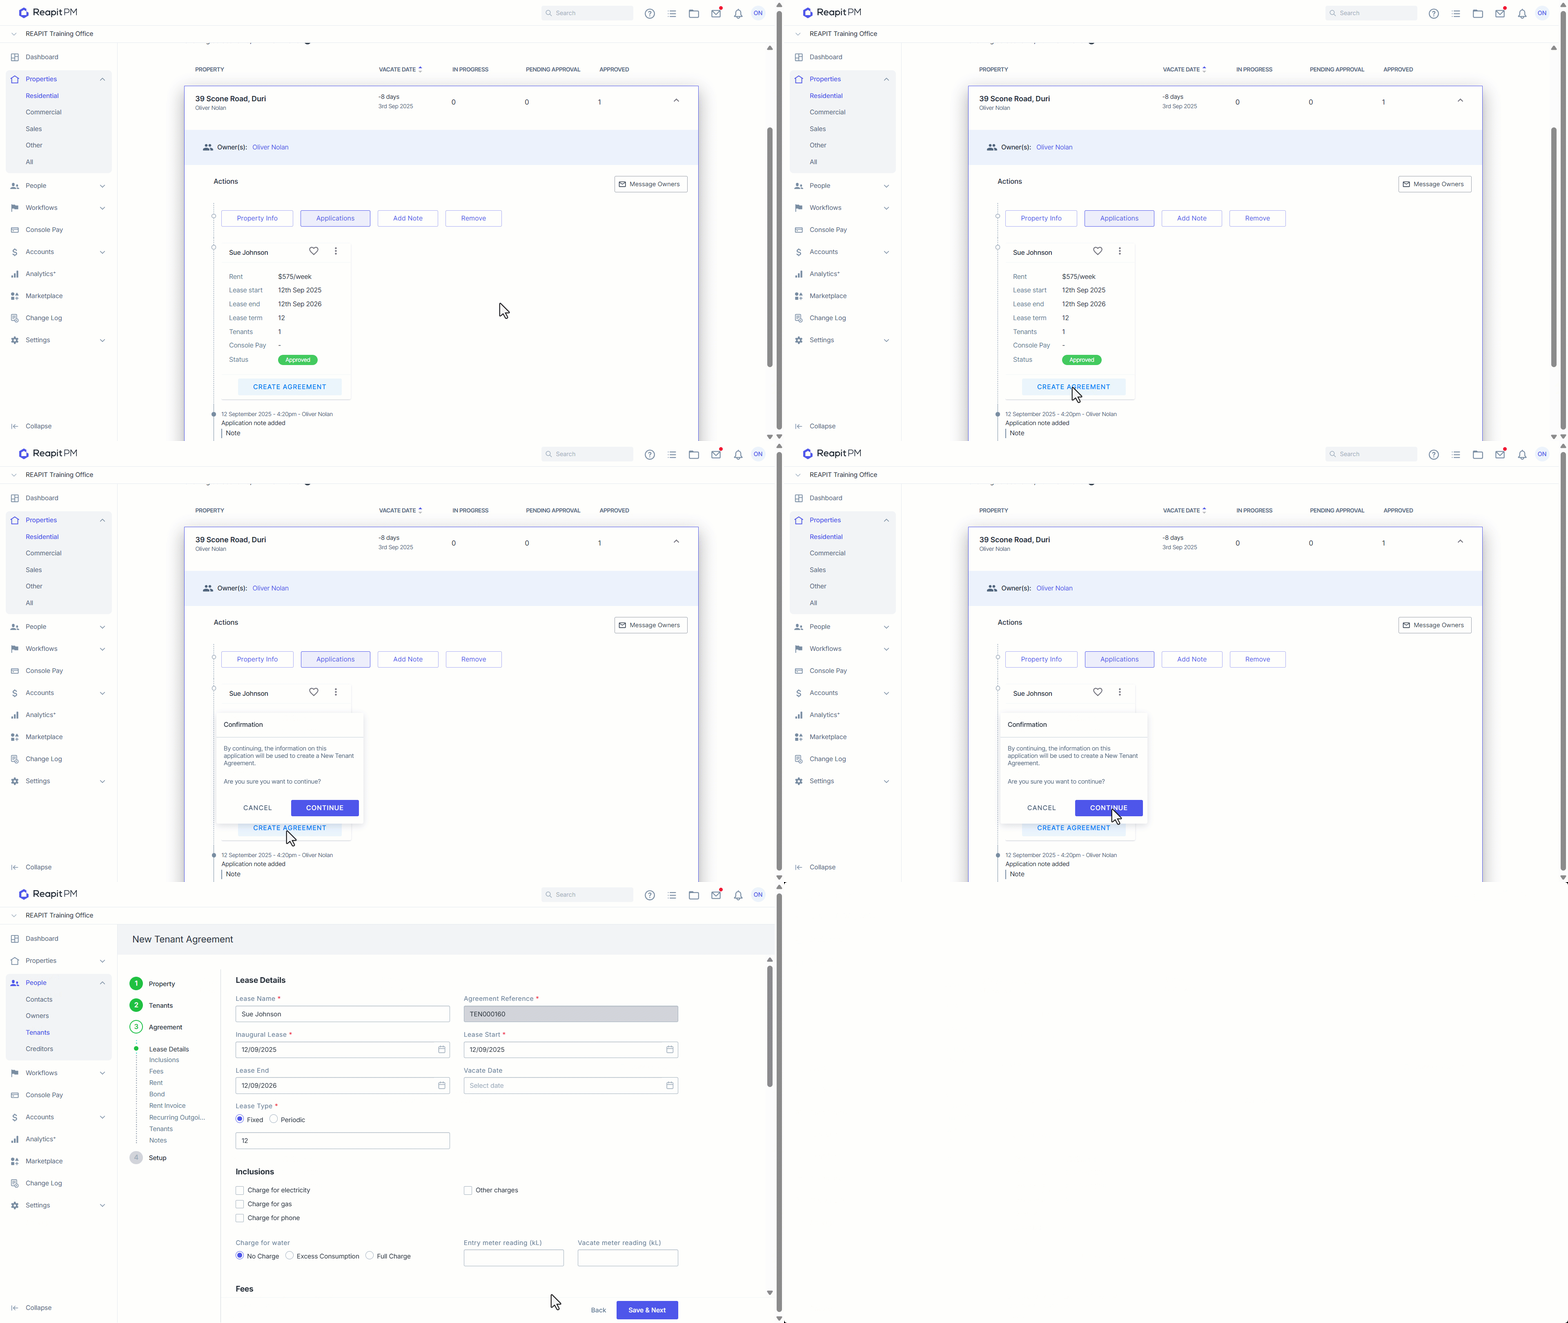
This will automatically take you to the New Tenant Agreement page and will pre populate some of the tenant agreement information for you
Complete the new tenant agreement as per standard process.
Once the tenant agreement is created, the property will automatically be removed from the Applications workflow.
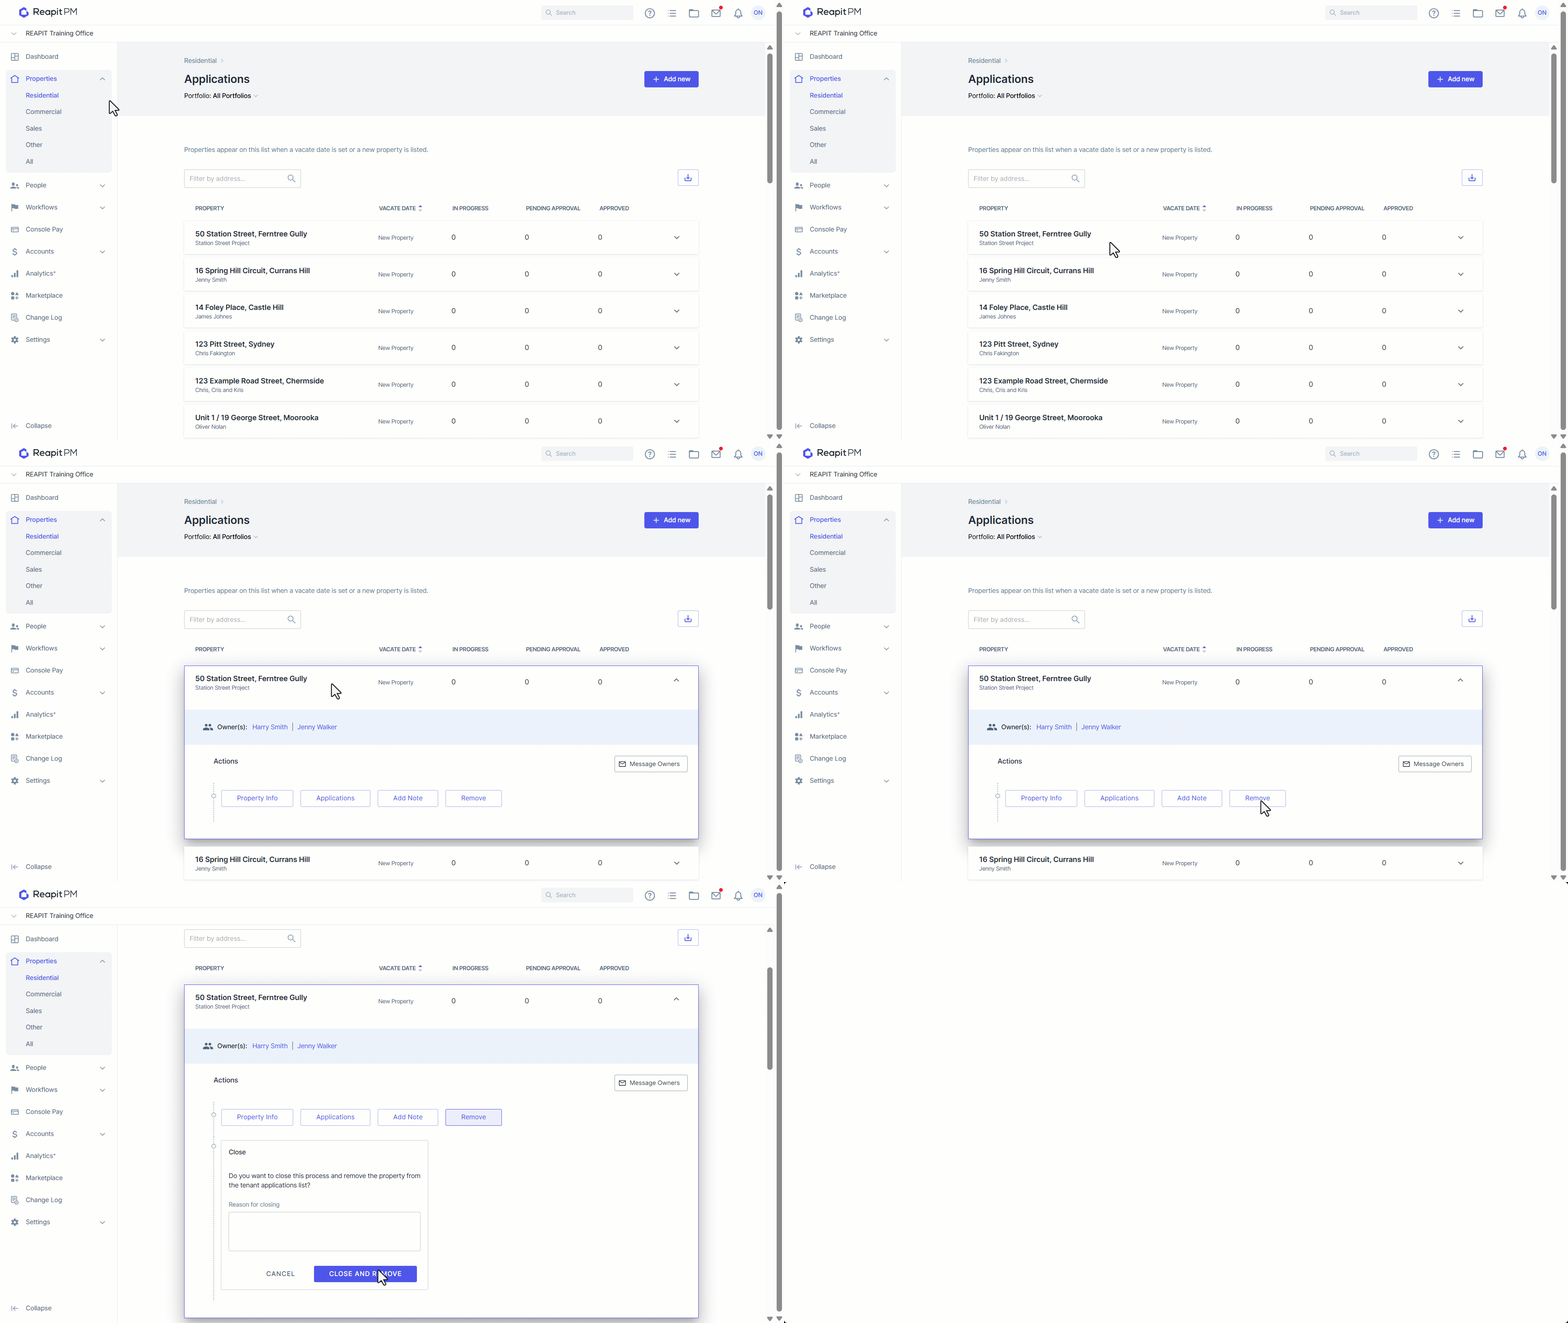
Remove Property from the Applications Workflow
- Search and select the property from the Applications Workflow.
- Click on Remove.
- Enter a Reason.
- Click on Close and Remove.