'%20d='M0%208a8%208%200%200%201%208-8h24a8%208%200%200%201%208%208v24a8%208%200%200%201-8%208H8a8%208%200%200%201-8-8V8Z'/%3e%3cpath%20fill='%23fff'%20d='M8.375%2013v14L20.5%2034l12.124-7v-7.737l-1.687-.975-2.806-1.62-1.082-.624v4.83l-.002%204.83H13.95V16.07l3.275-1.89%202.192-1.265%201.082-.625%203.275%201.877%202.192%201.256%201.083.62V9.782L20.5%206%208.376%2013Z'/%3e%3cdefs%3e%3clinearGradient%20id='reapit-pm__a'%20x1='20.702'%20x2='20.702'%20y1='.351'%20y2='31.228'%20gradientUnits='userSpaceOnUse'%3e%3cstop%20stop-color='%235573FD'/%3e%3cstop%20offset='.575'%20stop-color='%234E56EA'/%3e%3c/linearGradient%3e%3c/defs%3e%3c/svg%3e)
Compare and Connect Integration
This article is a guide on how to set up the Compare and Connect Integration within Reapit PM. The processes in this article include: Adding the Compare and Connect Integration How New Tenancy Leads are Sent Opting In and Opting Out a Tenant Viewing Leads that Have been Sent Deactivating the Integration
Overview
Compare and Connect Integration
This article is a guide on how to set up the Compare and Connect Integration within Reapit PM.
The activation and deactivation of this Integration can only be completed by office administrators.
The processes in this article include:
- Adding the Compare and Connect Integration
- How New Tenancy Leads are Sent
- Opting In and Opting Out a Tenant
- Viewing Leads that Have been Sent
- Deactivating the Integration
Adding the Compare and Connect Integration
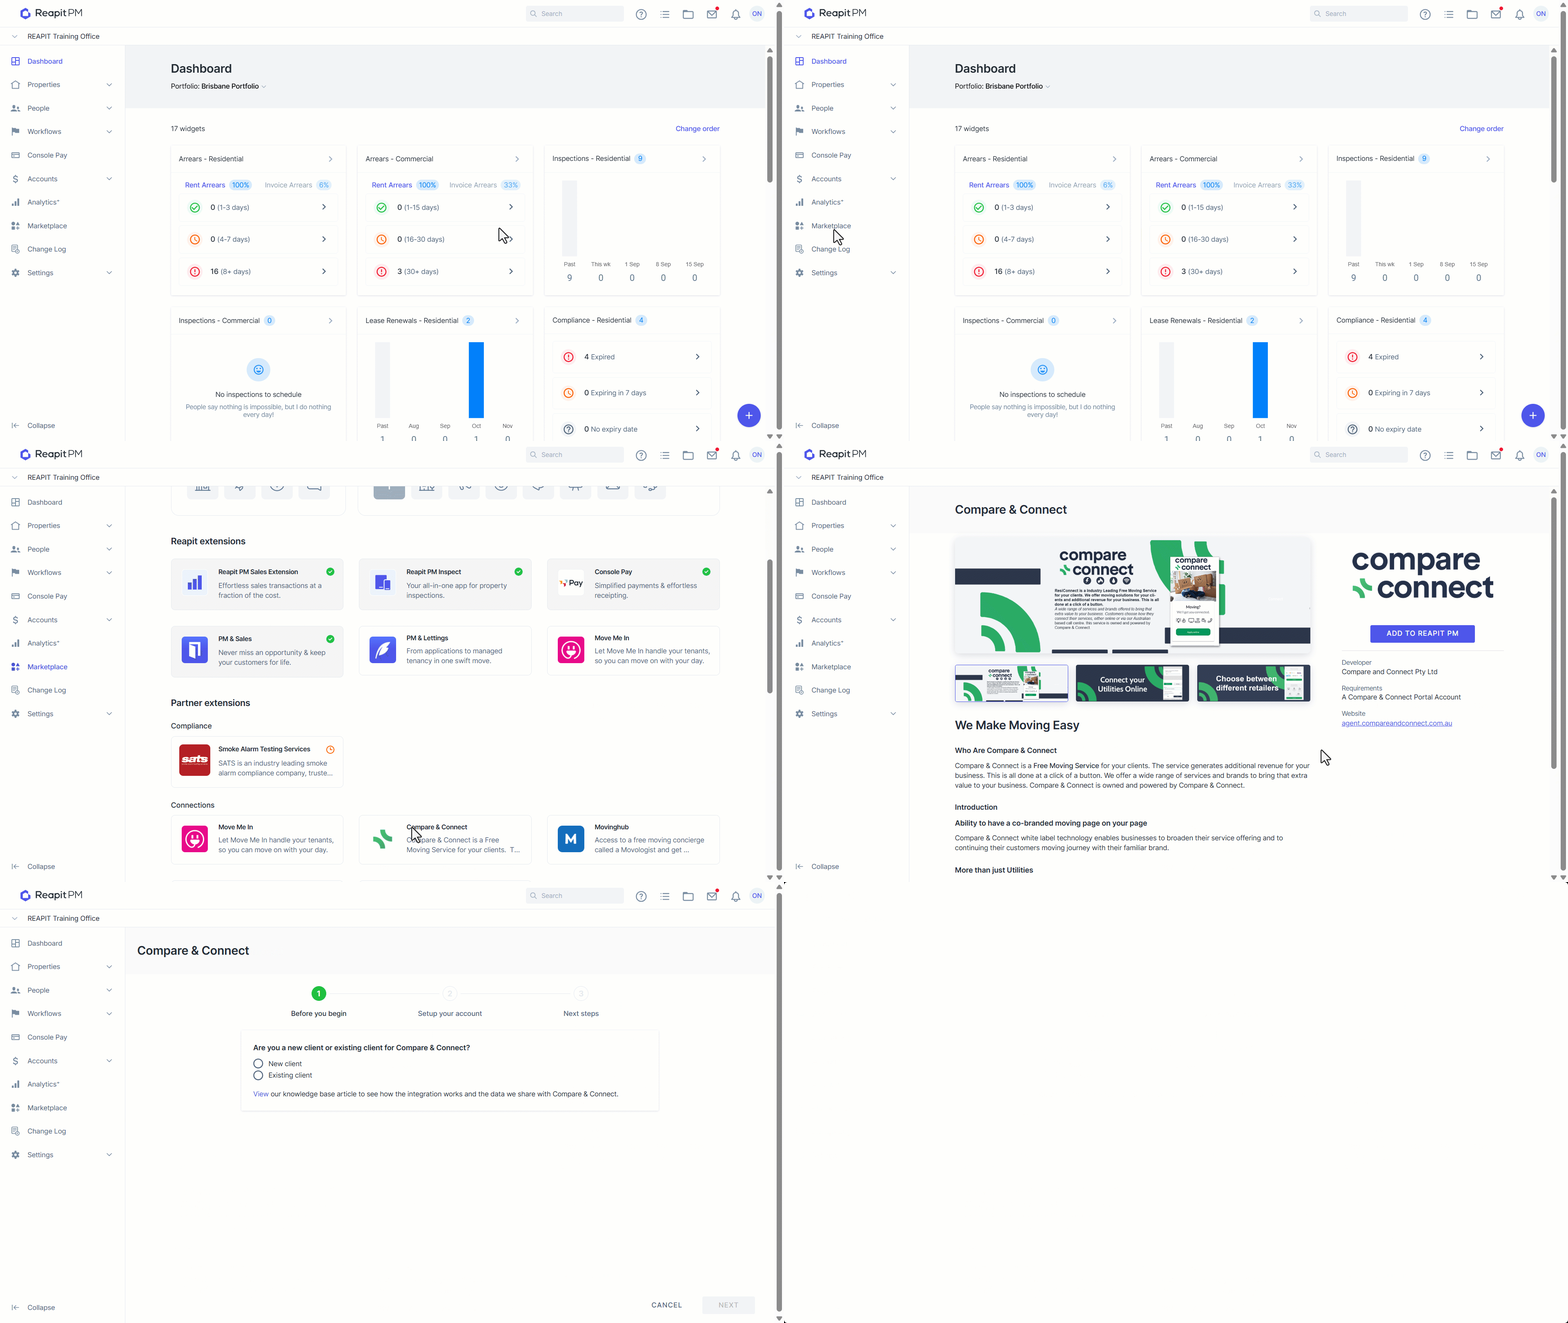
- Click on Marketplace.
- Click on Compare & Connect.
- Click on Add to Reapit PM.
- Follow the on screen directions in the activation Wizard.
- Go to your Compare & Connect account and complete the following steps:
- Paste your Reapit PM API Key into the API Key section and click Submit
- You will now see in the status the integration is “active”
How New Tenancy Leads are Sent
When a new tenancy agreement is created in Reapit PM and one or more tenants have opted in, a lead is sent from Reapit PM to Compare & Connect to follow up. This lead is only sent on the initial creation of the tenancy agreement. You will be able to track this lead in your Compare & Connect account. If you opt-in a tenant by mistake for a tenancy lead you need to call or email Compare & Connect to cancel the application.
Opting In and Opting Out a Tenant
When the integration is active, you will have the option to opt the tenant in and out from the edit tenancy agreement screen. This is required to be completed for each tenant when creating or saving an agreement. Opting out a tenant only applies to leads that have not been sent yet. If you need to opt a tenant out once a lead has been sent, you need to email Compare & Connect directly.
Viewing Leads That Have Been Sent
You can view what leads have been sent by logging into your Compare & Connect account. You can also see what leads have been sent and if they were successfully received by Compare & Connect when the integration is active.
- Go to Marketplace.
- Click on the Compare & Connect tile.
- You can now view the activity log for the integration.
Deactivating the Integration
- Go to Marketplace.
- Click on the Compare & Connect tile.
- Click on D****eactivate.
- Confirm you want to deactivate. Once deactivated, Reapit PM will no longer ask the PM to opt the tenant in or out and no more leads will be sent.